Tuesday, February 21, 2017

Beware the Procrastination Vortex!

One of my preferred approaches to dealing with a particularly frustrating WIP is the time-out. When a project is put in time-out, it leaves my sewing space and goes to live elsewhere, preferably somewhere I can’t see it, like tucked under a bed or buried at the bottom of my scrap bin or shoved in the back of a closet. I pull a project out of time-out out when my brain can deal with a challenge.

My latest finish, the Cargo Duffle Bag pictured below, was in time-out for almost 18 months. First, I couldn’t decide on a fabric for the pockets, then I misplaced the zipper and was waiting for it to turn up, and then I had difficulties shortening the replacement zipper I bought when I accepted that the original one was lost forever.

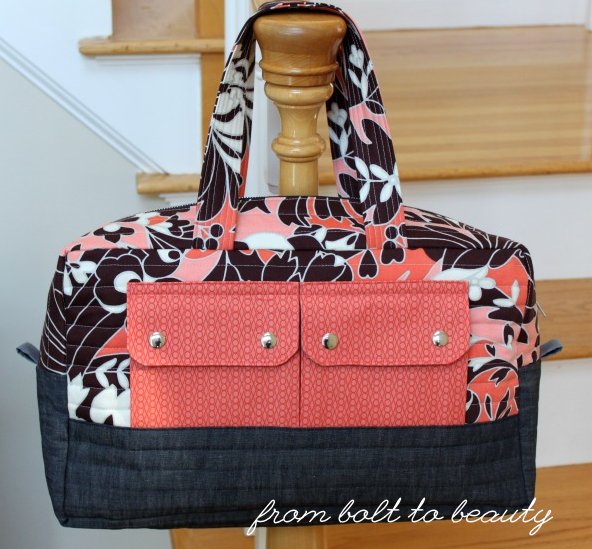
Here’s the Cargo Duffle in all its glory!

These obstacles messed with my perspective: How would I ever be able to finish this project and finish it well? This lack of self-confidence was completely unfounded because I had made this pattern before! (For real. See that version here.) With all sense of reason out the window, the time-out morphed into full-fledged procrastination!

If only I knew how beautiful the bag would be in the end, I think I would have shortened the 18-month time-out to 8 or 9 months. (Ha!) It’s the combination of fabrics that do it for me. The main fabric is from August Fields, an old home-dec line from Amy Butler. The bottom gusset and accent pieces are a denim-linen blend that was fabric-y love at first sight. It’s the most amazing shade of blue, with gray undertones that give it an air of sophistication. As for the pocket fabric ... after scouring my local quilt shops for the right print, I found this one in my stash. The bright salmon fabric is from Lizzy House’s Catnap line.

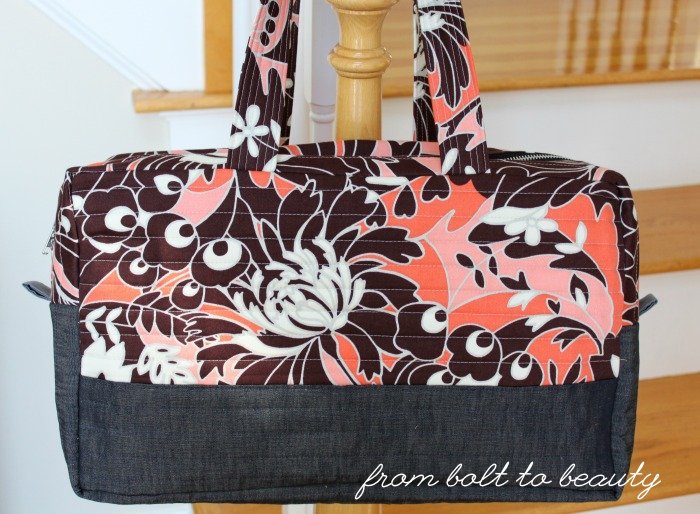
Isn’t that Amy Butler print divine?

Each of those fabrics is lovely in its own right, but together they’re even more striking. Truly, fabric is meant to shine in completed projects and not live on a bolt or in a stash!

Should you want to make a Cargo Duffle of your very own, you can find the free pattern, by Noodlehead, on the Robert Kaufman website. It is not for the beginning sewist. The instructions, although well written, presume you have experience following patterns.

As I mentioned earlier, I used home-dec fabrics for the main bag. This was in addition to the canvas layer indicated in the pattern; the home-dec and canvas worked well together to give the bag some substance and structure. The pattern uses two fabrics for the handles, but the denim wasn’t working for me—it didn’t lie nicely—so I stuck with just one, the August Fields fabric. (Even though I went rogue, the handle construction in the pattern is brilliant. I’ve used it elsewhere, like here.)

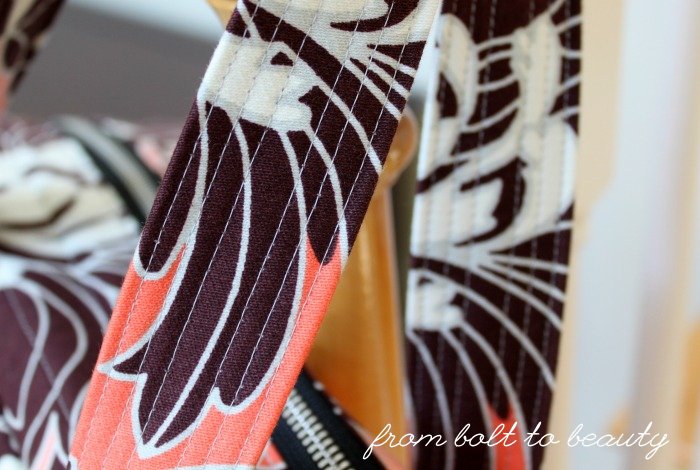
The handles also feature August Fields.

The pattern calls for binding the exposed seams in the bag’s interior. I chose to add a lining instead. I sewed together a bottom gusset, two zipper gussets, a front, and a back in a quilting cotton to create that lining. I couldn’t hand-sew it in the bag easily (the canvas was unpleasant to poke a needle through), so I Wonder Clipped the heck out of it and, following a line of quilting on the zipper gusset, sewed into the bag’s interior. For more ideas on how to pimp out this pattern, I recommend Coconut Robot’s post here.

You can see how the quilting line along the zipper is extra thick.
That’s where I attached the lining.

OK, it’s confession time! Who else has been swallowed up by the procrastination vortex?!

Linking up to Needle and Thread Thursday, Let’s Bee Social, and Finish It Up Friday ...

Follow on Bloglovin

Monday, February 13, 2017

A Foray into Orange-Peel Quilting

Last year, the lovely and talented Alice, of Alidiza fame, posted a project that kicked me in my lazy sewing butt. She planned to sew Denyse Schmidt’s Snake Trail Quilt, from Modern Quilts, Traditional Inspiration, but before she embarked on the full-size version, she sewed up a smaller one to ensure her approach to the pattern would work.

I almost always skip that step when I shouldn’t because making a prototype seems inefficient to me and because, well, I’m impatient. Why create a small version of a project when I’m gung-ho about making the real deal?

Recently, however, I got the notion to make a throw quilt in a simple patchwork of alternating white and colored fabrics and then finish it off with orange-peel quilting. (This was @chelseafr’s fault. After I saw this project of hers, I was smitten.) Since I had never tried orange-peel quilting, I chose to follow in Alice’s footsteps and make a kidsize quilt for charity first, using some long-overlooked pastel scraps.

I cut my pastel scraps into 3-inch squares. When I ran out of pastels, I moved on to darker-value solids. I ended up using six colors: hot pink, pale pink, pale orange, yellow, lavender, and purple (it’s hard to differentiate the pale pink from the pale orange in my pictures). Then I played with the squares on my dining room table until I came up with this arrangement. I love how the darker colors anchor the top left and bottom right corners, and the configuration of the pastels has a pretty ombre-like effect.

Mother Nature’s recent behavior has not been conducive to good photo shoots. So fed up with all the snow and wind, I opened up my front door, plunked this quilt on top of the snow, and started taking pictures!

Then I convinced my husband to stand in the 20-degree cold and help!

To tackle the quilting, I consulted Jacquie Gering’s new book, Walk. I sewed my base grid on point, in the white squares, and then marked dots to guide my creation of the edge-to-edge S-curves. As I quilted my project over multiple sessions, however, I noticed that the shape of my orange peels evolved. They started out nice and skinny but grew chunkier as I got further into the quilting. About halfway through, I stopped marking my guide dots, made a peel-shaped template, and marked the quilting lines in their entirety.

When I focus on the peels here, I’m pleased with the quilting, but when I look for the overlapping circles amid the peels, I realize I need more practice.

It seemed like a cop-out, but I like my quilting experiences to be as relaxing as possible. I want to enjoy the process, and it’s easier for me to follow lines than rely on my muscle memory to achieve consistently shaped quilting. I do what I have to do to get the results I want—even if it means taking the time to do all that marking!

I have another yard of that floral print, featured on the back, in my stash. Maybe there’s another practice quilt in my near future!

I’m glad I decided to make this quilt. I really like it, and I’m sure I’ll employ my newfound confidence with orange peels again. Creating this quilt convinced me, however, not to make the throw size I originally had in mind. Between the alternating white-and-solid patchwork and the orange-peel quilting, the quilt has a distinctly feminine feel, which is pretty but not right for the throw I want to make.

I have a question for my fellow straight-line quilters out there ... Have you tried any curves in your quilting? How much did you mark, and was there a reference you found particularly helpful? And if curves are new to you, I have to tell you that this experience has transformed how I think of quilting on my domestic machine. Maybe it could do that for you, too!

Linking up to Main Crush Monday, Scraptastic Tuesday, Let’s Bee Social, Needle and Thread Thursday, and Finish It Up Friday ... 

Follow on Bloglovin

Friday, February 3, 2017

Precuts, Pressing, and Pinning

You’d be proud of me, dear readers. I’ve been very good lately. I have made no I-need-it-because-it’s-pretty fabric purchases in months. Of course, my local quilt shop closed last June, which has made this feat more attainable, but it’s a triumph nonetheless, right?

This phenomenon does not date back to, say, Thanksgiving 2015. Back then, the Fat Quarter Shop was offering some crazy sales, and I found myself making multiple well-priced purchases, including two jolly bars of Civil War reproduction fabrics.

These fabrics, from Barbara Brackman’s Union Blues collection, weren’t my usual thing. The more masculine palette and traditional designs, however, had the potential to appeal to my dad, who had yet to receive one of my quilty creations.

So what can a modern quilter do with Civil War fabrics? This is what I made for my dad ...


The easiest way to bridge my uncharacteristic fabric selection with my more modern sensibilities was to piece something visually simple. All jolly bars include a pattern. The one accompanying Union Blues was called Regiment and required one jolly bar plus sashing fabric. Since I had two jolly bars in hand, I used the same pattern and enlarged the quilt from a small throw to a much larger one.

My signature straight-line quilting wouldn’t have done much for this project, so I sent it off to Crinklelove for quilting. The swirling leaves of the Harvest Winds pantograph I chose softened the quilt’s strong geometry.


This was my first time using Crinklelove’s quilting service, and I was very satisfied. The process of making this quilt, however, had its hiccups. Maybe you can learn from my missteps and save yourself some heartache in a project of your own!

Precuts: A Blessing and a Curse

I love a good precut because I like owning a cross-section of an entire line. I most often buy jelly rolls and layer cakes, but jolly bars are a great size, too. The 5-inch by 10-inch rectangles can be used as is or cut down to 5-inch charms or smaller. (See my other jolly bar quilt here.) When I buy precuts, I almost always buy Moda precuts because I like Moda fabrics. : )

Precuts have their shortcomings, though. It can be annoying to sew their pinked edges together, and I’ve purchased one jelly roll in particular, from Free Spirit, whose pinked edges were so deep that the strips weren’t a full 2½ inches. I accept that manufacturers do the best they can with the available technology but that precuts aren’t perfect.

Too bad I forgot that before sewing this quilt top together! One jolly bar was an eighth of an inch longer and wider than the other. I had to ease many seams when sewing my rows of rectangles together. If only I had checked the materials I was working with up front, I could have trimmed the larger pieces before piecing and saved myself the need to ease. This experience won’t stop me from buying jolly bars, or other precuts for that matter, in the future. It just makes me more wary.
 
Pressing and Pinning: The Downside of Peer Pressure

Pins are my friends. I don’t pin as much as I did when I first started sewing because there are plenty of times when it’s not necessary, but in general, pinning is crucial to achieving the precision I want when piecing. (Full disclosure: Here’s a way to avoid pins and still get nice points.)

My instinct with Regiment was to press my seams open and use pins—lots of pins!—to get everything to line up when I sewed my rows together. But I had heard enough quilters (you know who you are!) comment about avoiding pins, and I chose to follow the pattern’s pressing instructions, nest my seams, and forgo pinning.

Boy, did that plan backfire. As it turned out, I had to use pins. Remember that wrongly sized jolly bar? I had to pin and pin and pin to make the seams between rows line up. And I knew I was tempting fate by pressing to one side in a project with light-colored sashing, but I surveyed the situation, checking to see whether the dark colors were noticeable in the side presses. I thought I’d be OK. When I got the final quilt back from Crinklelove, those dark fabrics were noticeable (see picture below). I should have known better!


Despite these missteps, the quilt is still beautiful. My dad—who does not see it through the quilter’s eyes that I do—could care less about any imperfections. He loves this gift, and that’s all that matters, right?

Do you have any tales of woes from projects you’re working on right now? Share them in the comments. I’ll be sympathetic. : )

Linking up to Finish It Up Friday, Let’s Bee Social, Needle and Thread Thursday, and the Precut Linky Party ...

Follow on Bloglovin