Friday, June 27, 2014

24 Shades of Everything but Gray

This past week, I received a kind shout-out from the folks at Pink Chalk Studios about a pencil roll I made, and I thought I’d share it with you—because it’s a fun and colorful project.


Back in the day, when I only dreamed of making a quilt, I bought myself a copy of Joelle Hoverson’s Last-Minute Patchwork and Quilted Gifts. Joelle cleverly divides the projects presented, some of which she designed herself and some of which were contributed by others, by how long they take to complete.

The pencil roll, designed by Pink Chalk Studios, is categorized as a 2- to 4-hour project. Whatever! It’s more like a 2- to 4-year project! Back then, I had a humble stash, virtually no scrap collection (an essential for creating a project like this), and zero confidence in selecting fabric. So I started from scratch, and it took a darn long time to come up with the necessary 24 colors to coordinate with the colored pencils. Like, it took so long that a project I intended for my niece and nephew became a project for my own son—by the time I curated the collection of fabrics, my niece and nephew were too old for a pencil-roll gift.


You, of course, would not have that dilemma. I know you’ve got a great stash and a burgeoning scrap pile—so there’s probably no need to cut into your yardage anyway.

If you decide to tackle this project, may I make a suggestion? Crank out four or five of them assembly-line style. That’s how I got mine. I made five of them for my son and his buddies. Recently, when going through my yet-to-be-gifted pile of projects, I came across the fifth one and knew I needed to hold onto it for myself. Glad I did. : )

I’m linking up this post to Finish It Up Friday and TGIFF!

Update: I’m also joining the fun over at Stitch by Stitch’s Anything Goes Monday for the first time!

Wednesday, June 25, 2014

Oh, How I Love My Hexies

My obsession of the past week—hexagons—are not what might come to mind when you think of hexagons. They are not sweet, little, English paper-pieced hexagons. (For the record, I adore EPP hexies, but since I’m morally opposed to doing anything by hand, you’ll not find them on my to-do list.) These are huge, 16-inch hexagons. Some of them are hexagons within hexagons. And I am so darn smitten with them.


If you visited last week when I first talked about hexagons, you know that I’m doing a BOM program through my local quilt shop, which uses Jaybird Quilts’ Park Bench design and Carolyn Friedlander’s Botanics line. I’m 99.9 percent caught up on these guys. (For whatever reason, my LQS subbed a fabric in for one of the May blocks, and I’m not into it; that’s on hold until I come up with a sub for the sub.) Here’s the rest of the lineup thus far:


I cannot tell you how much fun these hexies are to cut and assemble. I love using Jaybird Quilts’ specialized rulers, and the Botanics line is nothing short of gorgeous—it really deserves all the attention it’s received. And I’m accumulating a nice pile of Botanics scraps. Why didn’t it occur to me that this project would feed my scrap collection?! I can only imagine what I’ll do with these pretty little leftover bits and pieces.

What about you? Have you done any of JQs’ patterns? (Audrey over at Hot Pink Quilts recently unveiled her latest iteration of JQs’ Northern Lights—she’s made a bunch of quilts with that design.) I’d love to hear your recommendations and invite you to gush about your own love of hexies.

Linking up to . . .


http://www.sewfreshquilts.blogspot.com/2014/06/lets-bee-social-26.html

Friday, June 20, 2014

When Bad Things Happen to Good Quilts

Prepare yourself for a story of woe . . .

Three weeks ago I ask the fine readers of WIP Wednesday to help me with a plan to quilt my Farmer’s Market Quilt. I was encouraged by the responses and set out to wrap this one up . . .

I started by quilting the narrow strips of navy fabric with navy thread. I liked the navy on navy. Good move.


(Fabric facts: Bonnie and Camille’s Happy Go Lucky, a beautiful navy couture fabric from perhaps Michael Miller, Kona Salmon, and Kona White.)

But then I couldn’t decide what color to quilt the rest of it. Navy thread looked weird on the white fabric. White thread looked weird on the navy. Gray—my stab at a happy medium—looked weird on both the navy and the white fabrics.

Plan B: Keep the machine quilting I had already done on those narrow strips and hand-tie the rest of the quilt. I’m not crazy about the look of hand-tying, especially after a trip or two through the washer, so I bound the quilt and decided to wash it before tying. (I’m a spray baster and wanted the adhesive to release from the fabric before gifting this quilt anyway.)

Yeah, I wish I hadn’t done that. Once I pulled the quilt from the dryer, I saw that a seam had opened in one of the navy diamonds.

It’s important to point out that I did not cry. I did not swear. I did not throw anything. I did, however, put the quilt in a time-out for a good three days.

When I felt mentally prepared to deal with the gaping hole in my otherwise beautiful quilt, I came up with a plan. I slipped a long, skinny strip of fusible interfacing under the wimpy seam and set it with an iron. Then I zigzagged along that seam as well as all the other seams in the navy diamonds. If one seam came apart in the washer, another one could. I really didn’t want to take any chances. I’ve seen some lovely zigzag quilting (see, for example, Rachel Hauser’s Tilt-a-Whirl). My take was definitely function over form.


The tragedy does not end there. I spent a few hours wrestling with tension issues. I finally got things to the point where I could use salmon-colored thread in the bobbin on those zigzags. I can only see the tiniest bits of navy from the back of the quilt.


The true outcome of this quilting experience: a pretty quilt and a resolution to quilt more densely (and not to wash prematurely—duh!). Also: buy a higher-end machine. It’s time. If you’ve blogged about your love for your machine, I’d love to hear about it!

I’m linking up this post to Finish It Up Friday and TGIFF!

Wednesday, June 18, 2014

Catching Up on Park Bench

When I learned that my local quilt shop was offering Jaybird QuiltsPark Bench BOM, it was hard to refuse. Not only would I be working with one of Julie Herman’s fantastic designs, but it would also be an excuse to buy some fancy rulers and sew with Carolyn Friedlander’s Botanics line.


I dutifully picked up my March BOM kit and then my April BOM kit and my May BOM kit—without so much as cutting a piece of fabric. Now knee-deep in June, it was time to play catch-up. Of course, once I cracked open the pattern book, I learned that I was not just three but six blocks behind. BAH!

It’s pretty rewarding to leave the land of squares and triangles and work with hexagons and half-hexagons, diamonds and what Julie calls “jewels.” There are some triangles, to be sure, but working with triangles cut with the Sidekick ruler are way easier to piece than others.

I am going to have to head back to my LQS to pick up some more yardage today. I managed to scorch a diamond for March and miscut some half-triangles for April. (Oh, and I need to pick up the June BOM kit!)

That’s where the readers of Freshly Pieced and Sew Fresh Quilts come in. I’ve made a point to get better about using my iron and encountered some problems. When working on my Farmer’s Market quilt, for example, I used steam that actually made some of the colors in the precuts bleed. I’ve stopped using steam as a result but encountered the whole scorching issue with Park Bench.

My question to you: What’s your take on ironing? (Yeah, yeah. I know: no ironing, just pressing.) What brand is your iron? What method brings about the most success?

Wednesday, June 11, 2014

Befriend New Sewers!

Is your current quilting project getting you down? Are piecing snafus making you mutter evil things at your sewing machine? Feeling like this quilting thing is for the birds?

Well, do I have a remedy for you: befriend new sewers!

Two friends of mine took a beginner’s sewing class last fall. They’ve learned a lot and made some fabulous projects, but they are still sewing newbies. I, on the other hand, have ripped out my fair share of seams—like, 11 or 12 years of them. I can say something as simple as “press, don’t iron” or toss around the names of fabric designers, and these friends think I’m brilliant. What an ego boost to talk sewing with these friends—I feel as if I know what I’m talking about!

In all sincerity, however, I love these two gals, and I was excited when they both, independently of each other, approached me about helping them with quilting. I suggested a sew-along, and they both jumped on board.

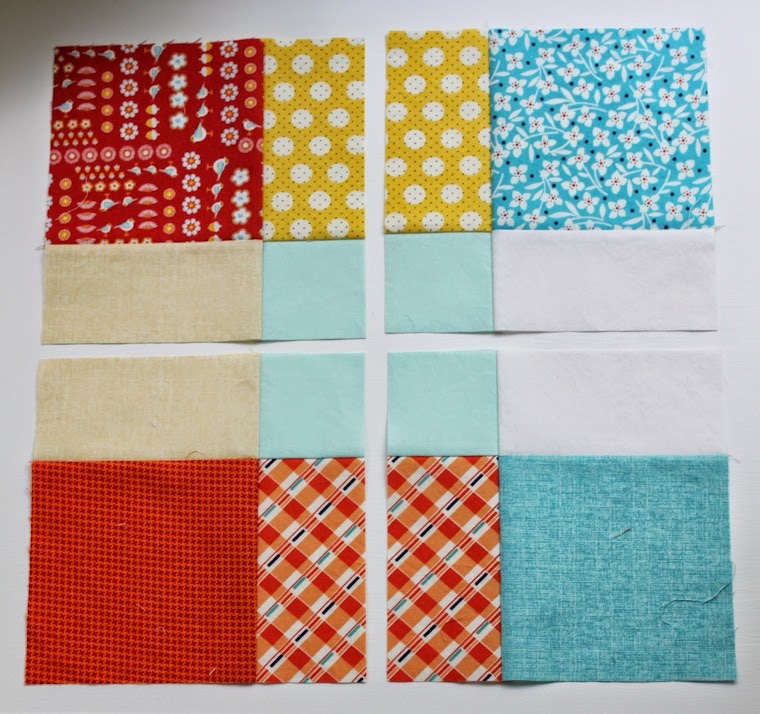
The challenge? We have different levels of sewing experience and different styles. What quilt would be a worthwhile sew for the three of us? The disappearing nine-patch seemed to fit the bill. It’s super simple to piece and offers fabulous versatility. If you pick traditional fabrics and lay the blocks in a predictable pattern, you end up with a traditional-looking quilt. Pick modern fabrics and rotate the blocks randomly, and you’ve created a more modern look. 

I’m going to work on a throw-size quilt inspired by the disappearing nine-patch I found at Bonjour Quilts. I started with the red bird fabric (Lauren and Jessi Jung’s Hideaway) and added the red and orange houndstooth (DS Quilts). Other fabrics with red, orange, pale yellow, and aqua were added to the mix, including more DS Quilts fabrics, two almost solids from Jenn Ski’s Mod-Century, Kona Snow, and Kona Ice Frappe.


I’m excited to get the nine-patches sewn and cut. I can’t wait to start playing with the placement of the blocks!


I’m linking up to Work in Progress Wednesday at and Let’s Bee Social. If you recently tackled your own disappearing nine-patch, I’d love to see it. Add a link in the comments below—thanks in advance for the additional inspiration!

Monday, June 9, 2014

My Favorite Quilt

After spending many years considering tackling a quilt project, I finally took the jump about a year ago. Since then, I’ve made eight quilts—not too shabby for the new kid on the quilting block!

This is my version of Rachel Hauser’s Penny Sampler, from an online class she taught in the fall of 2013. I consider it my favorite because it was a pivotal learning experience for me, strengthening my skills in piecing with precision and introducing me to the worlds of applique and foundation piecing.


My Penny Sampler is composed of my favorite colors—red, green, and blue—in some favorite fabrics. It highlights a lot of Denyse Schmidt fabrics. (I love so much of her work, especially Hope Valley.) I also used this fabulous red fabric with blue and green flowers on it. I bought it at least eight years ago and only had a fat quarter of it, but I used every bit of that fabric in this quilt.


By the end of our journey together, this quilt felt like an old friend—I had witnessed its evolution from a pile of fabric to a work of art. I knew, however, how many hours (and hours and hours) I dedicated to the project, and I knew I wouldn’t be able to enjoy the finished quilt. It was something I’d pack away and bring out every so often to look at. So I gifted it to a little girl who loves picture books. To me, the Penny Sampler seems like the storybook of quilts. There’s so much to look at—trees and houses and horses and flowers. I like to imagine that little girl poring over those quilted images, making stories of her own.


Friday, June 6, 2014

Can’t Stop with the Totes!

Apparently, this thing with the tote bags is an official tangent. I was so happy with the one I made last week that I followed it up with two more, from the same Noodlehead pattern, both of which look like this:


(fabric facts: DS Quilts Fancy Free and Essex Linen in ivory)

I have a few nonquilt patterns that I tend to rely on a lot—I’ve done them a bunch of times, and I know how to do them really well (like, so well that I have the yardage requirements memorized!). The first that comes to mind is Alicia Paulson’s Jane Market Bag. The picture here shows just three examples, but I am not exaggerating when I report that I have made more than two dozen Jane Market Bags.


Most of my Jane Market Bags were completed when my sons were just babies and I had limited time—and brain cells—to devote to sewing projects. It felt good to pick out fabrics and complete something, even if that something was a bag I had made many times over.

This Noodlehead pattern is proving to be the same. It’s a great stash buster and easy, easy to put together. I invested in some canvas to interline the first one I made, but the second and third were interlined with scrap curtain lining I had hiding in the back of my sewing closet. I knew I was holding on to that lining for good reason!

Over at Lovely and Enough, Kelsey Boes writes about those quilting labors of love, projects you piece slowly over time. There is much to be said for savoring the process and watching a quilt top come together block by block. My biggest quilting triumph along these lines has been my Penny Sampler.

I can relate to Kelsey’s experience, but I also find enjoyment in the small accomplishments—skirts that you can crank out in a day, a tote bag that doesn’t require a trip to a fabric store.

Do you have any Noodlehead totes or Jane Market Bags in your pattern collection? What do you go back to time and again?

I’m linking up this post to Finish It Up Friday!

Wednesday, June 4, 2014

Christmas in June

The most amazing thing is happening at my sewing table these days: I am ahead of schedule on a project! I’m not very good at last-minute panic sewing. Sewing is much more enjoyable when I don’t fixate on a deadline. Of course, this means I’m still working on a quilt for a January 2014 birthday and a quilt for Mother’s Day 2014. Yesterday I finished a tote bag for Mother’s Day 2014 just as the recipient was walking through my front door—only 23 days late, people!

I’m slowing chipping away at this table topper with Christmas fabrics from my stash. I like how the design pairs a rigid geometric pattern with the haphazard placement of patterned fabrics. I’m using my last bits of Martha Nagley’s Poinsettias and Holly (below), Robert Kaufman’s Quilter’s Linen in red, and a snowflake pattern from (I think) Michael Miller. Everything is tied together with Color Spectrum Dark Moss.


I like how it’s turning out—I think I’ll keep it for myself, actually—but the project is forcing me to consider when close enough is close enough for me. That is, when do I rip out a seam to get my triangles a big tighter and when do I let things ride? It’s important to me that the pinwheels meet nicely in the center. I also wanted the dark moss triangles to have intact points. There are some wonky blocks . . . we’ll see what happens with them as I finish piecing. Since I’m using my last bits of these prints, there is no starting any of the blocks again from scratch, just ripping out seams and redoing.


I have to put this down every so often to work on more pressing projects, but with five months of lead time left, I think it’s safe to say that it will be done for Christmas 2014!

I’m linking up to Work in Progress Wednesday over at Freshly Pieced today. If you’re also working on something Christmas-y or if you have a recommendation for another Christmas project, I’d love to hear about it!