Showing posts with label finished quilts. Show all posts

Friday, August 8, 2025

Ornament Collection Quilt / Beauties Pageant 303


When I learned that one of my sisters-in-law likes Rifle Paper Co’s designs, I took it as an opportunity to—ahem!—buy some fabric. I chose selections from multiple lines to curate a collection of wintery scenes, Nutcracker motifs, and Christmas decorations. 


The oversize baubles and balls in my Ornament Collection quilt pattern were the perfect venue for these prints. I loved using big swaths of the fabrics to feature the sweet designs instead of cutting them into tiny bits. 

And I am smitten with the palette. There were so many colors in the fabrics to choose from. I homed in on grayish blue, orangey red, apple green, and forest green. I am a sucker for nontraditional holiday palettes!

My friend Ophelia gave this project her special panto treatment with a swirly holly-and-berry design, and I found the perfect striped fabric for the binding, one that plays off the grayish blue in the ornament frames. I hope I can get my hands on more of it because I have a bunch of fabric leftover, and naturally, I’m planning on a near-identical Ornament Collection for my other sister-in-law, who is also a fan of Rifle Paper. : )

We’re less than five months out from Christmas ... Is anyone else sewing now for the holidays?!
 

Follow Me On ...  


* * *


The pageant rules are simple:
  • Post your finish in the linky tool. (No links to your own giveaway or linky, please!)
  • Point your readers back here with a text link or use the button above.
  • Visit and comment on other participants’ finishes.

You are invited to the Inlinkz link party!

Click here to enter

Friday, July 25, 2025

On Gifting Quilts / Beauties Pageant 301

Over the years, people have inquired about whether I sell my finished quilts. As a policy, I don’t. I choose to gift them to friends and family instead, because it seems like the safer bet. I’d much rather pass my projects on to recipients I know and who are more likely to enjoy them and appreciate my work.

For years, then, the life cycle of my quilts was simple: I would make whatever brought me joy and then decided on a home for a project. This was a fine approach, but in retrospect, there were times when a gifted quilt seemed to fall flat. Maybe the design or palette wasn’t to the recipient’s liking? (That’s understandable, especially with my, at times, limited knowledge of the person’s taste.) Maybe she just wasn’t into having a handmade quilt in her decor? (No judgment! Such people do exist!) 

So I’ve honed my approach. Now I like to accumulate several finished quilts and then ask the recipient to pick her favorite. 

It works! Perhaps the person doesn’t get the sense that this quilt was specifically crafted for her in mind, but she leaves with a useful piece of art that, for whatever reason, speaks to her.

And that’s the process I followed recently to gift eight finished throw-size quilts to teachers who worked with my younger son through middle school.  

I have a friend who follows a similar process with family. She lays out her quilts at a family reunion, and everyone can pick a favorite or two. I conducted my process over email, contacting a few recipients with pictures of my finishes and asking them to pick a quilt before weeding out pictures of the claimed quilts and reaching out to the next small group.

It feels good to gift a quilt, and it feels even better knowing that I’ve increased the likelihood that the quilt will be used and loved by giving the recipient a say in the process.

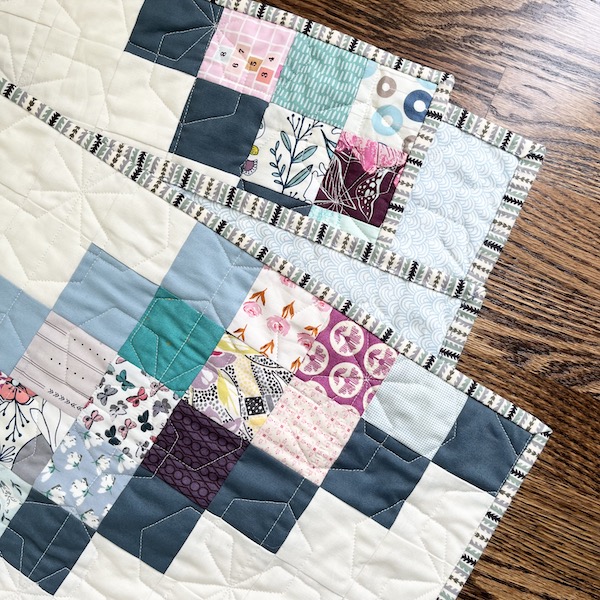
Pictured here is one of the quilts I passed on to its forever home in the latest round of gifting. The design is Step Dance, from Not-Your-Typical Jelly Roll Quilts, and it’s a prototype I made years ago, well before I had even decided to write the book.

This project is so old that I have to plumb the depths of my memory (and email folders!) to dig up the details. The fabric is Ava Kate by Carina Gardner for Riley Blake, and Narda Junda of Maz Q’s Sewing and Quilting Studio quilted it for me in a fabulous swirly pantograph. 

(You can see the version I sewed for the book, in a collection by Sweetwater, here.)

The black in this line caught my attention—I love a fabric collection with some unexpected black in it! The striped print was an especially effective addition to the quilt design, because it accentuates the idea of ascending stairs and helped me settle on a name for the pattern.

I was working with a fat quarter bundle for this project and used as much of it as I could, even piecing the leftover blue bits together to make a scrappy binding.

What do you do with your finished projects? Do you, too, pass them on to family and friends? Do you enjoy the thrill of selling them online or at craft fairs? Or do you fold them up and put them in a closet, a dilemma to solve another day? 


Follow Me On ...  


* * *


The pageant rules are simple:
  • Post your finish in the linky tool. (No links to your own giveaway or linky, please!)
  • Point your readers back here with a text link or use the button above.
  • Visit and comment on other participants’ finishes.

You are invited to the Inlinkz link party!

Click here to enter

Friday, July 18, 2025

Kitchen Table Quilting's Fire Truck Quilt, Again/ Beauties Pageant 300

That dazed look on my face? That’s a sure sign of summer. I’ve been driving kids around, prepping for road trips, and keeping everyone busy. It’s starting to feel as if I’m not having a summer … Summer is having me! 


It’s a minor miracle, then, that I have a finish to share. This is the Fire Truck Quilt from a free tutorial by Erica Jackman of Kitchen Table Quilting. I made it for a very special one-year-old. I hope he loves it!

Before you balk at the idea of sewing a pixelated quilt, with all its little pieces and seams, this project was fun and surprisingly fast. In fact, this is the second Fire Truck quilt I’ve made over the years. (See the first one here.) 

What makes this quilt worthy of a second go-round? Aside from the fact that it’s crazy cute, it’s a fabulous venue for busting through scraps. I counted 24 different reds in this project, all of which came from my scrap bin or hoard of red fat quarters. 

Amassing the required number of red squares wasn’t challenging, but assembling the grays were. My stash contains brownish grays and purpley grays and grays with green undertones. I homed in on the shade of gray that was the most prevalent and ran with it, even breaking open a jelly roll and cutting the strips into 2.5-inch squares to meet the necessary number.

The piecing went faster with this second version. Because the design has so few colors, I was able to mindlessly chain-piece the reds and grays into chunks of four squares. From there, I would lay out a section of the quilt and sew it before moving on to the next. 

I pressed my seams to one side for this project. Naive Past Michelle thought she was doing herself a favor by pressing everything open in an effort to produce a flat and easy-to-quilt top. Present Michelle had no time for such foolishness! Pressing to the side allowed me to nest my seams, which made the process go faster and resulted in a top that was just as easy to quilt. 

I was glad I didn’t wait until the top was finished before selecting a backing fabric. I found the most perfect print for the back from On the Go by Stacy Iest Hsu and was able to steer the palette—especially the colors in the windshield—to coordinate. 

How is the summer going for you? Are you finding the time to sew or out and about, enjoying all that the season has to offer? (Friends in the southern hemisphere, I’d love to hear from you, too!)   


Follow Me On ...  


* * *


The pageant rules are simple:
  • Post your finish in the linky tool. (No links to your own giveaway or linky, please!)
  • Point your readers back here with a text link or use the button above.
  • Visit and comment on other participants’ finishes.

You are invited to the Inlinkz link party!

Click here to enter

Friday, June 27, 2025

Rosemary Quilt by Tales of Cloth / Beauties Pageant 299

Until a year ago, I had no interest in English paper piecing. I’m a girl who needs regular finishes to stay engaged, and doing anything by hand takes in the neighborhood of forever. Over time, however, I’ve seen one friend after another embrace, and create truly amazing quilts with, the technique.

Then, last summer, I was faced with some special circumstances: I had to occupy myself while my older son was taking a class an hour away from home. Because of the distance, I stayed near the class site, taking walks and reading books and starting some hand sewing. Pictured here are the fruits of my labor!

I made the Rosemary Quilt from Jodi Godfrey’s book, The Seedling Quilts. This project is not fully hand pieced and perfect for the EPP skeptic. I supersized the sample quilt from the book and made 11 EPP pieces, which I then hand-appliqued onto background rectangles. The remaining blocks without an appliqued EPP design provided an opportunity to highlight favorite prints, including some large-scale designs.

Those solid rectangles are a who’s-who of fabric designers: Kate Spain, Amy Butler, Lizzy House, Heather Ross, and Anna Maria Parry (formerly Horner), among others. For a lady who is famous (notorious?) for using white backgrounds, this Rosemary Quilt is my version of maximalism.

I handed this project to my friend Ophelia for quilting (she and I settled on an edge-to-edge pantograph called, most appropriately, Rosemary!). Then I used one of the featured prints again for the binding. 

I so enjoyed making the EPP sections for this quilt that I started another Rosemary project. I didn’t make too much progress with that second project last summer, but I was in no rush and tucked it away until now. I have two trips planned in the next few months and look forward to whiling away summer nights visiting with family and hand-stitching more Rosemary blocks.

I know some of you are accomplished EPPers. I’d love to see your past projects! You’re welcome to upload them to this week’s linky along with your more recent finishes. : )


Follow Me On ...  


* * *


The pageant rules are simple:
  • Post your finish in the linky tool. (No links to your own giveaway or linky, please!)
  • Point your readers back here with a text link or use the button above.
  • Visit and comment on other participants’ finishes.

You are invited to the Inlinkz link party!

Click here to enter

Friday, June 20, 2025

Pattern Hack! Pixelated Herringbone / Beauties Pageant 298

It was just a matter of time before I hacked one of the patterns from Not-Your-Typical Jelly Roll Quilts ...

Ever since I made the original Pixelated Herringbone, I wanted to make a version from my scrap bin.  Early this spring my sewing schedule was finally clear. It was time!

The Piecing and Fabric Pull

I let my stash and scraps dictate the palette for this version. I found two blues in my stash that worked well together, and I took them to my big bin of 2.5-inch squares. A bunch of Art Gallery scraps in blues, teals, mauves, and grays set the palette. When my scrap bin didn’t provide enough of a particular color or value, I cut a 2.5-inch strip from stash. 

The beauty of the Pixelated Herringbone design lies in the strip sets used in its construction. (It’s a pixelated quilt that takes much less time than you’d imagine!) Once I decided to make the design scrappy, however, I had to veer from my own instructions. 

The chunks of solid fabrics were still constructed with strip sets, but because I was using 2.5-inch squares from my scrap bin, the sections with prints had to be assembled individually. If I were a leader-and-ender kind of gal, I would have gone that route and sewn the prints together slowly over time. I do not sew any leader-and-ender projects, though, and instead sewed all the print units at once. This approach took longer than the original Pixelated Herringbone I made for the book, but the finished quilt top was worth the extra time. I foresee making more scrappy beauties like this one!

The Quilting and Binding

Pixelated Herringbone is a big quilt, measuring in at 64.5 inches by 80.5 inches, so instead of quilting it myself, I passed the torch to Lilo Whitener-Fey of Trace Creek Quilting to do her magic. She quilted the project with an edge-to-edge panto called Hexi Flower. 

I’ve been doing more quilting myself lately—mainly because I’ve been making smaller quilts and have had the time to quilt projects on my domestic—but my straight-line quilting would have fallen flat here. Working with a longarmer as skilled as Lilo was the way to go! 

To finish off the project, I used a stripe from Denyse Schmidt’s 2009 collection, Hope Valley. I tried multiple solids to tone down the scrappiness of the project, but the stripe really drives the idea home that this is a scrappy quilt.

Do you, too, have a giant bin of 2.5-inch squares? A scrappy Pixelated Herringbone requires 480 of them. I wish I could say this made a discernible dent in my bin, but it didn’t!


Follow Me On ...  


* * *


The pageant rules are simple:
  • Post your finish in the linky tool. (No links to your own giveaway or linky, please!)
  • Point your readers back here with a text link or use the button above.
  • Visit and comment on other participants’ finishes.

You are invited to the Inlinkz link party!

Click here to enter

Friday, June 13, 2025

Windmill Weave by Sewspicious / Beauties Pageant 297

Here in Massachusetts, we are in the home stretch before summer vacation, and I am in all-out quilting mode. My younger son is wrapping up his last days of middle school, and I will be gifting his team of teachers and therapists quilts. This has proved to be an effective motivation for getting projects bound and off my WIP list!

One project that is headed to its forever home is Windmill Weave, a design by Vickeidy Plybon of Sewspicious. The plan for this project has been in the works for a few years, so I’m especially pleased to be able to share it with you today!

The Fabric

The pattern is written to accommodate a single cut of yardage or multiple fat quarters. I knew the two-color version I wanted to sew merited something other than my usual solids, so I cut into my stash of Cirrus Solids by Cloud9 Fabrics.

I bought these fabrics years ago ... They’re lovely, yard-dyed solids, with a texture that gives them more personality than the Bella Solids I usually work with.

Because their weave is looser than other quilting cottons and because I was using white as a background, I hand-washed and machine-dried all of my yardage. In fact, I even used Retayne, a color fixative, on the Amazon yardage, to prevent bleeding.

To be honest, I’m not sure how readily Cirrus Solids are anymore, but I’ve enjoyed the projects I’ve made with them and was happy I had them on hand for this project. (See my Quilt Buzz Bingo project for another example of how I have quilted with Cirrus Solids.)


The Pattern

I am always on the lookout for a cleverly written pattern, and Windmill Weave did not disappoint! If you’re a partial-seam fraidy cat, you can construct the blocks without sewing a single partial seam. I, however, followed a supplementary blog post and sewed all nine of my blocks with partial seams. 

Truly, they’re no big deal! My only words of warning for you are these: For the partial-seam approach with the square throw, I needed to sew 18 strip sets instead of 15. You could buy more yardage to accomplish this, but I chose to get creative with how I cut my yardage. Some of the necessary strips were cut width of fabric; others were cut along the length. In the end, I’m not sure exactly how much foreground fabric I used (I had already used a bit in this quilt). If you follow in my footsteps and sew this pattern with partial seams, be sure to do all the math up front to ensure you have enough fabric on hand.

The Quilting and Binding

I was at a loss for how to quilt this top. I knew I didn’t want to quilt it myself because I thought Windmill Weave’s strong geometry, with all those horizontal and vertical lines, would benefit from something softer and swirly-er than my straight-line quilting.

Taking a cue from the backing, I selected a panto with a circular pattern ...

I considered many different scenarios for the binding. (Doesn’t it seem as if the binding can make or break a project?!) I decided that the binding fabric should either be overstated (think: lime green!) or understated (think: white!). In the end, chose the understated option: I had a light gray in my stash that played off the light gray quilting thread.

Windmill Weave was an enjoyable make. I got to use my AccuQuilt Go to cut out all those skinny strips, streamlined the quilt-making process with strip sets as directed in the pattern, and busted through long-stashed yardage in the process. I might have another Windmill Weave in me. I think I would have fun with a second go by using multiple foreground fabrics.  : )

Follow Me On ...  


* * *


The pageant rules are simple:
  • Post your finish in the linky tool. (No links to your own giveaway or linky, please!)
  • Point your readers back here with a text link or use the button above.
  • Visit and comment on other participants’ finishes.

You are invited to the Inlinkz link party!

Click here to enter

Friday, January 3, 2025

Because People Keep Having Babies / Beauties Pageant 278

Just when I think all the babies in my life have a Michelle-made quilt, another one comes into the world!

The quilt you see here was made for the 4-month-old of a very special teacher. This project is the sixth time I’ve sewn this particular pattern. It’s Little Man, an oldie but a goodie by Camille Roskelley from her book Simplify (Stash Books, 2010). 

What makes a baby quilt pattern worthy of sewing a half-dozen times? Well, Little Man is super cute, and its fabric requirements are easily fulfilled by my stash. Although I opened a layer cake for Little Man #6, I usually cut into the suggested four fat quarters. That’s an easy bill to fill for a gal who doesn’t invest in many baby-friendly prints. 

Little Man is also a fast sew and measures in at about 40" x 50", so the recipient can use it well into his toddler years and beyond (and I can squeak by without piecing a back!). Gah—it’s the best baby quilt pattern!

My only regret with this quilt is that I didn’t get pictures of the quilted-and-bound finish. With my usual machine in the shop, my backup machine and I struggled to finish much of anything before Christmas. This beauty was completed the night before it was delivered, and it went straight from being bound by my humble backup machine to being wrapped up for gifting. To see my past versions of this pattern, including more than one I’ve dubbed a “Little Lady,” click here.

For those of you who fall in love with this project’s turtles and crabs and whales, they’re from Ahoy! by Gingiber. Could that have been Stacie Bloomfield’s first collection for Moda way back when? One way or another, the collection is long out of print. I can cut another (my seventh!) Little Man out of what remains from my layer cake, and then that will be the end of my fun with Ahoy!

Follow Me On ...  


* * *


The pageant rules are simple:
  • Post your finish in the linky tool. (No links to your own giveaway or linky, please!)
  • Point your readers back here with a text link or use the button above.
  • Visit and comment on other participants’ finishes.

You are invited to the Inlinkz link party!

Click here to enter

Friday, December 6, 2024

My QuiltCon Submission (and Rejection!) / Beauties Pageant 274

I am a sucker for a good quilt challenge. There are projects I never would have developed without a formal challenge encouraging me to focus on a particular palette, block, or theme. My favorite such events are those hosted by the Modern Quilt Guild for display at QuiltCon.

The MQG usually releases the details of two challenges during the summer, when my creativity and productivity are low, low, low. The result is a harried fall, when I try to get a project or two over the finish line before QuiltCon submissions close. It’s not an ideal schedule, and because of that, there are many years I don’t sew anything for submission.

What you see pictured here is Folk Heart, the quilt I made for this year’s Ruby and Bee challenge. Tara Faughnan chose the six colors, and participants had to use at least three of them in a quilt top.

I spent a long time spinning my wheels with these fabrics. At one point, I was determined to work with applique, figured out how I could create a particular design, and then abandoned the idea. 

For me, the key was to stop thinking about shape and home in on the palette. Once I decided to place red hearts on a black background, it was easy to imagine them in off-set columns of chunky half log cabins with misplaced cornerstones.

I quilted Folk Heart with a big X and then echoed the quilting lines in each quadrant of that X. I finished by hand quilting one color in each block. The picture below shows some orchid cross-stitches and blue running stitches. Elsewhere in the quilt, there are little Vs on some of the red hearts and diagonal running stitches on some of the black backgrounds, among other embroidery motifs.

Although I didn’t set out to create a project that reflects my Pennsylvania upbringing, I think Folk Heart does just that. The juxtaposition of so much blue and black reminds me of Amish attire, and the hearts are reminiscent of Pennsylvania Dutch folk art. 

Unfortunately, Folk Heart was not juried into the show. I know a lot of people were discouraged by their rejection emails. Honestly, I would have been more surprised if Folk Heart had been accepted. There’s a QuiltCon aesthetic, and this isn’t it!

I realize that, as time goes on and I delve deeper into pattern design and sales, the less modern I’ve become. I still love big blocks, negative space, new takes on old classics, but it’s a spectrum and I’ve inched away from the modern design that initially captured my quilty heart all those years ago.

I usually encourage people whose projects aren’t accepted to submit the next year, but I’m convinced QuiltCon isn’t the right venue for Folk Heart and will save myself the application fee. : )

Do you ever submit to shows? It’s not really my thing, but it sure is fun to attend an event and see my work on display!


Follow Me On ...


* * *


The pageant rules are simple:
  • Post your finish in the linky tool. (No links to your own giveaway or linky, please!)
  • Point your readers back here with a text link or use the button above.
  • Visit and comment on other participants’ finishes.

You are invited to the Inlinkz link party!

Click here to enter