Showing posts with label Art Gallery. Show all posts

Friday, May 1, 2026

A Quilt Trade / Beauties Pageant 329

There’s something special about owning projects made by other makers. You can find such projects throughout my house—I have mini-quilts, pouches, and other items I’ve either been gifted or have purchased from other sewists and quilters. 

A few months ago, I laid claim to a friend’s finished Folk Blooms quilt (pattern by Lindsay O’Neil of Pen and Paper Patterns). "Laid claim" is the appropriate phrase. My friend didn’t offer to gift it to me. I didn’t offer to purchase it. But I was immediately smitten with the throw-size project and asked whether she had a recipient in line. When she said didn’t, we agreed to a trade.

Now the only question was, what would I make for this friend in return? At some point in the months that followed, she saw my in-process scrappy Quilty Stars (pattern by Emily Dennis of Quilty Love) and decided it would be perfect for her.

Pictured here is Quilty Stars, all quilted and bound and in the hands of its new owner. This project had been a WIP for a few years, just waiting for some free time in my sewing schedule to become a priority.  

Quilty Stars was my opportunity to use up dark-blue and low-volume prints from my scraps and stash. Some prints appear once, maybe twice, in the quit top. Many others appear in many more blocks. That’s how I like my scrappy projects: Repetition creates much-needed cohesion for me.

To counter all the scrappiness on the quilt top, the backing is a solid pale green. A friend quilted a figure-eight edge-to-edge panto over the collection of blue and white fabrics, and I used my last remnants of Denyse Schmidt’s Hope Valley for the binding.  

For the first time, my guild has organized a more formal quilt swap this year, called Secret Buddies, and I’m excited to take part in that. It’s not a person-to-person trade, though: The person you’re making a quilt for isn’t the person sewing for you. In addition to making a throw-size quilt, participants surprise their partners with a few gifts throughout the year. The quilt and buddy reveal isn’t until November, though, so don’t expect to see anything around here for a while! : )

Have you ever swapped finished quilts with another quilt maker?

Linking up to Favorite Finish at Quilting Jetgirl ... 

Event Tomorrow!


Follow Me On ...  


* * *


The pageant rules are simple:
  • Post your finish in the linky tool. (No links to your own giveaway or linky, please!)
  • Point your readers back here with a text link or use the button above.
  • Visit and comment on other participants’ finishes.

You are invited to the Inlinkz link party!

Click here to enter

Friday, June 16, 2023

A Plaid-ish Finish! / Beauties Pageant 220

A guildmate once shared a scrap quilt of hers in which there were no repeats—each fabric was used just once. Can you imagine the scrap bin necessary to create such a masterpiece?! Although a challenge like that would be a worthwhile one, my taste in scrappy quilts swings to the other end of the spectrum. 

First, I like my scrappy projects to have a strong geometry. Sharp, predictable lines create an orderly environment for me and my scrap bin to play. Then I need a well-defined palette to reign things in—I can’t handle what I’ve heard others refer to as “scrap vomit”—and my favorite way to develop a color scheme is to use a few fabrics as inspiration. 

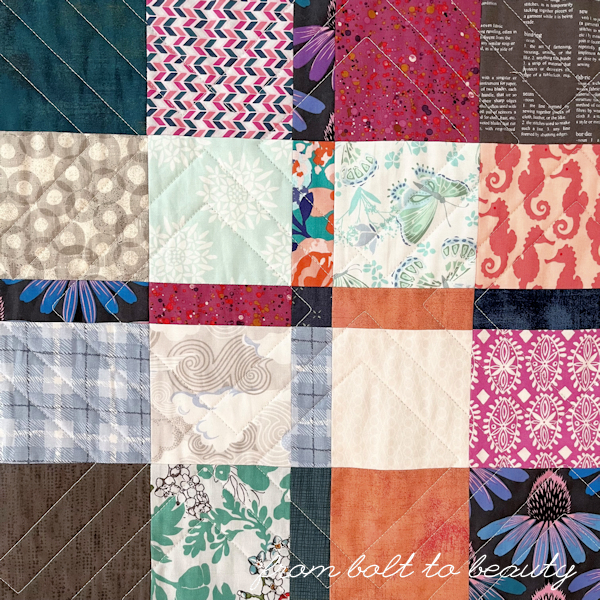
My latest finish, a second go-round with Kitchen Table Quilting’s Plaid-ish pattern, meets both of those criteria. I started with a few prints from Kate Spain’s Sunnyside, and from there fleshed out a sizable  enough fabric pull to complete this 64-inch by 82-inch quilt.

Some fabrics make a single appearance, but there are many others that are represented a half-dozen times or more. I like that kind of repetition in my scrap quilts—it creates some cohesion and helps me bust through a few fat quarters while I chip away at my stash of scraps.

I’d be remiss not to mention the beautiful quilting in this finished quilt. It was done by my friend Ophelia and is a pantograph by Urban Elementz called Diamond Plaid. Those angled lines soften the horizontal and vertical seams in the piecing, don’t they?

To read more about how I built my palette (and expanded it when necessary), click here. To see my first Plaid-ish quilt, read this blog post. And to make your own Plaid-ish, visit Kitchen Table Quilting and click on “tutorials.”

 I have more to say and show you about this Plaid-ish finish. Come back next week to see what I did with the back. Spoiler alert: I used Kelly Young’s new book, Perfectly Pieced Quilt Backs, to make it!

Follow Me On ...


* * *


The pageant rules are simple:
  • Post your finish in the linky tool. (No links to your own giveaway or linky, please!)
  • Point your readers back here with a text link or use the button above.
  • Visit and comment on other participants’ finishes.

You are invited to the Inlinkz link party!

Click here to enter

Friday, June 2, 2023

The Perils of Not Prewashing / Beauties Pageant 218

When I first started quilting I was a diligent prewasher. Eventually, though, I came to see prewashing fabric as a waste of water and time, and let it fall by the wayside. And honestly, I prefer sewing with fabric right off the bolt—I like the feel of quilting cotton with the sizing from the manufacturer still in it. 

In general, my no-prewashing policy works well for me, but there have been some significant hiccups. One story, from 2016, is documented here. Another happened last fall, when I was washing the Extra X, pictured below.

It’s hard to see in the photographs, but the Extra X quilt, bled substantially. This wasn’t terribly shocking: The fabrics are all creams and blacks, but I was too excited to start sewing and couldn’t be bothered to wash the fabric first. And because I intended to submit the project to QuiltCon, I wanted to block it before binding it. I put it in a bathtub with mild soap, plenty of cool water, and some Shout Color Catchers, agitating it with my hands and rinsing it in the bathroom before I put it in the washer for a spin.

Alas, color catchers were no match for this quilt.

I quickly discovered that some of the blacks had bled. Additional bathtub washings in hot water (the seemingly antithetical solution to bad bleeding) improved the issues with the black dyes but caused red fabric on the back to bleed. Friends, it was a hot mess and one that likely could have been avoided if I had prewashed.

Since this experience, I’ve returned to prewashing the fabrics that are most likely to bleed. And instead of simply submerging them in soapy water, rinsing them, and running them through my dryer, I dug out an old bottle of Retayne, a color fixative, to address the issue of bleeding before it begins.

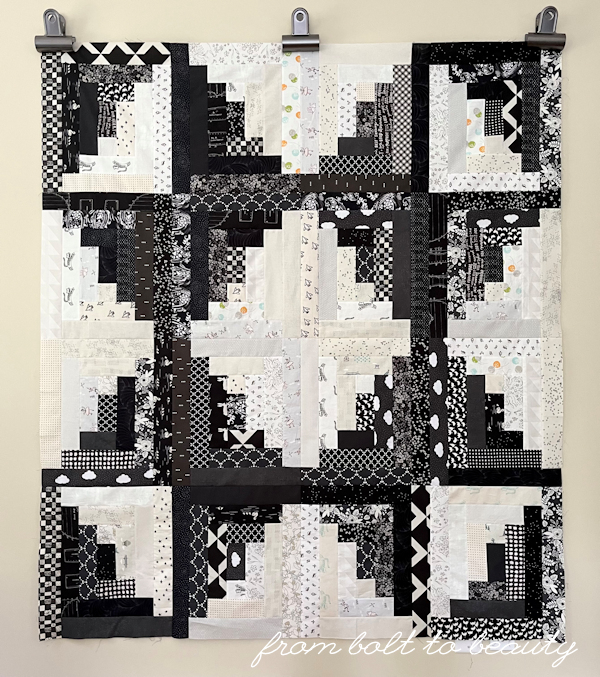
All of this brings me to the story of Big Star, the flimsy at the top of this post. It and the Extra X contain many of the same black fabrics, so the likelihood that it will bleed are high. So what should I do? Do I treat it with Retayne now? Do I quilt it and then treat it with Retayne? Do I quilt it and then try to wash it with a different method? (I could follow Vicki Welsh’s advice and submerge the finished quilt in a tub of hot water for hours and hours. Read her process here.)

The Extra X was always going to live with me. It is about my younger son and, despite its flaws, is special to me. I do want to gift this second quilt, however, and I can’t in good faith give away a quilt that will cause someone problems like those I experienced with the Extra X. Any advice on how to proceed?

Related links:


Follow Me On ...


* * *


The pageant rules are simple:
  • Post your finish in the linky tool. (No links to your own giveaway or linky, please!)
  • Point your readers back here with a text link or use the button above.
  • Visit and comment on other participants’ finishes.
You are invited to the Inlinkz link party!

Click here to enter

Friday, October 21, 2022

Patchwork Ghosts / Beauties Pageant 191

I’m not a fan of celebrating Halloween, but The Little Ghost Who Was a Quilt is a seasonal story I can get behind. Are you familiar with this picture book? Written by Riel Nason and illustrated by Bryon Eggenschwiler, The Little Ghost is the charming story of a ghoul whose patchwork sets him apart from his friends. The happy ending and it’s relatable message make it an enjoyable read for kids and adults alike. Take a peek at one of the book’s illustrations, below. Super sweet, right?

Another quilter transformed the book’s hero into stuffies last Halloween, and with this year’s holiday on the horizon, I knew I needed to follow suit! 

Construction was super easy: I sewed 3-inch squares into 4-by-6 panels, quilted them, added the mouths and eyes, and squared the bottoms. I then stuffed the bodies with a little polyfill and whip-stitched the bottoms ... Voila! Two cuties!

Rooting through my scraps and selecting fabric for the patchwork was fun, as was making the felt faces. A circle die on my AccuQuilt Go made cutting the eyes easy, and a little embroidery added some life to them. I will be shipping both stuffies, with a copy of The Little Ghost, to my nieces.

Are you sewing anything for Halloween? If so, I’d love to hear about your project in the comments.

My Halloween sewing is over. I’m in the mad rush to finish up QuiltCon submissions (which happens some years despite my best intentions to avoid it) and working on a new pattern release. If you enjoy testing patterns, this one is easy. More details are in my latest Instagram post here.


Follow Me On ... 


* * *


The pageant rules are simple:
  • Post your finish in the linky tool. (No links to your own giveaway or linky, please!)
  • Point your readers back here with a text link or use the button above.
  • Visit and comment on other participants’ finishes.
You are invited to the Inlinkz link party!

Click here to enter

Friday, October 14, 2022

A Free-Motion Quilting Success! / Beauties Pageant 190

Longtime readers know my heart belongs to straight-line quilting. I particularly like parallel lines on a diagonal, but I also love a good cross-hatch or something slightly fancier a la Jacquie Gering (see the list of links at the bottom of the post for examples of past projects). When a project warrants a quilting design with soft curves or something intricate, I usually opt to “quilt by check” and send the project to a longarmer.

Free-motion quilting appeals to me in theory, but up until now, I haven’t free-motion quilted frequently enough to master anything more than a simple stipple, which makes my current project noteworthy.

I’m not ready reveal anything more than a peek or two of this quilt. It’s slated to be submitted to QuiltCon, and if it’s accepted, I like the idea of withholding it from blog readers and social media until after the show. But the gist of the project is this: I pieced large-scale blocks using my Still Pretty Simple Jelly Roll Quilt pattern and then free-motion quilted a series of words horizontally across it. To practice quilting the words, I composed them in a Word document and printed them out on newspaper. Then I experimented using small quilt sandwiches. Doing so improved my muscle memory and helped me get better at stopping and starting midword. In fact, the paper worked so well that I decided to quilt the entire 62-inch by 70-inch project with the technique.

As you can imagine, it’s been slow going. I’ve been pinning a word to the sandwich, quilting it, and then pinning the next one. The picture above shows me a few lines from the bottom of the project (I started at the top and worked left to right). At this point, there is so much bulk. I have to pivot the quilt to be able to smooth it out and pin the next word, and then I pivot it back under the arm of the machine to do the actual quilting. It’s been quite the wrestling match.

I think the results are worth the hassle, though, and honestly I don’t know if I’d be able to get this caliber of quilting text any other way. Ripping out the paper, however, has proved to be a headache. Tiny fibers of newsprint are getting caught underneath the stitches, and I’ve resorted to using a seam ripper and tweezers to tease them out. : /

Slow and steady will win this race! Wish me luck!

Examples of quilting designs I’ve used to date:


Follow Me On ...

 
* * *


The pageant rules are simple:
  • Post your finish in the linky tool. (No links to your own giveaway or linky, please!)
  • Point your readers back here with a text link or use the button above.
  • Visit and comment on other participants’ finishes.
You are invited to the Inlinkz link party!

Click here to enter

Friday, September 23, 2022

Still Pretty Simple Jelly Roll Quilt / Beauties Pageant 187

When I was designing my latest PDF, the Still Pretty Simple Jelly Roll Quilt, I photographed the quilt I originally made from the design for the cover and was really pleased with how it turned out. The bright colors of that quilt make for an eye-catching cover. But this pattern includes five different layout optionsfour of which I had never sewn before!so I couldnt help but embark on a new project from the instructions.

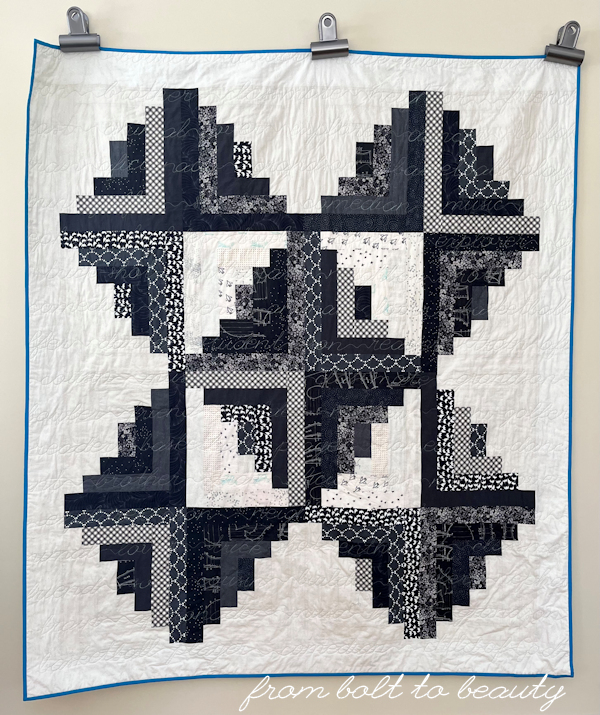
And here is the final flimsy: a super-scrappy, two-color Still Pretty Simple Jelly Roll Quilt. This layout creates a huge star with what looks to me like four photo corners. (And if anyone is going to sew a 56-inch by 64-inch star, its going to be me!)

The nexus for the fabric pull was a set of black and white fat eighths that I won through my guild. There was everything from OG Cotton and Steel to Zen Chic to Sarah Jane fabric in it. One of our board members cut the pieces from her rather extensive personal stash. It was an awesome prize, and because I used only the prints that read as all white or all black, supplementing them with my own stash and scraps, I still have a good chunk of the bundle left over. 

Its going to be a while before I have the bandwidth to quilt this flimsy, but I want to pick the binding and piece the backing before I fold everything up and put it aside for a few months. This black and white quilt needs a little something for the binding—specifically, something that’s not black or white. There are infrequent bits of aqua, orange, avocado, and pink in the scrappy low-volume background, so they’re logical candidates for the binding. My current plan of attack is to go with a bold pink binding and coordinate the backing appropriately.

This is only my second two-color quilt project. (See my first one, a QuiltCon challenge reject, here.) It was fun to sew with these fabrics, and even though I homed in on two colors, there were plenty of fabric decisions to make. Have you made a two-color quilt? Id love to see the ones you have. Post one or two of them to this weeks linky, even if they are finishes from way back when. : )

The Still Pretty Simple Jelly Roll Quilt PDF is available exclusively through my pattern shop. It’s priced at just $3, with proceeds going to support a Down syndrome organization in my area.

Linking up to Oh, Scrap! at Quilting Is More Fun Than Housework ...


Follow Me On ... 


* * *


The pageant rules are simple:
  • Post your finish in the linky tool. (No links to your own giveaway or linky, please!)
  • Point your readers back here with a text link or use the button above.
  • Visit and comment on other participants’ finishes.

You are invited to the Inlinkz link party!

Click here to enter

Friday, September 16, 2022

Taffy Quilt Kit / Beauties Pageant 186

I tried something new: I made a quilt from a kit! 

In general, I dont consider kits very “me.” I enjoy the process of developing a palette and pulling fabric too much to allow a quilt shop to do those steps for me. When I won a Taffy quilt kit in Pure Solids through one of my guilds monthly raffles, though, it was time to challenge my thinking.

And I was pleasantly surprised. This kit was just what I needed for my May quilt retreat. My in-process projects were not easily picked up and schlepped to Maine for a weekend, so I cut out and organized all the Taffy pieces in advance of the event. After the three days of the retreat, the top was done, as were a few other items from my quilty to-do list.

Theres another selling point for working from a kit on this project. The large throw-size Taffy quilt requires 30 different fabrics in addition to the background. It would have been hard to find this particular spectrum of colors in any one quilt shop, and it would have been nearly impossible to buy the necessary yardage online without ending up with a lot of extra fabric. With the kit, however, I had just enough fabric.

Im really pleased with how this quilt turned out. The pantosized to my liking for a less crinkly washed quiltis subtle and doesnt detract from the bold design of the quilt top. The binding is a woven fabric that matches one of the mauves in the piecingit adds texture and interest next to all of those Pure Solids. And the backing, although simple and designed to use up stash, is one of my all-time favorites.

The only decision I would make differently in the future is the batting. The Pure Solids have a fine handtheyre beautiful, but theyre not a beefy Bella or Kona solid. I think Warm and White would have made that background in Pure Solid Snow shine more brightly than the Hobbs 80/20 does. 

I should note that I encountered some issues with the pattern. I found the 6.5"x 8.5" professionally printed booklet that came with the kit difficult to navigate. If youre considering making your own Taffy quilt, Id purchase the PDF; perhaps it’s laid out differently.

Also, the plus blocks should be trimmed to 11.5 inches (not 11 inches, as the pattern states). My blocks came out closer to 11.75 inches, so I adjusted all the sashing measurements to accommodate that. Instead of following the patterns instructions for the borders, I found it easier to figure out how I wanted the border blocks to line up with the focal blocks and figured out the math on my own.

Despite those points, Taffy is a beautiful design. If youre an experienced pattern reader and comfortable tweaking things a bit, youll be fine.

What have you been working on? Link up your latest finish in this week’s linky!

Linking up to Needle and Thread Thursday ... 

Follow Me On ... 


* * *


The pageant rules are simple:
  • Post your finish in the linky tool. (No links to your own giveaway or linky, please!)
  • Point your readers back here with a text link or use the button above.
  • Visit and comment on other participants’ finishes.

You are invited to the Inlinkz link party!

Click here to enter

Friday, October 29, 2021

Yes, Another Economy Block Quilt! / Beauties Pageant 151


When I realized that my first economy block quilt (unveiled last week in this post) used more than 7 yards of stash and scraps, I started cutting a second. How could I resist? Culling through the Art Gallery fabrics I had on hand was a lot of fun. There were some fabrics I thought I would never find the right project for, but once I realized the sheer amount of eggplant, green, and peach in my Art Gallery stash, a palette quickly coalesced. And the results? Pretty, pretty, pretty!

I quilted last week’s finish with my walking foot, reasoning that it would be silly not to straight-line quilt a project whose seams offered the luxury of quilting without marking any lines. With this second project, though, I pulled out my darning foot for some stippling. The more I free-motion quilt, the more I like it—although I’d be lying if I said I were 100% satisfied with the results. (To be honest, though, I say the same about my straight-line quilting!)

I especially like the pieced back on this project. It combines some brand-new yardage with some well-aged fat quarters. That serene green, pictured above and below, is from Sharon Holland’s recent Lilliput collection. The owls, however, are from Maureen Cracknell’s Nightfall line, released in 2016. I could not bear to hack those beautiful creatures into smaller bits for piecing. They are the perfectly highlighted in this backing, though. (I actually won all of Nightfall in fat quarters. See what I made with the lion’s share from the bundle here.)

Between this quilt and last week’s finish, my stash is 15 yards lighter. I think that means it’s time to go fabric shopping. : )

Follow Me On ...


* * *


The pageant rules are simple:
  • Post your finish in the linky tool. (No links to your own giveaway or linky, please!)
  • Point your readers back here with a text link or use the button above.
  • Visit and comment on other participants’ finishes.

You are invited to the Inlinkz link party!

Click here to enter