Friday, September 29, 2023

Double-Sided Diamond Quilt / Beauties Pageant 230

The Double-Sided Diamond Quilt is one of my Almost Free for Charity PDF patterns. 

It’s just $3 in my Etsy shop, $1 of which goes to an organization supporting the Down syndrome community.

* * *

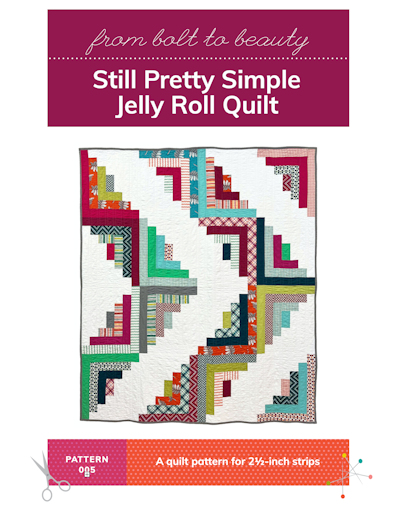
I’ve been on a roll these past few weeks with posts about precuts. First, I revealed a finished quilt of 2.5-inch strips. Then I followed up with some recommended jelly roll patterns and projects for 2.5-inch squares. So I thought I’d talk a bit about layer cakes today.

First of all, for any precut newbies out there: Layer cakes are collections of 10-inch squares. Each one usually contains 42 squares, but that number can vary from one manufacturer to another. 

I love layer cakes for their versatility—there are just so many smaller shapes I can cut from them! They’re also fabulous to use as 10-inch squares, however, and that was something I explored in this quilt ...

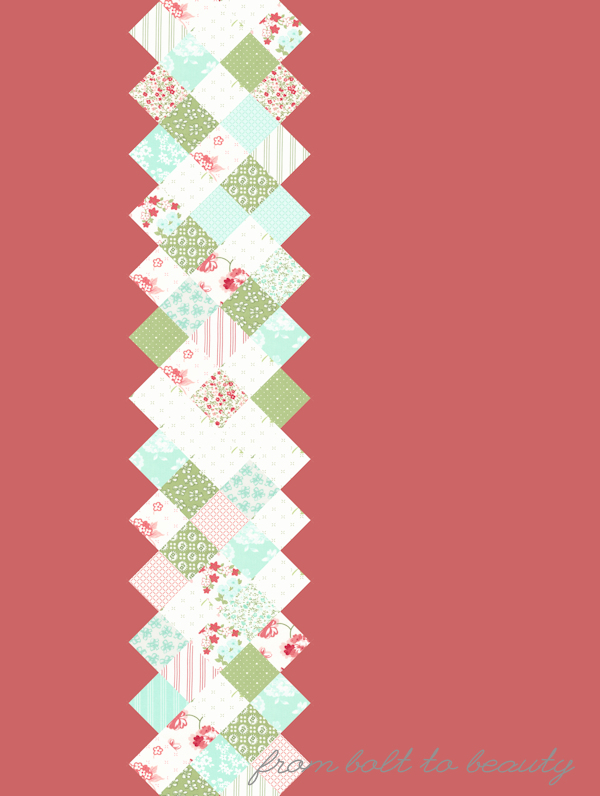
This is my Double-Sided Diamond Quilt, and it’s my love song to big blocks. The top uses 10-inch squares to supersize half-square triangles, creating a show-stopping project.

Because the top requires just 24 layer cake squares and the one I had contained 42, I designed a coordinating backing of small diamonds, making this project two quilts in one.

I’ve been meaning to make this pattern again but haven’t been successful fitting it into my to-sew schedule. The next-best option was to play with the design in Electric Quilt and explore the possibilities.

My original Double-Side Diamond Quilt was made with Little Ruby, a collection from Moda by Bonnie and Camille. Bonnie has since retired. Camille is still designing fabric, though, and most recent collection, Lighthearted, just shipped to stores this month. Lighthearted features the trademark B&C palette ...

I use so many solids as backgrounds, it was nice to see this design mocked up with those tiny hearts in the background.

And a backing that pulls out the pink (with just the slightest bit of orange) from the collection makes a beautiful companion for the front. Red and green is my favorite complementary pair. This mocked-up combination does not disappoint!

I’ll work on some additional mockups in the upcoming week. Do you have any requests? EQ and I are at your service!

The Double-Sided Diamond Quilt went out free to newsletter subscribers back in May. Now it is one of my Almost Free for Charity PDF patterns. It’s just $3 in my Etsy shop, $1 of which goes to an organization supporting the Down syndrome community. (To subscribe to the newsletter and receive future free patterns in your inbox, click here.)

On that note, next month is Down Syndrome Awareness Month. To read about my story raising a son with Down syndrome, read this post.

Follow Me On ...


* * *


The pageant rules are simple:
  • Post your finish in the linky tool. (No links to your own giveaway or linky, please!)
  • Point your readers back here with a text link or use the button above.
  • Visit and comment on other participants’ finishes.

You are invited to the Inlinkz link party!

Click here to enter

Friday, September 22, 2023

So Many 2.5-Inch Squares, So Little Time / Beauties Pageant 229

Ever since last week’s post, I’ve had precuts on my mind—namely, minicharm packs and the 2.5-inch squares in them. It’s rare that I purchase minicharm packs because they don’t contain that much fabric and the project options for them are limited. But I’m a big fan of 2.5-inch squares overall. In fact, my scraps are stored in two forms: Substantial pieces are sorted by color and put in a drawer; odd-shaped pieces are cut into 2.5-inch squares and stored in a plastic bin. Currently, that plastic bin is overflowing. It’s a treasure chest of different fabric collections and colors, and I get excited thinking of the potential that lies there. But what does one do with an abundance of 2.5-inch squares? I looked back in the From Bolt to Beauty archives and came up with a list of projects large and small.


Granny Square Quilt

I finished my Scrappy Granny Square Quilt back in 2021. I cut and sewed over twelve hundred squares for it, so as you can imagine, it was a slow project, one I picked up to make a block or two and then put down for a few weeks (or months). There is no pattern for this. I simply pieced the a block as laid out below, trimmed it while trying to maintain those points, and sewed everything together with a 1.5-inch (unfinished) sashing. For more pictures of this finish, click here.


Pixelated Picture Quilt

Pixelated picture quilts had a moment in the spring of 2022 when Tilda released its free Embroidery Flowers pattern. I quickly scooped up a kit that included all 46 colors to make the project, but there are bunches of pixelated quilts out there. Kitchen Table Quilting’s fire truck tutorial is another one (learn more about my version here and here). If a quick Google search doesn’t give you options that pique your interest, you could use a cross-stitch pattern to make something that does.


Hexagon Projects

Minicharm squares are the perfect size to make projects that incorporate the hexagon technique pioneered by Nicole Daksiewicz of Modern Handcraft. I’ve made multiple, all of which have been pillows or bags. And although I steer away from using commercially produced minicharm packs, the Market Bag I sewed required just one. Read more about my hexagon projects at these links:


Are you like me, not-so-secretly sitting on a stash of 2.5-inch squares. And if so, what do you plan on doing with them? Inspire us with your ideas in the comments!

Follow Me On ...


* * *


The pageant rules are simple:
  • Post your finish in the linky tool. (No links to your own giveaway or linky, please!)
  • Point your readers back here with a text link or use the button above.
  • Visit and comment on other participants’ finishes.

You are invited to the Inlinkz link party!

Click here to enter

Friday, September 15, 2023

Two Patterns for National Sew a Jelly Roll Day / Beauties Pageant 228

Have you heard about National Sew a Jelly Roll Day? (It’s a real thing, up there with National Golden Retriever Day and National Chocolate Chip Cookie Day!) On the third Saturday of September each year, we’re encouraged to unroll those lovely bundles of strips and get to quilt making!

Thimble Blossoms’ Patchwork Sky

One jelly roll pattern I sewed recently and wanted to recommend to you is Thimble Blossoms’ Patchwork Sky. (Thimble Blossoms is Camille Roskelley’s pattern company.) This project turned me into a fan of strip sewing—that is, sewing the strips together length-wise and then cutting them into usable units for the quilt top. 

That technique makes the 16-patches in between the big stars go together much faster, while still maintaining the super-scrappy, I-pieced-all-these-little-squares-individually look.

I had hoped to have my Patchwork Sky all quilted and bound for a National Sew a Jelly Roll Day debut—after all, it’s been basted since June!—but here you see the project as a flimsy. I am planning on quilting double lines on an angle all over this top and binding it with Grunge in wild ginger (the stars are Grunge in blue steel). Here’s hoping it crosses the finish line before the end of the year!

Ridiculously Easy Jelly Roll Quilt

Regular readers are familiar with the second pattern I wanted to showcase today. It’s my own Ridiculously Easy Jelly Roll Quilt. This humble pattern has been my most successful to date, and the ombre version was so well received that I recently updated the cover of the PDF version with it.

Patchwork Sky is not a weekend project, but the child and lap sizes of Ridiculously Easy are. Personally, I think the lap size is the project’s sweet spot, because it calls for 29 strips and jelly rolls usually contain 40. In other words, there is a little wiggle room for you to select the fabrics that work best with your background fabric.

The pattern requires sewing long columns together (it is not a block-based pattern) and includes tips on getting great results. If you’re a new sewist, I recommend making one of the smaller sizes before embarking on one of the larger sizes.

Will you be at your machine on National Sew a Jelly Roll Day? If so, we’d love to hear what you plan on making!

Follow Me On ...


* * *


The pageant rules are simple:
  • Post your finish in the linky tool. (No links to your own giveaway or linky, please!)
  • Point your readers back here with a text link or use the button above.
  • Visit and comment on other participants’ finishes.

You are invited to the Inlinkz link party!

Click here to enter

Friday, September 8, 2023

A Finally Finished Jelly Roll Quilt / Beauties Pageant 227


** The Still Pretty Simple Jelly Roll Quilt pattern is one of my Almost Free for Charity PDF patterns. One dollar from each $3 pattern is donated to a nonprofit that supports the Down syndrome community. **

Last fall, I broke into my black and white fabrics to make this project. I call it Big Star, but it’s really a version of my Still Pretty Simple Jelly Roll Quilt. The pattern makes 16 log cabin blocks, and one of its four possible layouts is this star configuration. 

The Fabrics

I went all-out super-scrappy for this project. If you look closely, you’ll spot selections from many different manufacturers. Perhaps most noteworthy is the OG Cotton and Steel fabrics (those little birds, pictured below, are my favorite!). I won the Cotton and Steel prints through a guild event, and they have been aging nicely in my stash, just waiting for the perfect project. 

I had never sewn a black and white quilt before, and it was fun—and satisfying—to cut up those fabrics and put them to good use.


The Quilting

Although I fell in love with Big Star early in the making process, the black and white palette seemed stark to me as I considered the finished flimsy. Sure, there are some subtle hints of color in the low-volume prints, but I thought the quilting could provide some much-needed pizzazz. Eschewing my usual off-white quilting thread, I opted for a mustardy yellow. It’s such a departure for me that the friend who longarmed the project double-checked whether that was really my selection before she got started. (What can I say? My people know me!)

The Binding 

Now that the quilt is done, I think the binding alone gives the project the necessary infusion of personality; I could have stuck with my usual off-white thread and been satisfied with the results. And the nice thing about matching the quilting thread to the lowest volume in a project—which for me is almost always white—is that it is visible in parts of the finished quilt and nearly invisible elsewhere. The yellow here stands out uniformly throughout this project. 

That’s not to say I regret the yellow thread—I just forgot the power of a fabulous binding fabric and the beauty of watching quilt lines advance and recede over the expanse of a quilt top!


The First Washing

This past June, I posted about an unfortunate quilt-washing experience. I made a project with many of the same fabrics I used in Big Star, did not prewash anything, and had to deal with subsequent bleeding. At this time, Big Star was just a flimsy, and I knew it would likely bleed in the wash, too. Some of you suggested I try to wash it before quilting it. Others thought I should finish it and wash it as usual or wash it with a product called Synthrapol. It was helpful to hear how everyone would handle the situation—thank you for chiming in!

In the end, I decided to wash it in the washing machine with plenty of cold water and mild detergent, and hope for the best. After all, the Still Really Simple Jelly Roll Quilt pattern is an easy one, and I can always make another. The most precious aspect of the quilt at hand is the OG Cotton and Steel stash used in it, and I still have a bit left.

When I took Big Star out of the washer, I noticed some color transfer. It was minor—so minor, in fact, that I couldn’t photograph the problematic spots clearly. I wasn’t sure whether to try to fix the issue (and run the risk of making it worse) or to throw the quilt in the dryer, so I can up with a third option: I hung it up outside, hoping the sun would lightened the spots in question. 

I am not sure whether that accomplished anything, but air-drying Big Star did not worsen the situation. I’ll take that as a win.

For kicks, I measured this project before and after the machine wash and air dry. It started out at 63.5 inches by 55.75 inches and ended up 62 inches by 54 inches. I was surprised by the amount it shrank, especially since I opted for the air dry.

The Happy Ending

The ending to this story? I am going to keep Big Star for myself. I don’t like the idea of gifting a quilt that could bleed further, and I am unwilling to invest any more time in it—there are more quilts to make! Plus, because it’s not a pristine quilt, it will likely get used more than others at my house. In other words, furry family members will be allowed to nap on Big Star unsupervised. Ha!

** The Still Pretty Simple Jelly Roll Quilt pattern is one of my Almost Free for Charity PDF patterns. One dollar from each $3 pattern is donated to a nonprofit that supports the Down syndrome community. **

Linking up to Oh Scrap! ...

Follow Me On ...


* * *


The pageant rules are simple:
  • Post your finish in the linky tool. (No links to your own giveaway or linky, please!)
  • Point your readers back here with a text link or use the button above.
  • Visit and comment on other participants’ finishes.

You are invited to the Inlinkz link party!

Click here to enter

Friday, September 1, 2023

Technique: How I Sew Chunky Stitches on Bindings / Beauties Pageant 226


It’s fair to say that I avoid hand stitching at all costs. I don’t enjoy it, it tends to be rough on my wrists, and besides, I’ve got some mad sewing machine skills ... Why would I hand-stitch something that I can sew by machine? 

The one exception for me is chunky hand stitching on bindings—I love the look of it!

This is what I am talking about, a thick line of imperfect stitches that contrasts with my binding and that reminds the quilt recipient an actual person made this object ... 

The technique is easy—so easy, in fact, that I hesitated to write this post. If you don’t already have this binding option in your quilty arsenal, I hope these instructions will help you make the leap.

Ready, Set, Go!

Chunky hand stitching is the final step of binding a quilt. At this point, I have already made my binding with 2.5-inch width-of-fabric strips and attached it to one side of the quilt by machine. Whether I attach it to the front or back depends on the project. Sometimes I like the look of the chunky stitching on the front. Other times, I prefer it on the back. Do whatever gives you the look you’re striving for.

Tools of the Trade

 
This technique requires notions you likely already have on hand ...


Thread

I use a 12-weight Aurifil thread when finishing bindings with chunky stitches. I’m sure less expensive thread would work just as well, and I think an 8-weight thread would be fine, too. (Remember, as the number of the weight decreases, the thickness of the thread increases.) I recommend trying what you have on hand and seeing how it works before purchasing something new.

I don’t use a thread conditioner, but if using one makes you happy, go for it!

Hand-Sewing Needle

There is nothing fancy about my needle. It’s sharp, has a big-enough eye to accommodate the thick thread, and is long enough that it feels good in my hand. If you’re savvy about needles (admittedly, I am not), I’d say something in the embroidery or crewel family would work. (If you have insight into needle selection, by all means let us know in the comments!)

Quilting Gloves

I do not use thimbles—I haven’t invested the time (or money) into finding one I like. Instead, I prefer to wear my Machingers quilting gloves. They help me grasp the needle, lessening the wear and tear on my hands.

Step-by-Step Instructions

1. Cut a length (say, 24 inches) of the chunky thread you’re using, and double-knot the end.

2. Insert the needle an inch away (or less, whatever the quilting lines permit) from where you want to start (or, in the case of the photo below, to continue) your lines of stitches.


3. Pull the thread through, burying the knot between the fabric and batting. This will not hurt the fabric! Sometimes I have to lift the fabric a bit to encourage the knot to go through more easily.


4. Start sewing, ensuring the thread passes through the binding and the fabric without peeking through on the other side. My stitches are about a quarter-inch long. I strive for uniformity, but part of the beauty of this stitching is the little wobbles and inconsistencies. : )

Sometimes I can get away with weaving the needle up and down and making multiple stitches at a time.

5. Secure the corners by stitching an X.


6. When you’re close to the end of your thread, tie a double knot a little beyond where your next stitch will end. Sew that last stitch, ensuring the knot lies between the fabric and batting, and bringing the needle through the fabric about an inch from that endpoint. Trim the tail close to the fabric.

That’s it! I think the hardest part of this process is making sure I don’t poke the thread through to the opposite side of the quilt. : )

There are plenty of times when I still finish my bindings by machine—especially when I’m short on time—but I do enjoy hand stitching a binding here and there.

Have you given this technique a try? If so, tell us about it in the comments.

Follow Me On ...


* * *


The pageant rules are simple:
  • Post your finish in the linky tool. (No links to your own giveaway or linky, please!)
  • Point your readers back here with a text link or use the button above.
  • Visit and comment on other participants’ finishes.

You are invited to the Inlinkz link party!

Click here to enter