Thursday, July 30, 2015

T Minus 4 Months, 25 Days

Hello and welcome to another installment of TGIFF, where we celebrate our finishes instead of focusing on the huge pile of WIPs in our sewing rooms. (It’s much more fun that way!)


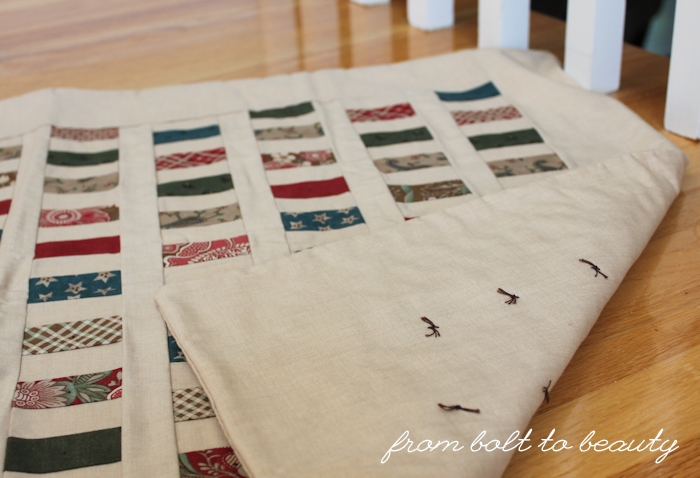
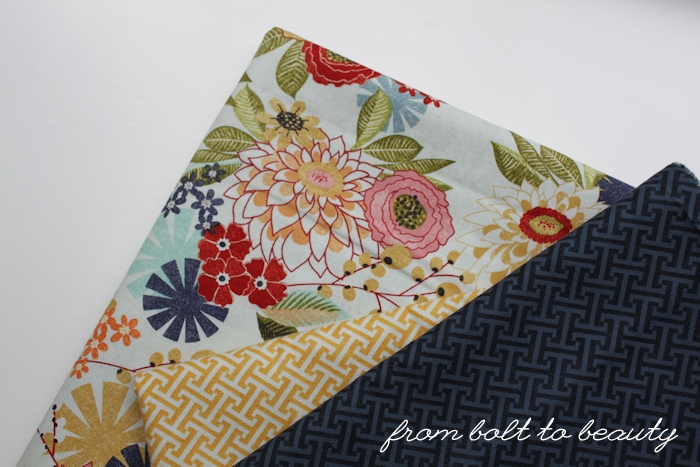
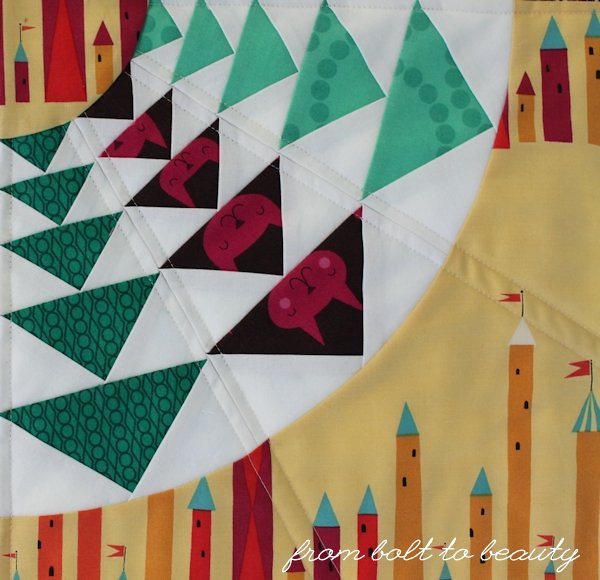
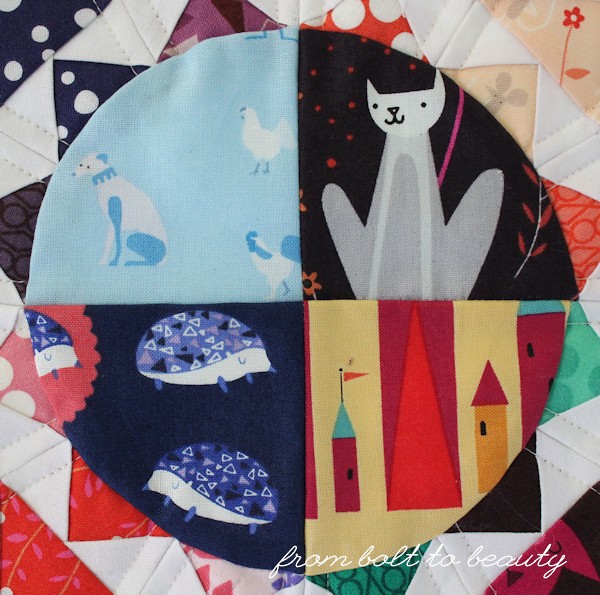
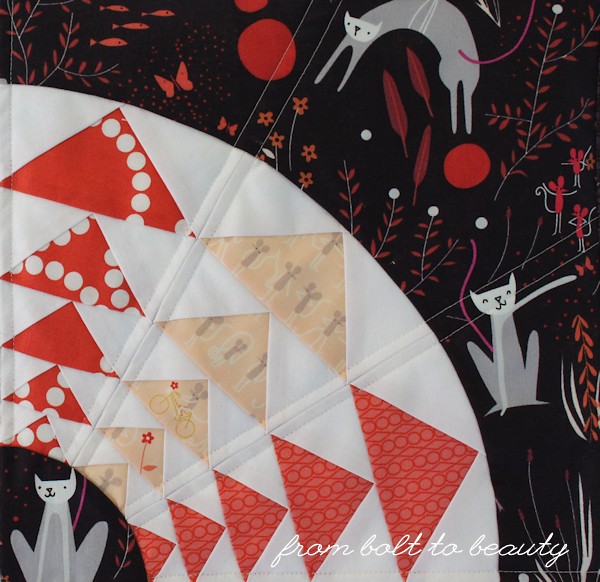
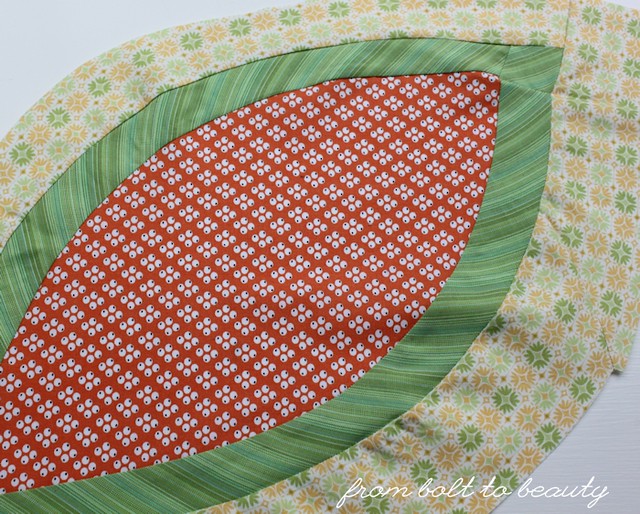
I started my finish, a Christmas runner, back in March while I was prepping for my first quilt retreat (see the post “Transformation Complete: I’ve Become My Mother”). I don’t do much seasonal sewing, but I have a weakness for Christmas decorations and Christmas fabric. I dug through my scraps for this project, a free pattern from the Fat Quarter Shop, and homed in on some vintage-inspired Christmas designs. I then paired them with some not-so-Christmassy greens and some reds that border on coral, and pulled everything together with a white-on-white cross-hatch from Carolyn Friedlander.


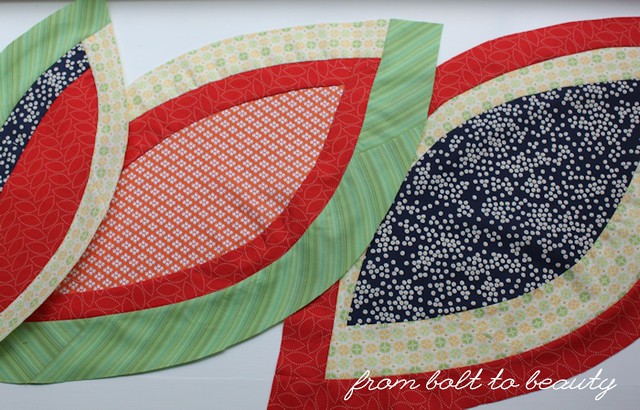
Eep! I love this runner—it is staying at my house! I’m crazy about the fabrics, the size (the project is a generous 60 inches in length), and the quilting. I’ve been playing with free-motion quilting lately, but my heart belongs to the simple straight-line quilting I used here: randomly spaced horizontal and vertical lines.


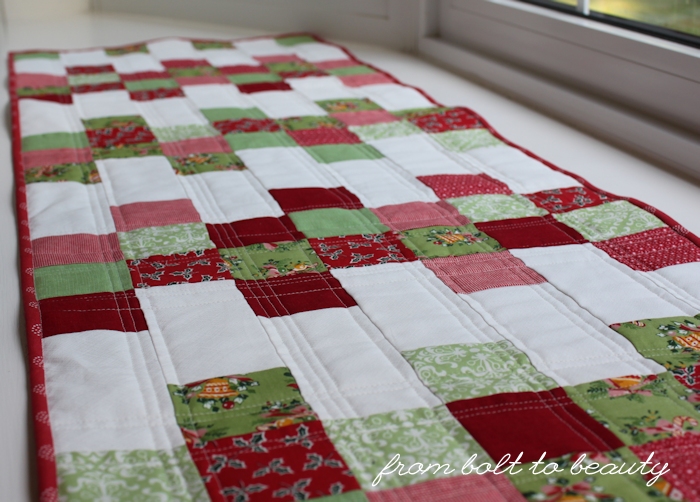
A note on the pattern: This is an easy project and appropriate for beginners. That said, I can’t tell you how many times I had to rip out stitches because I assembled the pieces incorrectly. Perhaps it was the hours of continuous sewing I did at that retreat. Perhaps it was my halfhearted system of labeling the runner pieces. Just take your time, refer to the pattern pictures, and label the components—you’ll be fine.

Linking up to Let’s Bee Social, Needle and Thread Thursday, Finish It Up Friday, and Ho Ho Ho and on We Sew ...

Follow on Bloglovin


Enough about my week’s finish. What have you been up to? If this is your first time at TGIFF, the rules are simple:
  • Post your finish in the linky tool.
  • Point your readers back to TGIFF with a text link or button. (You’re welcome to swipe the TGIFF image above.)
  • Visit and comment on other participants’ finishes.

Tuesday, July 21, 2015

What the Heck Do I Do with This?

If you had asked me a few weeks ago about my first quilt, I would have told you about the humble picnic blanket I made of 8-inch squares for my friend Miss K. I would have told you how making it was an exercise in locating my inner quilter and determining whether I was interested in pushing a gigantic swath of fabric and batting through my machine on a regular basis.

If you ask me about that first quilt today, I’d tell you that I’ve been living a lie because recently I found this, my actual first quilt:

You’d be wrinkled too if you were folded up and forgotten in my guest room
closet for five-plus years!

I had completely forgotten about this project from years ago. Frustrated with shopping for suitable wall art, I made this mini (it measures 25 inches by 36 inches) to hang above my bed. I bought a jelly roll of Brannock and Patek’s Remembrance because I love the combination of red, green, and blue. I tied this mini instead of quilting it and opted for a pillowcase binding. I’m pretty sure I followed some sort of pattern, but I went through my sewing library and can’t put my finger on the source.


When the project was finished, I decided that it was too blah to hang up above my bed or anywhere else, for that matter. I ended up buying some photography from this Etsy shop to use in my master bedroom instead.

Although I didn’t hang the mini here, I did purchase yardage from Remembrance
to make the two big pillows.

Looking at it now, years later, I like the fabrics. They’re more traditional than those I usually use, but I’m a sucker for the red-green-blue combination. And I like the strong geometry of this mini. It’s simple, reminiscent of a coin quilt. This mini has potential!


The way I see it, I have three options:
  • I can let it live as a mini. If I take this route, should I cut it down so it’s not so rectangular? Add a border? Bind it?
  • I can make it into something completely different. Does it want to be a pillow? (Do I need another pillow?) A journal cover?
  • I can fold it up and shove it back in my guest room closet. This is the easiest of the options. It’s also the lamest.
So what is your take on my dilemma? Is this a finished project, or should I demote it to a WIP (or worse—the trash!)? Thanks in advance for your help!
Linking up to WIP Wednesday, TGIFF, Finish It Up Friday, and Sew Cute Tuesday ...

Follow on Bloglovin

Sunday, July 19, 2015

These Are My People!

About two hours north of me is Keepsake Quilting, a shop that’s great in both size and reputation. I’ve driven by it before, faced pressed to the window, pleading with my husband and kids to stop, but I was denied. Determined to enjoy the Keepsake experience (finally!), I waited until my husband and older son were out of town, got a babysitter for my little guy, and sent out a call for New England quilt bloggers to meet up at this famed store.

Here are the takers, from left to right: Karin of Leigh Laurel Studios, Terri of Childlike Fascination, Chelsea of Patch the Giraffe, me (I’m having way more fun than my lame smile would suggest), Sarah of Smiles Too Loudly, and Jen of Never Just Jennifer.

As fellow quilters and bloggers, these people get me! I loved our day together!

Fueled by a preshopping lunch and quilty conversation, we descended on Keepsake. I’m sure the potential for fabric enabling is not lost on you. It’s one thing to be set loose in such a shop by yourself, but when you have an additional five pairs of eyes perusing the bolts with you, the purchasing possibilities skyrocket.

I bought these fabric selections just because I liked them ...

From left to right: More Hearty Good Wishes (Janet Clare/Moda), Sunnyside
(Kate Spain/Moda), Low Country Indigo (Nancy Gere/Windham), Wildflowers
(Alisse Courter/Camelot)


And others because they were on sale and too lovely (and too hard to find elsewhere) to pass up ...

I’m planning a Bonnie and Camille quilt of epic proportions. This pink Scrumptious
print and this red Vintage Modern print will be put to good use.

The highlight, however, was when Sarah found some PB&J for me (see my previous musings on the wonders of PB&J here and here). The discovery caused me to jump up and down, a reaction witnessed by more than a few Keepsake employees and shoppers.


I adore Basic Grey’s PB&J. I scored 3 yards of the top fabric and 1 yard of the
yellow at Keepsake. Sarah swapped the navy with me. Love!

But the day was not all shopping and eating and entertainment (i.e., me spontaneously jumping around the store). It was also educational. Random topics of conversation included but were not limited to: black holes, the rigors of ROTC training, and the little arrow next to the gas gauge on recent-model cars that indicates where the gas tank is located. (Terri, I will forever be indebted to you for that last bit of knowledge!)

Fabric shopping is always fun, but fabric shopping with smart and talented quilty friends is crazy, crazy fun. I can’t wait to plot more adventures. (BTW: If you live in New England and want to be informed of future meet-ups, follow me on Instagram. That’s where I’ll post details.)

Linking up to Sunday Stash, Sew Cute Tuesday, Let’s Bee Social , and Needle and Thread Thursday ...

Follow on Bloglovin

Tuesday, July 14, 2015

This Finish Brought to You by Gilmore Girls*

I have spent a good chunk of this year wrapping up some long-lingering projects. I’ve completed two holdover quilts from 2014 (here and here) and one from 2013 (here). Although it feels good to check these WIPs off my to-do list, I’ve been wanting to start something new and different—and something that wouldn’t be hanging around my sewing table forever.

Then last month, I won two Carolyn Friedlander patterns from the Fat Quarter Shop over on Instagram: Nest Egg and Social Tote. Receiving these patterns was the perfect excuse to hang out in my stash. I had missed that beginning part of the sewing process—the fabric pulls, the color-card consultations, and the time spent considering the possibilities.

I homed in on my last sizable chunk of Basic Grey’s PB&J (left over from the back of this quilt) for a Social Tote but was doubtful that I would find anything else in my stash to coordinate with it. PB&J has a washed-out quality to it. The colors are lovely; I just wasn’t sure it would play well with other fabric lines. And then I found, smooshed down between other fat quarters, a lone fat of Denyse Schmidt’s Hope Valley. Perfect!

Heads up: The Social Tote is surprisingly small, measuring in at 10 inches long, 7 inches wide, 3½ inches tall (10 inches tall with handles).

I’m pleased with the results of my first Social Tote! It’s hard to estimate how long it took me to make it, because I worked on it here and there and jumped to other projects when I needed a more mindless task to focus on. I can say, though, that it was a really fun sew. Early in the process, when I had all the pieces cut out and ready to go, it was hard to imagine that those rectangles would become much of anything, let alone a three-dimensional object that could hold and carry other objects. (Kudos to both Carolyn Friedlander and Anna Graham, Carolyn’s collaborator on this pattern. The way this project is assembled is nothing short of brilliant.) Watching it come together reminded me of my first Sew Together Bag, and I’ll be riding the sense of accomplishment from my Social Tote for a while.

The Social Tote features three compartments. There’s also a pattern for a pin cushion that fits in one of the smaller sections, which I opted not to make.

I definitely have another Social Tote or two in me. I didn’t veer from the pattern for this first one. For any future renditions, I may choose a darker lining fabric or figure out something to make the handles less floppy.

What are your most recent sewing triumphs? I’d love hear about them! Leave a comment or URL so we can celebrate with you.

* A note on the title of this post: I stream TV shows while I sew, and for the last few projects, I’ve been trucking through season after season of Gilmore Girls. After being jerked around by season 6, I was eager to get to the end of the series and see how the writers would resolve the various plot lines. I watched the series finale during this project, and now that it’s over, I’m a little sad. Sad and in need of another show to watch. : (

Linking up to Let’s Bee Social, Needle and Thread Thursday, TGIFF, and Finish It Up Friday ...

Follow on Bloglovin

Tuesday, July 7, 2015

A Lizzy House Finish

Four months ago, I wrote about the Lizzy House mini swap hosted on Instagram by Jo (Riddle and Whimsy) and Sarah (Smiles Too Loudly). At the time, I couldn’t decide whether to make the leap. Now, after signing up at the last moment, mulling over (for months!) what to sew for my partner, and finally shipping everything off in the most neurotic packing job of all time,* I can proudly say that I’m no longer a swap newbie.

I sewed for Christina, over at Made by Chrissymae. She wrote in her swap questionnaire that she loves geese, fussy cutting, and cool colorways. I decided that Better Off Thread’s Right Round pattern would fit the bill ...


I started this swap experience with modest Lizzy House reserves: a collection of Catnap in warm colors and Lizzy’s jewels and pearl bracelets in various colors. I bought much more additional fabric than I needed to, but I wanted options. Armed with a newly reinforced Lizzy House stash, I chose the four corner pieces and then pulled colors out of those fabrics for the adjacent rows of geese.

Honestly, I probably wouldn’t have bought this yellow print from the Castle Peeps collection if it weren’t for the swap, but I’m happy I did. It’s sweet, and I’ll be using the leftover yardage for fun stuff for my boys.

I’m very pleased with how the project turned out. As with every bag and quilt I make, this mini took longer than I anticipated. I’d say that each of the 12 Dresden wedges took me 30 minutes to paper-piece. Add fussy cutting, making and then trashing one wedge (which necessitated an emergency trip to my LQS for replacement Lizzy House fabric!), piecing the curves ... yeah, it was a substantial project but worth it.

I tried using the same background white in the center of the quilt, and it didn’t work. By using the corner fabrics a second time here, I got to fussy-cut some more.


I attempted stitching in the ditch on this project, but I never achieve success when I press my seams open, which I did here to avoid bulk. I opted instead to quilt on each side of the Dresden seams. Love it!

Of course, the flip side to this story is that someone made a quilt for me! (Somehow, so engrossed in my own making process, I forgot that another swap participant was stalking me, plotting a Lizzy House creation tailored to my likes.) That someone is Chelsea, from Vancouver. Check out the cool paper-pieced color spectrum mini she made me here. The challenge now is to claim a chunk of wall space to display my growing mini collection. : )

* I can’t bear to fold a mini for shipping. Since I received the one Kim, of Leland Ave Studios, made me nice and flat in a foam-core wrap job of her own ingenuity, I decided that it’s worth the extra effort and expense. Heads up: I found foam core at my local dollar store. I overlapped sheets of it to make two pieces that were big enough to protect the mini. Then I wrapped the quilt in plastic and sandwiched it between the foam-core sheets. Then I taped the heck out of it, wrapped it in brown paper, and taped the heck out of it again. It made it to Alaska from Massachusetts without a problem. (Please note: My husband witnessed the whole wrapping process and thought I was nuts.)

Linking up to Let’s Bee Social, Needle and Thread Thursday, TGIFF, Finish It Up Friday, and Sew Cute Tuesday ...

My Lizzy House mini is also my entry into this month’s Le Challenge. I can honestly say that this is the only project I’ve ever made that would fit into the current theme: direction. It’s got geese flying in all directions!

http://le-challenge.blogspot.com/


Follow on Bloglovin

Wednesday, July 1, 2015

Break-the-Rules Improv Piecing

In the past few months, I’ve added to my quilting library with some notable titles. I wish I could say that I’ve finished—or even started!—projects from all of these books. I have many craft books, however, that I’ve never made projects out of. They serve more as reference and inspiration than sources of patterns.


The exception is Sherri Lynn Wood’s Improv Handbook for Modern Quilters. Purchasing that volume coincided with attending a workshop, hosted by my guild and led by the author. I went into that daylong event presuming that improvisation wasn’t my thing. The most I had pieced improvisationally was a few projects from the Stitched in Color Curves Class I took earlier this year, and although I liked the results, I still preferred the predictability of patterns. Plus, I didn’t know much about Sherri Lynn Wood or her work. I figured I’d gain some techniques that I could incorporate into my quilt making, but I doubted that the sewing I did in the workshop itself would result in a quilt. I was wrong.

The workshop explored bias-strip piecing. We started with big fabric petals (like 18 inches long!) and proceeded to add layers of bias strips to them. Along the way, we addressed all the unforeseen puckers and curling and general wonkiness that arose when sewing with those shapes.

By the end of the day, I was hooked. Working with the petal shapes opened new doors for me. I had been thinking a lot about movement since I saw my friend Kim’s Exodus quilt. I think the petal shape in itself evokes a sense of movement, and I can’t wait to see where the project with these petals ultimately takes me.

Three of the four petals I made at the workshop.
The far-right petal is 26 inches long!

What was perhaps the most striking part of the workshop, and something that Sherri touches on in her book as well, is the process of creating improvisationally. Most of my quilting is done in bits and pieces between breaking up my boys’ WWF matches and feeding/chasing after/carting around my aspiring wrestlers. Sherri, however, encouraged us to be present in the moment in a way I’m usually not. Often my hands are sewing, but my mind is focused elsewhere. She suggested methods to center ourselves, to constrain our creative process (with, for example, self-imposed limits on the time at task or on our fabric resources), and to make the most of our time with improv techniques. I’m notorious for skipping the intros in quilting books and heading straight to the quilts themselves, but I recommend the opening pages of The Improv Handbook for Modern Quilters that address these issues of creating improvisationally.

During the workshop, Sherri also showed us ways to break the rules to get the results we wanted. After years of striving for consistent quarter-inch seams and perfectly pressed quilt blocks, I found myself stretching fabric (on purpose!), pruning away parts of the fabric I had just pieced, and in general, celebrating the places my so-called mistakes took me as a quilt maker.

Can you see some of my creative sewing solutions here?
I inserted pleats to flatten the fabric.

Where do you stand on the subject of improvisation in quilts? Have you dipped your toes in the improv waters or already jumped off the diving board into the deep end? (I’d understand if you were still sitting under an umbrella working on a drink. It’s a comfortable place to be.)

Linking up to Let’s Bee Social, Needle and Thread Thursday, Sew Cute Tuesday, and WIP Wednesday ...

Follow on Bloglovin