Saturday, December 27, 2014

2014: By the Numbers

I’ve been blogging about nine months. I think that is long enough to merit a year-in-review post! : )

The Top 4 Blog Posts

Clockwise from top left: Do I Like This Quilt?, A Gift Bag for Beer Lovers,
A PB&J Finish, and Quilty Cross-Stitch Blocks

It’s fun to see what resonates with blog readers, and the top post was the six-pack gift bag tutorial. My response to that? Bwahahaha! I think the gift bag is popular because it’s unique, it’s easy and attracts a variety of crafters, and it appeals to men, who tend to be overlooked in the craft world.

The Rest of the Story

And here are the other numbers, what I accomplished since last January and what I did not. (Boooo!)

27 quilted tissue holders
12 totes
8 finished quilts
6 UFOs (you can see for yourself: 1, 2, 3, 4, 5, 6)
5 pouches
2 purses
2 minis
2 skirts
2 tutorials
1 feature on Sew Mama Sew
1 featured sewist nod from Pink Chalk Studios
1 Rubik’s cube ornament
1 silly craft-related poem
And countless broken promises to use my stash instead of purchasing more fabric—alas!

Whatever the journey that is 2015 brings, I’m happy to have you as a traveling companion. Happy new year!

Follow on Bloglovin

Monday, December 22, 2014

And That’s a Wrap

It’s December 22, and my sewjo is waning. I’ve barely touched my sewing machine in the past week. I’ve cleaned and cooked and hosted (the first wave of holiday guests has already come and gone). I’ve wrapped and tagged and bagged. And I’ve napped, thank you very much.

The last of our presents will be delivered to family and friends this week, and looking over these gifts and what I’ve accomplished in the past two months may give me the kick in the pants I need to pick up my rotary blade and get going again ...

The library totes I made back in November are going to three special teachers. I paired them with a hot cocoa kit, which I layered into a Ball jar and topped off with the recipe and an ornament. (If you want to make your own cocoa gift in a jar, check out this post at Love Grows Wild.)


The quilted tissue holders I became infatuated with earlier this fall have multiplied and will go to the staff at my younger son’s preschool. You do the math: 25 for them + 2 for me = a crazy number of tissue holders!


Accompanying the basket of these cozies is a note from my 4-year-old. He adores the educators at his school. The feeling is mutual: I honestly think some of them hope that I won’t show up at pickup someday so they can take him home themselves!


And then there’s the Sew Together Bag I conquered most recently. I’ve filled it with sewing-related goodies—needles, thread, extra Chaco chalk (but not yellow!), pins, and more. It’s under the tree and ready to be gifted to my mom on Christmas.


You may notice that I have not shared any quilt finishes. Alas! I am dead-set on FMQ the two I have in the works, and I am not yet competent enough at FMQ to finish them. However, I have a new partner in crime on that front. I suspect 2015 is going to be a very interesting year ...


This may be my last message for this year, so I wanted to wish you all an amazing Christmas! Big blessings to you in the new year!

Linking up to Let’s Bee Social and Finish It Up Friday ...

Follow on Bloglovin

Tuesday, December 16, 2014

Michelle: 1, Zippers: 0

Friends, I am pleased to present my latest finish, my first Sew Together Bag:


Honestly, it was no big deal. I wouldn’t recommend a new sewer try it—sew some easy-peasy totes first. But if you know your way around your machine and have a walking foot, you can do this. For some context, I’d say that it’s more complicated that the pouches and totes that I’ve blogged about thus far; it’s not even close to the complexity of the Amy Butler Cosmo Bag I made.

Still not convinced? Here are my responses to your best excuses not to try this pattern. : )

The pattern looks difficult!

No, the pattern isn’t difficult—but I sew my best with lots of visuals, and this pattern has few pictures or illustrations. Go to Quilt Barn’s Sew Together Bag sew-along for more step-by-step pics. It’s a sanity saver.

There are four zippers!

Based on advice from other sewists, I used thin strips (⅛” wide) of Pellon’s 805 Wonder-Under on the lining panels of the bag (B1, B2, B3, and B4) to adhere each panel to its corresponding zipper(s). (There are other comparable products that would work just as well; I happened to have Wonder-Under on hand.) Then I pinned the pocket lining on top of the lining panel and zipper. I thought everything stayed together well as I sewed.

There is so much fabric!

Yes, you have to sew through some bulky chunks to construct a Sew Together Bag. I used my walking foot throughout the process. (I did not use my zipper foot at all; I couldn’t get everything through my machine without my walking foot.) I also used size 14 or 16 needles. (I started with a 14 and moved to the 16 when I had to attach the side panels.) And I trimmed the interfacing on the lining panels (B1, B2, B3, and B4) smaller (8¾” x 9¼” instead of 8¾” x 9¾”), based on this advice, so that there would be one fewer layer in the side seams. I’m not sure whether it really helped, but I would do a second bag the same way.

My final take

The funny thing about the Sew Together Bag is people never make one. I think I know why. It goes together more easily than you think it will. And once you have a first under your belt, a second isn’t intimidating at all. Plus, there’s the novelty factor. It doesn’t look like other bags or pouches out there, and it makes a great gift. After all, what says “I love you” more than four zippers?!


A postscript on the fabrics: The exterior fabric is DS Quilts; the binding is Quilter’s Linen in garnet; the interior fabrics are Denyse Schmidt, Marcus Brothers, and Aunt Grace, some of which have been in my stash for longer than I care to admit.

Linking up to Let’s Bee Social, Needle and Thread Thursday, Finish It Up Friday, TGIFF at Things I Make, and Bag Brag Tuesday ...

Follow on Bloglovin

Saturday, December 13, 2014

A Winner and a Thank-You

The Sew Mama Sew giveaway has ended, and the winner of the collection of Aurafil thread is #338: Kat of Kat & Cat Quilts! Congratulations! We can’t wait to see the loveliness you sew up with all that new thread. : )

And I wanted to extend a big thank-you to everyone who entered and to those new followers who are giving From Bolt to Beauty a test-drive.

I knew that giving away a cool prize would be fun, but I didn’t foresee how much I’d enjoy reading the comments. I’m still working my way through them, having decided early on that I wanted to respond to each one. How could I resist? Hearing what everyone had to say about their expectations for the new year made me feel the same way I do when I leave a guild meeting: These are my people! I went so long without taking part in a sewing community. Now that I have crafty connections—both in person and online—I can’t imagine being without them.

One final thought: If you’re a blog reader who doesn’t comment on posts—whether here or elsewhere—can I make a recommendation? Start commenting. I lurked in the shadows of the blogosphere for years, thinking I was getting everything out of it that I could. But things changed when I began commenting. Truly, you have more insight and experience that is worth sharing than you think!

OK, I have a quilt to baste! Good luck with your holiday to-do list!

Follow on Bloglovin

Wednesday, December 10, 2014

Plan B

For those of you who are new to my sewing adventures, my plans for Christmas crafting were modest:

•    Learn how to free-motion quilt
•    Put that new skill to use on two lap-size quilts
•    Make a Sew Together Bag (this is scary because it requires installing many zippers)

I’ve been experimenting with FMQ, and it’s going OK. I still haven’t found my groove yet, and I’ve decided that before I devote too much time to the task, I should invest in a new machine. I love my current Janome, but it is a home décor machine and not designed for quilters. I need something with more throat space and an extension table, all of which will help me become more proficient at FMQ. (I truly believe this—buying a new machine is not a procrastination ploy!)

As a result, I had to devise a plan B:

•    Buy a new machine (learn to FMQ in the new year)
•    Put off one quilt until I’m competent at FMQ; quilt the other with my walking foot
•    Make a Sew Together Bag (yup, still scary!)

The postponed quilt is for my sister. She would understand if I presented her with a pieced quilt top on Christmas day with an IOU for a finished quilt, but I thought she needed something tangible to tide her over. So I made her a Mini Miranda Bag.


Eep! I love it! It’s so darn pretty, don’t you think? I pulled the Amy Butler floral and the eggplant Quilter’s Linen from my stash; both were left over from my Cosmo Bag. I had the Clover handles on hand as well. (Bonus points for using my stash!) All I had to buy was the Kona Plum that’s visible as the faux binding at the top.


I recommend this pattern. It’s well written and thoroughly illustrated. Just use your walking foot to help your machine get through the layers. The only change I make is omitting the flap; I just think the bag looks better without it. This is my fifth Mini Miranda Bag, the second for my sister. (My fourth was blogged about here.)

Time is ticking. Just 15 more days until Christmas. I hope I can meet my new-and-improved goals! Have you had to revise your holiday to-do list, too?

Linking up to Needle and Thread Thursday, Finish It Up Friday, TGIFF at Quilt Matters, and Bag Brag Tuesday (for the first time!) ...

Follow on Bloglovin

Monday, December 8, 2014

Sew Mama Sew's Giveaway Day!

Win me!

**Please note: The giveaway is closed**

Welcome readers of Sew Mama Sew! You’ve landed at From Bolt to Beauty, a crafty corner of the interwebs where I chronicle my sewing and quilting adventures.

First, a word or two about me …

I’m Michelle. As the mama to two little monkeys, I crave peace and sanity. I find that at my sewing machine, where I make bags and quilts and the occasional garment or window treatment.  Some of my projects from the past few months have included ...

Clockwise, from top left: Candy Circle quilt, Mini Miranda Bag, The Tree Is Trimmed, and 10 tissue cozies

Other important things to know about me are:

•    I love Quilter’s Linen. I really love Moda fabrics. And I really, really love Denyse Schmidt’s designs.
•    I avoid hand-stitching at all costs.
•    I have an unnatural fear of Clover’s yellow Chaco Liners.

But I suspect that you’re really here to learn about winning this fabulous set of Aurafil thread. It’s 12 large spools—1,422 yards each!—of the most popular thread colors.


This giveaway is open to anyone anywhere in the world except the woman who gave birth to me (because, Mom, it’s against the rules of giveaways; I’ll make sure Santa hooks you up if you want some fancy thread).

For a first chance to win, leave a comment, telling us what one sewing-related resolution you hope to keep in the new year. I, for one, plan on getting proficient at free-motion quilting.

For another chance, leave a second comment, indicating how you follow me—on RSS, Bloglovin’, Instagram, etc.

Old and new followers are welcome to leave a comment. If you’re on the fence about following me, give me a month. Both here and on Instagram, it’s all crafts all the time. No pics of my kids or my meals. No inspirational sayings or photos of pets (although my husband has plans otherwise!). We’ll laugh. We’ll cry. And by the end of the month if you’re not into my scene, we’ll part as friends. No hard feelings. : )

This giveaway is open through Friday, December 12 at 8 p.m. eastern time. Mr. Random Number Picker will select a winner. I’ll post the winner here and email him or her. Good luck!

**Please note: The giveaway is closed**

BTW: I typically respond to comments on my blog via email. Since I expect a lot of people to want a chance to win this prize, I doubt I’ll be able to follow up with everyone on this post. My apologies! Rest assured that I read every comment, though. : )

Follow on Bloglovin

Friday, December 5, 2014

The Tale of the Yellow Chaco Liner

We quilting bloggers like to write about the techniques and skills that go into the creation of our quilts. I know that I approach my quilt making as an art, and I’m happy to tell anyone who is willing to read my blog about it! At the end of the day, though, I’m making a blanket. I see quilting as a utilitarian art form.

I have never sold (or tried to sell) any of my quilts. All of them either live here at From Bolt to Beauty world headquarters or have been gifted to a friend or family member. As a result, my quilts are just as much about the recipient as they are the creator.

With that in mind, I want to tell you the story of quilt #3.

In the spring of 2013, I decided that my friend Miss L needed a quilt. This present would be both unexpected and meaningful. The problem with this plan, however, was that I had never made a quilt before.

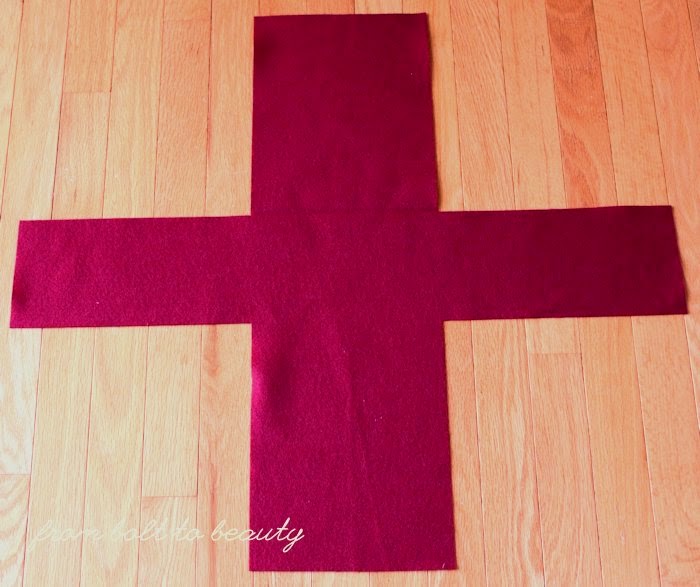
So I did a test run, sewing a quilt top of big squares and quilting with a simple cross-hatch. I moved on to a baby quilt. With two quilts under my belt, I approached my third with confidence. Using Joelle Hoverson’s Last-Minute Patchwork and Quilted Gifts, I chose to sew my own version of this quilt for Miss L …

Cutting Corners, from Last-Minute Patchwork and Quilted Gifts

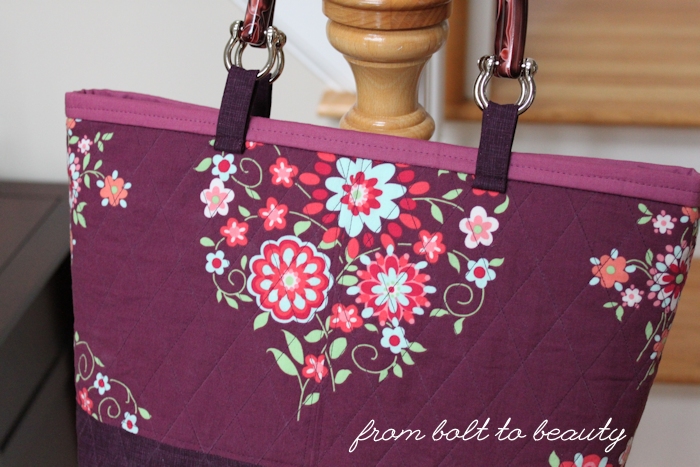
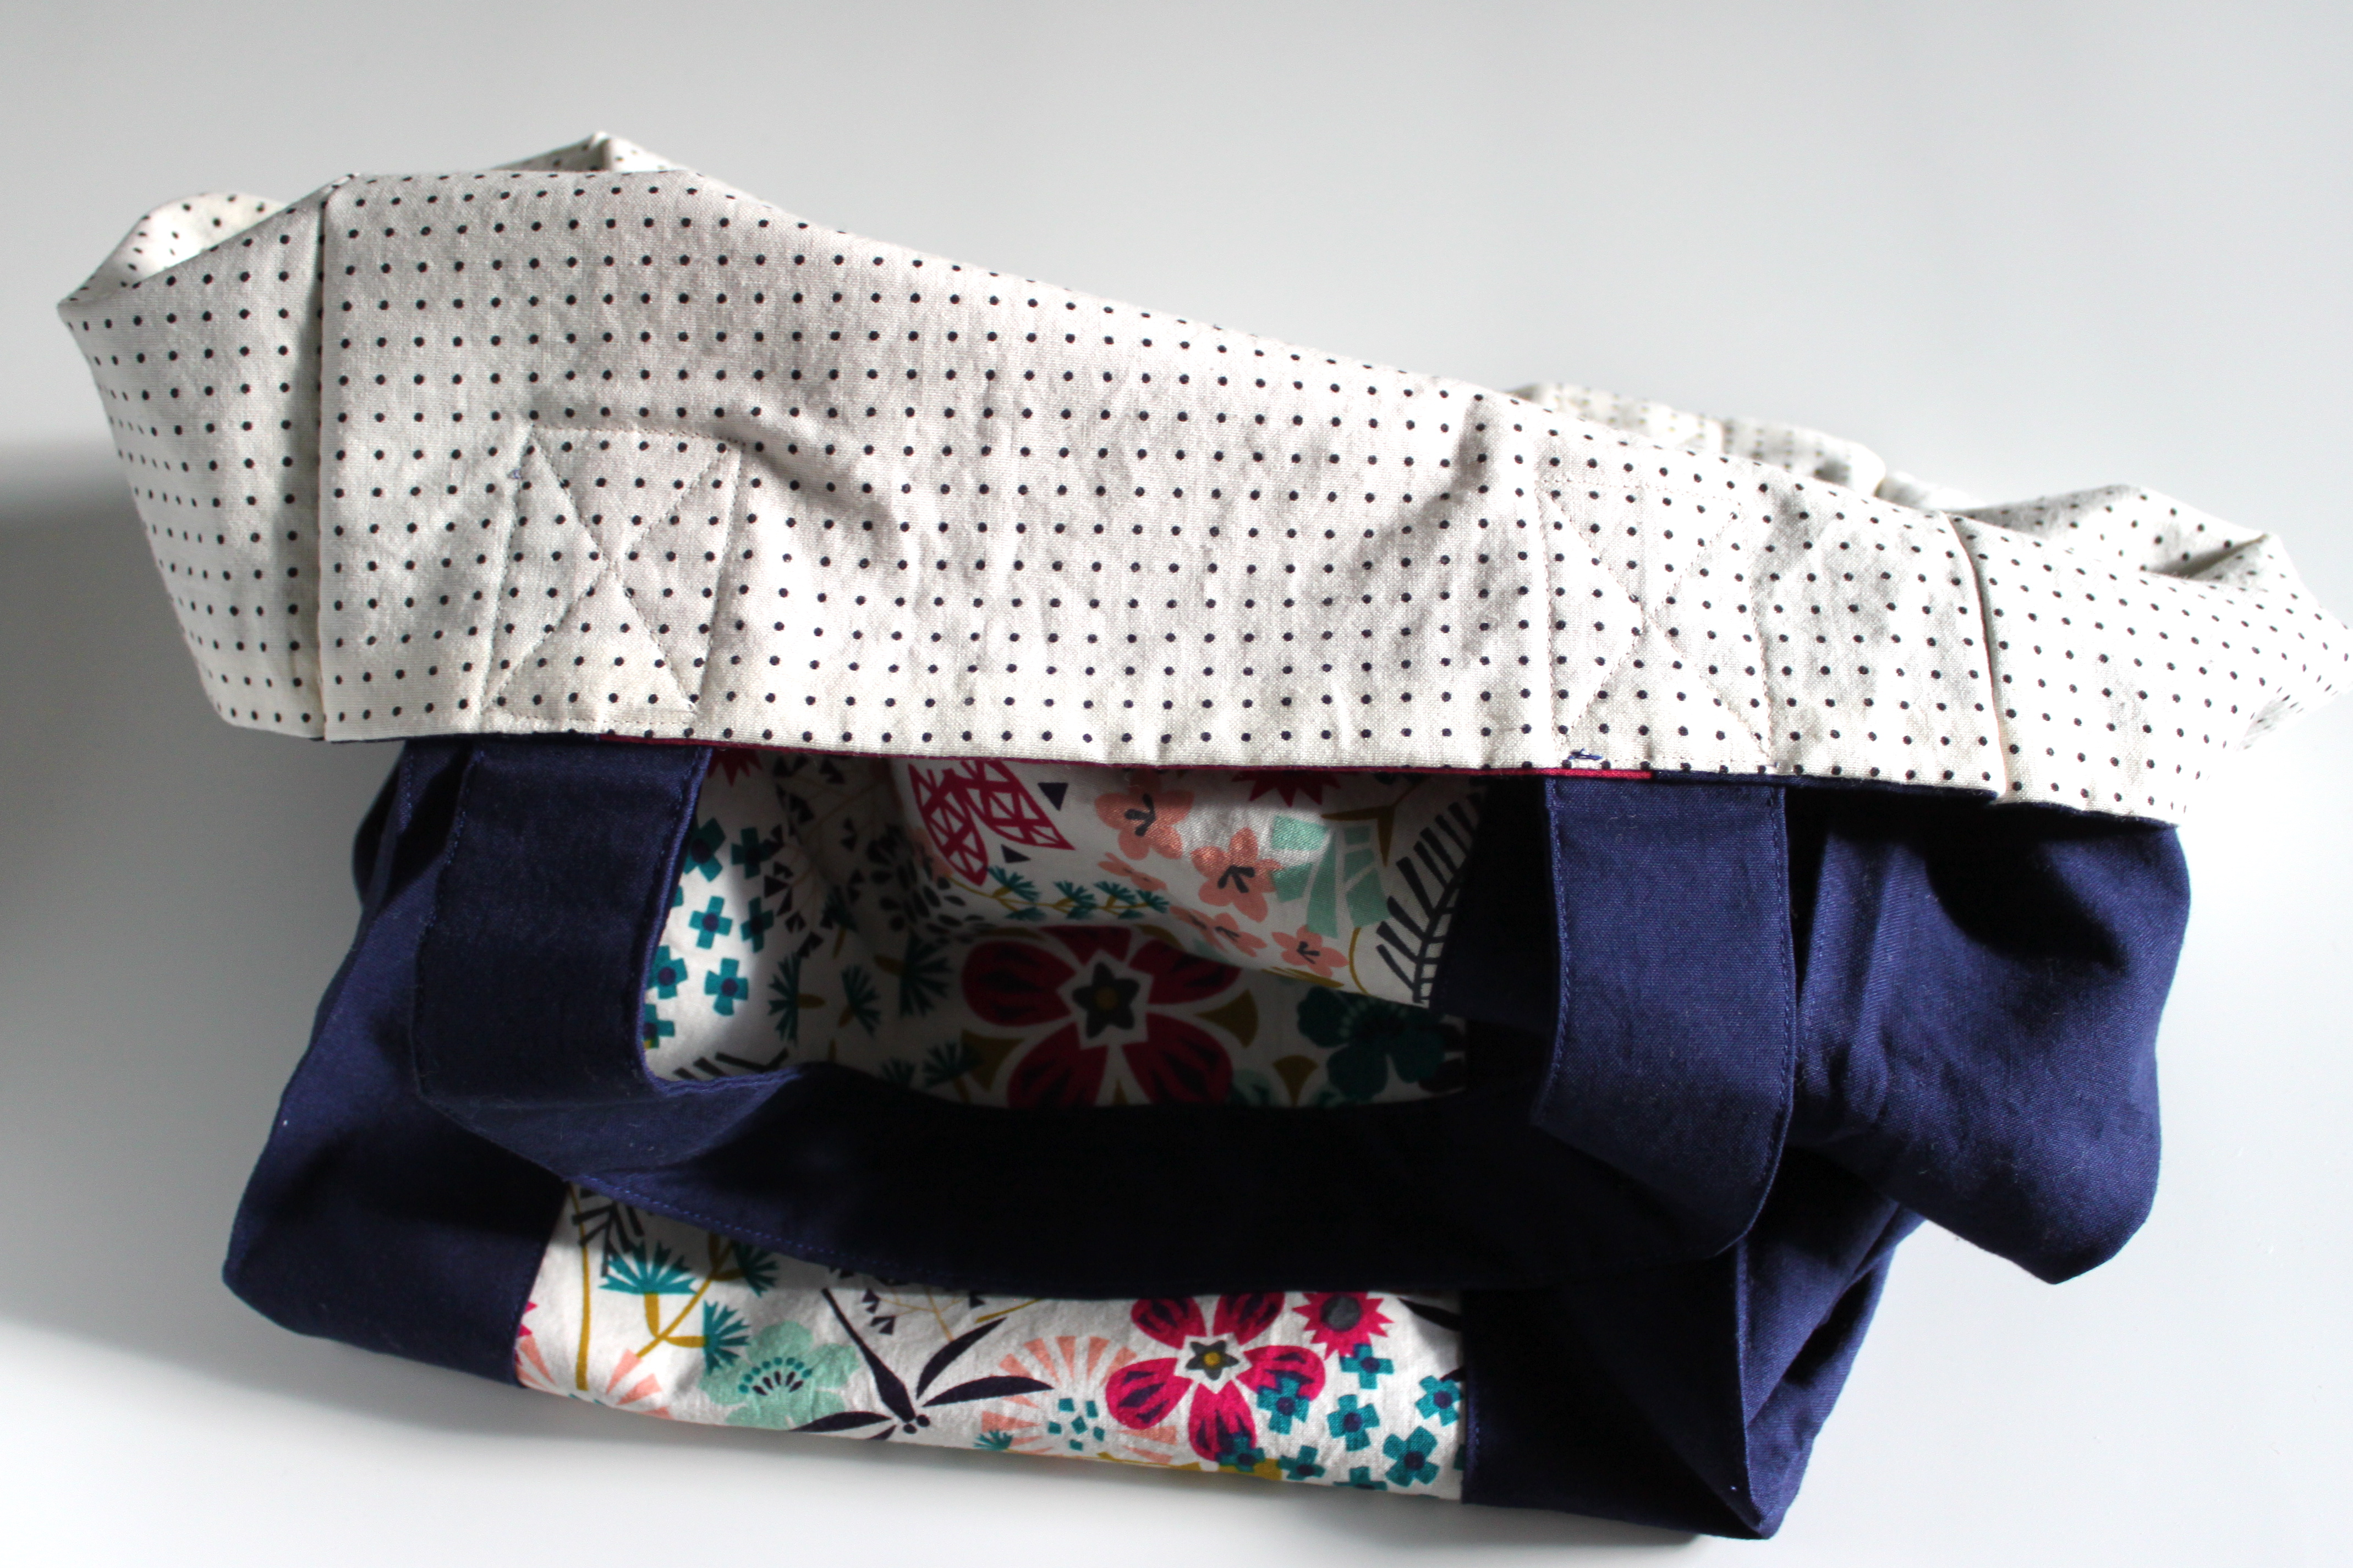
The tote bag, pictured below, incorporates the same fabrics I used in the quilt. The center rectangle was the floral, from Rashida Coleman-Hale’s Koi collection, and was surrounded by borders in the navy solid and the black dot, from Zen Chic’s Comma collection. (In the end, I bound the quilt with a fushia solid, visible in the second tote pic below.)

Photo courtesy of Leland Ave Studios

I marked the quilt with my trusty white Chaco Liner, from Clover, and a yellow version of the same tool, which I had bought specifically for this project. I love Chaco Liners. I find them easier to work with than white pencils or Hera Markers, and I never had a problem with them until I washed this quilt.

I did not follow the manufacturer’s recommendation and test the yellow Chaco Liner before use, and it washed out of the floral print but not the Zen Chic fabric. I was devastated. I did unspeakable things to that quilt in attempt to remedy the situation. I used commercial stain removers. I used a homemade hydrogen peroxide mixture. By the end, the yellow lines remained, and due to my interventions, some of the colors in the floral had begun to bleed. Sigh.

Here’s the thing: I gave the quilt to my friend anyway. It didn’t meet my expectations as the product of my creativity, but it still had a purpose to serve. The heinous yellow lines did not affect its performance as a quilt!

Plus, I made this quilt especially for Miss L. It was an expression of my love for her. Keeping it for myself because it didn’t turn out as planned was not an option.

Granted, I was too heartbroken to take a picture of the quilt. It doesn’t appear in my list of finished quilts here. But my friend was clearly touched by this gift, and that eclipsed the mishap with the yellow Chaco Liner. So there was a happy ending after all.

Actually, there were two. I had enough scraps for a tote bag, which I gifted to another friend just recently. I didn’t know at the time, but this friend was having a rough spell. (Children + illness = long days for mamas!) I could have buried both the yellow-marked quilt and remaining fabric bits at the bottom of my fabric stash. I’m happy, though, that I followed through with gifting the original quilt project and then made a second project that features the same lovely fabric combination.

Photo courtesy of Leland Ave Studios

Amy, over at 13 Spools, recently encouraged her readers to embrace their mistakes. The example she gives, however, is more of a design decision that she ended up disliking. Mine is more of a marking-tool malfunction, a mistake that could have been avoided. Can you relate to one or the other? I’d love to hear your experience along either vein and how you handled it!

Linking up to Finish It Up Friday and Let’s Bee Social ...

Follow on Bloglovin

Tuesday, December 2, 2014

A Winner and Procrastination 101

First off, the winner of the PDF copy of Meadow Mist Designs’ Looking Glass pattern is mfhagopian.

Congratulations! I’ve sent you an email with your PDF.

And second, a word on procrastination ...

It’s amazing what you can accomplish when you’re avoiding a tough task. And by that I mean, it’s amazing what I can accomplish when I’m avoiding learning how to free-motion quilt.

In the past few weeks when I have not been learning to FMQ, I have been:

•    Finishing 20 tissue cozies for my son’s preschool staff for Christmas
•    Cutting and piecing the quilt top for a Christmas present
•    Mending items that were damaged so long ago I was surprised to learn that (a) they still fit and (b) they are still in style

Of the items in that list, the most interesting project is the new quilt top ...


My mother-in-law asked that I make her a quilt, and when I saw a version of this one on Instagram, I thought it fit the bill. I needed something that would work in a formal, more traditional décor with an Asian flair. With the help of Corey, of Little Miss Shabby, and Dorie, of Tumbling Blocks, I managed to track the pattern down to Pam and Nicky Lintott’s 2008 book, Jelly Roll Quilts.


The version in the book, as well as those by Corey and Dorie, have a scrappy feel to them, which doesn’t suit my mother-in-law’s taste. I chose to incorporate fewer fabrics and use matching fabrics in each layer of the flower. Doing so, I think, instantly makes it a more tailored quilt.

I still haven’t decided how to quilt it. I am (finally) experimenting with FMQ—not on real quilts but on ugly fabric and leftover batting. I suspect I’ll use a combination of straight-line quilting and FMQ ... if I become proficient enough in the very near future. (Did I mention this is a Christmas gift?!)

What’s your knee-jerk reaction? How would you quilt this one?

Update: You can view the final quilt here.

Linking up to Sew Cute Tuesday, Let’s Bee Social, WIP Wednesday, Monday Makers, and Needle and Thread Thursday ...

Follow on Bloglovin

Monday, November 24, 2014

Fraidy Cat for Color

Cheryl’s first Looking Glass quilt,
featuring Into the Woods, by Lella Boutique for Moda
You can’t say I’ve led you astray. I’ve been completely honest about this: I am afraid of color.

I can handle a little color. Four rooms in my house are painted a shade of yellow (five are a shade of beige). I wore a bold red shirt this week (under a navy hoodie). When it comes to my quilts, this tendency translates into slabs of white and negative space. My preferred fabric to achieve this result? Some Kona Snow, please.

When I offered to test the latest quilt pattern from Cheryl Brickey, of Meadow Mist Designs, I thought I was headed in the right direction. I bought a layer cake of Bonnie Christine’s Winged and yardage of Kona Snow. When it came time to join the pieced rows to the sashing, however, I got cold feet. I feared there was too much going on color-wise—light teal, medium teal, deep eggplant, salmon, pale coral, gray, aqua, yellow!—and sent out a call for feedback. (Many thanks to those of you who chimed in!)

In the end, I decided to split the five pieced rows between the quilt top and backing instead of following the pattern. The top features three rows broken up by chunks of Kona Snow.


The back highlights the remaining two rows sashed with Kona Sage.


The result is true to my gut feeling about the fabrics I was working with, but it doesn’t make me the most helpful pattern tester! My next step is to learn how to free-motion quilt so I can finish this project up in time for Christmas. (My procrastination efforts on this front have been most effective.)

If you would like to try your hand at Looking Glass, Cheryl is offering this pattern for $5.50, a special price good through December 6. It’s available on both Etsy and Craftsy. This pattern works well with layer cakes or charm squares. If you start today, it’s definitely doable by Christmas. : )

To celebrate the release of this pattern, Cheryl is giving away a PDF version of Looking Glass to one From Bolt to Beauty reader (my first giveaway!). To enter, include a comment on this post, sharing with us your top sewing or quilting priority at the moment. If you’re a no-reply blogger, please include your email address so I can contact you if you win. This giveaway will remain open through Monday, December 1. I’ll post the winner here on my blog and contact him or her via email on Tuesday, December 2.

Update: The giveaway is closed. The winner is mfhagopian. Congratulations!

I am just one stop on the Looking Glass blog hop. To see other testers’ quilts, and for additional chances to win the pattern for yourself, visit the other participants:

Friday, November 21: Cheryl @ Meadow Mist Designs
Saturday, November 22: Lin @ Lin’s Quilts
Sunday, November 23: Beth @ Cooking Up Quilts
Monday, November 24: Anna @ Fresh Dew Drops
Tuesday, November 25: Chelsea @ Patch the Giraffe
Wednesday, November 26: Shauna @ Shauna’s World
Friday, November 28: Shelley @ The Carpenter’s Daughter Who Quilts

Linking up to Sew Cute Tuesday, WIP Wednesday, and Let’s Bee Social ...

Follow on Bloglovin

Friday, November 21, 2014

Oldies but Goodies

My stint as a knitter was illustrious but brief. I loved making scarves and baby hats and even more scarves. My arms, however, couldn’t keep up with all the repetitive motions. After more doctor appointments than I can now remember, I had to acquiesce: I wasn’t a knitter after all.

My friend Miss C has had the opposite experience. As an art-school graduate and graphic designer, this lady knows her way around a sewing machine. Her arms are on board but her heart isn’t: she’d rather knit and pearl than thread her vintage Singer any day.

Miss C and I, we make a good pair. She welcomes my knitting and graphic-design needs and knows where to go when she wants something sewn. So far in the bargain, I’ve received a fancy-pants header for my blog as well as a big box of fabric-y goodness. I will transform some of this, most notably the unidentified print with the Matryoshka dolls, into pillows for Miss C’s living room. But I have yet to determine the destinies of the rest of these older-but-still-beautiful fabrics.


When I first opened the package from Miss C, I spied various Marimekko designs. My favorite is a red fabric with 11” red dots on it. This swath is a generous 54” in width. The repeat is huge, and photographing it requires more ironing than I can be bothered with. You’ll have to wait until I use it in a project to see it. : )

Other highlights include a fat quarter of Heather Bailey’s Freshcut ...

 
... and this lovely unidentified green print.


The real gold in this booty? Denyse Schmidt.


There are three fat quarters of Katie Jump Rope, which I should have stockpiled by the bolt when it was released. I know I won’t cut into these anytime soon; I’ll visit them regularly in my stash cabinet, though. And there are 2 yards of Flea Market Fancy. I don’t know what to say about such a find—something so coveted and so large!—other than WOW.

Rediscovering out-of-production fabric designs is like spending time with old friends. Man, it makes me happy. I have my sources other than Miss C, both online and brick and mortar, for older bolts. I’ve shown great self-control on that front of late—passing up on bolts of Tula Pink, Anna Maria Horner, and Denyse Schmidt—as my friend Sarah at Smiles Too Loudly can attest to.

How about you? What oldies but goodies do you covet or have to buy when you encounter them?

Linking up to ...

http://www.mollisparkles.com/2014/11/sunday-stash-100-sensuede.html


Follow on Bloglovin

Sunday, November 16, 2014

X Marks the Spot

There are so many contests and sew-alongs in the quilty corner of the blogosphere. I often find it difficult in deciding what to participate in and what to let pass me by.

It’s hard to say no to Le Challenge, however. Each month, the creators of Le Challenge—Lucy of Charm About You and Nat of Made in Home—post a theme. Crafters then interpret that theme, sometimes in very different ways, and post a project in line with it the next month. Previous themes have included nature, charity, and small.

I joined the party back in September, when the theme was era, and made a Rubik’s cube Christmas ornament. In October, the theme was mix, and I made a Christmas tree of cross-stitch blocks. (The tutorial is available here.) And then the theme for November was revealed: X.

The beauty of that—for me!—was my October project fit the bill for November. So I made another Christmas tree of cross-stitch blocks. The first one will be gifted. This second one is for me, me, me!


I like working with the tiny 2½” cross-stitch blocks. My seams match up well, but my Xs are a bit off in places. I think that would bug me if the blocks were bigger. Somehow the dense patchwork of smaller squares seems more forgiving. I stitched in the ditch, as I did with my first tree. Admittedly, that part was a little annoying. I like stitching in the ditch, but the seams in this project are bulky, and it shows in my quilting lines.


I still have a stack of cross-stitch blocks in Christmas fabrics waiting to be made into something. With two quilts to wrap up before Christmas 2014, I think those X’s will have to wait until Christmas 2015.

With one submission for Le Challenge complete, I opted to make a second one that interpreted the theme completely differently. X can also represent the Roman numeral for 10, so I made 10 quilted tissue holders as teacher gifts for Christmas (my goal is to make 20!) ...


These are identical to the tissue cozies I made last month for myself and are based on this tutorial from Leland Ave Studios.

Lucy and Nat have unveiled December’s theme: ink. I have zero idea what I might do for that. If you have a suggestion, I’m all ears. Share it in the comments below, or post it to the Le Challenge blog!

http://www.le-challenge.blogspot.com/2014/10/le-challenge-16-mix.html


Follow on Bloglovin

Saturday, November 15, 2014

Getting Smarter About Stashing

When I started sewing, I did a lot of bags and home-dec projects. (I still make a lot of bags and I am in denial about the home-dec projects I should be working on. It’s been seven window-treatment-less months in my family room now. Alas!)

Those projects were not conducive to establishing a stash because they often required at least a yard of a particular print. My selections at that time were haphazard. I bought what I liked and chose the amount to buy whimsically. I even invested in fat quarters, which were not particularly helpful for the projects I was making. I still find myself today using some of those fats that were purchased six, seven, eight years ago.

Now I’m a quilter and I’ve gotten smarter. Fats are appealing, but I try not to stash them; half-yards work better for me and my projects. And although my stash contains many designs purchased only because I like them, I try to focus on almost-solids. They have a longevity that the latest and greatest can’t always offer. (I’m convinced that in 10 years we’re going to look back at our owl-adorned quilts and sewing projects and think, “What the heck?!”) I’d argue that those sensible almost-solids can also transform a good quilt into a great one, offering a visual interest that even the best solid can’t.

I put my stashing instincts to the test at Sew Fresh Fabrics’ going-out-of-business sale.

First up: oranges, aquas, and teals. I have been obsessed with these colors lately. (Click here for a recent orange project, here for an aqua one, and here for a teal one.) From left to right, I scored selections from Comma by Zen Chic, Juggling Summer by Zen Chic, Acacia by Tula Pink, and Fox Field by Tula Pink. Actually, I like Tula’s scribbles so much that I got the hot-pink colorway, too.


My favorite is the fabric from Juggling Summer. Eep—I adore this and wish I had bought a full yard!


I also purchased Lizzy House’s butterflies in two different colorways, convinced that they’ll soon disappear from store shelves. Little did I know that Andover plans to release that design in a slew of new colorways next spring. Woo hoo! These two pretties will soon have some sisters.


How about you? What is your stashing strategy, or are you one of those disciplined quilters with a slim stash?

Linking up to ...

http://www.mollisparkles.com/2014/11/sunday-stash-100-sensuede.html


Follow on Bloglovin

Monday, November 10, 2014

Tutorial: A Gift Bag for Beer Lovers

If you’re like me, you have at least one occasion each holiday season to thank a friend for his or her hospitality with a bottle of wine. And if you’re like me, you think that the addition of a handmade bag elevates that gift to a new level.


May I make a suggestion, though? If I invite you to my house for the holidays, skip the wine—and bring a six-pack instead. Don’t get me wrong: my husband and I would appreciate the wine and we’d eventually open it, but we’re beer drinkers at heart. (And while I’m making suggestions, I prefer something nice and hoppy; my husband goes for amber ales!)

And just because you’re toting beer instead of wine doesn’t mean you have to skip the handmade gift wrap. Using felt and a little pearl cotton, you can make a gift bag for the beer lovers in your life. In fact, you will probably spend more time making your beer selection than you will whipping up this project.

Materials

28½” x 26” rectangle of acrylic felt
Contrasting thread
Pinking shears
Pearl cotton

These instructions are for a beer carrier whose bottom dimensions are 7½” x 5” (from my research, this is a standard size).

Instructions

Take your 28½” x 26” rectangle of acrylic felt. From each of the four corners, cut out a square that measures 10¼” x 10¼”. (I found it easiest to use my white Chaco liner to mark the cut lines on the wrong side of the felt.) The result will be a cross that looks like the picture below:


Pink the very tip of each side with your pinking shears.


Embellish the bag as you desire. I free-handed snowflakes in pearl cotton on one of the long sides of the gift bag. I made sure to embellish away from the yet-to-be-sewn sides, to ensure my embroidery wouldn’t later end up in the seam allowance. The sides of my beer carrier are 5½” tall; I made sure to place my snowflakes so that the wrong side of the embroidery wouldn’t be visible when the beer carrier was inside the gift bag.


Now, using thread in a contrasting color, sew the side seams together. To do this, match the top edges of two adjacent sides with the wrong sides together and pin. Start sewing a ¼” seam at the bottom corner and work your way out to the top, back-stitching at both ends. (I think a longer stitch length looks best on this project.) Repeat until all four seams are sewn.


Insert your six-pack of beer (the weight of the bottles will help you here). The beer carrier will fit very snuggly in the felt gift bag. This is by design: the tight fit allows you to carry the beer by the handle without losing the gift bag.


Happy gift giving!

Linking up to Sew Cute Tuesday, Let’s Bee Social, Needle and Thread Thursday, Finish It Up Friday, TGIFF at Quilt Matters, and Ho Ho Ho and on We Sew ...

Follow on Bloglovin