Monday, November 24, 2014

Fraidy Cat for Color

Cheryl’s first Looking Glass quilt,
featuring Into the Woods, by Lella Boutique for Moda
You can’t say I’ve led you astray. I’ve been completely honest about this: I am afraid of color.

I can handle a little color. Four rooms in my house are painted a shade of yellow (five are a shade of beige). I wore a bold red shirt this week (under a navy hoodie). When it comes to my quilts, this tendency translates into slabs of white and negative space. My preferred fabric to achieve this result? Some Kona Snow, please.

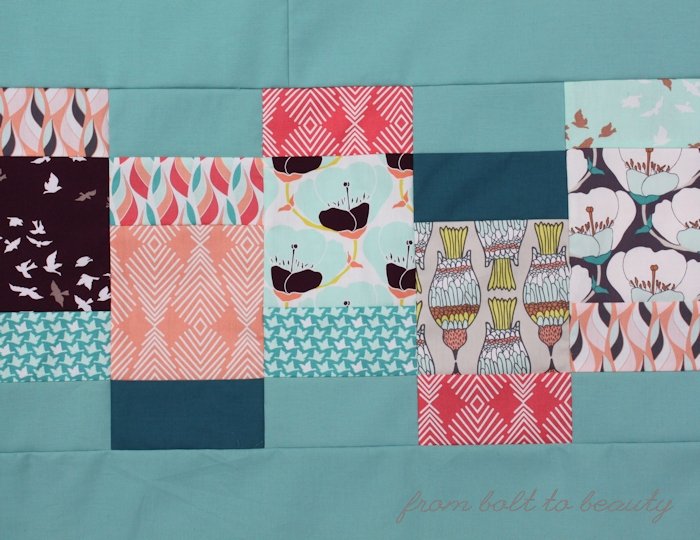
When I offered to test the latest quilt pattern from Cheryl Brickey, of Meadow Mist Designs, I thought I was headed in the right direction. I bought a layer cake of Bonnie Christine’s Winged and yardage of Kona Snow. When it came time to join the pieced rows to the sashing, however, I got cold feet. I feared there was too much going on color-wise—light teal, medium teal, deep eggplant, salmon, pale coral, gray, aqua, yellow!—and sent out a call for feedback. (Many thanks to those of you who chimed in!)

In the end, I decided to split the five pieced rows between the quilt top and backing instead of following the pattern. The top features three rows broken up by chunks of Kona Snow.


The back highlights the remaining two rows sashed with Kona Sage.


The result is true to my gut feeling about the fabrics I was working with, but it doesn’t make me the most helpful pattern tester! My next step is to learn how to free-motion quilt so I can finish this project up in time for Christmas. (My procrastination efforts on this front have been most effective.)

If you would like to try your hand at Looking Glass, Cheryl is offering this pattern for $5.50, a special price good through December 6. It’s available on both Etsy and Craftsy. This pattern works well with layer cakes or charm squares. If you start today, it’s definitely doable by Christmas. : )

To celebrate the release of this pattern, Cheryl is giving away a PDF version of Looking Glass to one From Bolt to Beauty reader (my first giveaway!). To enter, include a comment on this post, sharing with us your top sewing or quilting priority at the moment. If you’re a no-reply blogger, please include your email address so I can contact you if you win. This giveaway will remain open through Monday, December 1. I’ll post the winner here on my blog and contact him or her via email on Tuesday, December 2.

Update: The giveaway is closed. The winner is mfhagopian. Congratulations!

I am just one stop on the Looking Glass blog hop. To see other testers’ quilts, and for additional chances to win the pattern for yourself, visit the other participants:

Friday, November 21: Cheryl @ Meadow Mist Designs
Saturday, November 22: Lin @ Lin’s Quilts
Sunday, November 23: Beth @ Cooking Up Quilts
Monday, November 24: Anna @ Fresh Dew Drops
Tuesday, November 25: Chelsea @ Patch the Giraffe
Wednesday, November 26: Shauna @ Shauna’s World
Friday, November 28: Shelley @ The Carpenter’s Daughter Who Quilts

Linking up to Sew Cute Tuesday, WIP Wednesday, and Let’s Bee Social ...

Follow on Bloglovin

Friday, November 21, 2014

Oldies but Goodies

My stint as a knitter was illustrious but brief. I loved making scarves and baby hats and even more scarves. My arms, however, couldn’t keep up with all the repetitive motions. After more doctor appointments than I can now remember, I had to acquiesce: I wasn’t a knitter after all.

My friend Miss C has had the opposite experience. As an art-school graduate and graphic designer, this lady knows her way around a sewing machine. Her arms are on board but her heart isn’t: she’d rather knit and pearl than thread her vintage Singer any day.

Miss C and I, we make a good pair. She welcomes my knitting and graphic-design needs and knows where to go when she wants something sewn. So far in the bargain, I’ve received a fancy-pants header for my blog as well as a big box of fabric-y goodness. I will transform some of this, most notably the unidentified print with the Matryoshka dolls, into pillows for Miss C’s living room. But I have yet to determine the destinies of the rest of these older-but-still-beautiful fabrics.


When I first opened the package from Miss C, I spied various Marimekko designs. My favorite is a red fabric with 11” red dots on it. This swath is a generous 54” in width. The repeat is huge, and photographing it requires more ironing than I can be bothered with. You’ll have to wait until I use it in a project to see it. : )

Other highlights include a fat quarter of Heather Bailey’s Freshcut ...

 
... and this lovely unidentified green print.


The real gold in this booty? Denyse Schmidt.


There are three fat quarters of Katie Jump Rope, which I should have stockpiled by the bolt when it was released. I know I won’t cut into these anytime soon; I’ll visit them regularly in my stash cabinet, though. And there are 2 yards of Flea Market Fancy. I don’t know what to say about such a find—something so coveted and so large!—other than WOW.

Rediscovering out-of-production fabric designs is like spending time with old friends. Man, it makes me happy. I have my sources other than Miss C, both online and brick and mortar, for older bolts. I’ve shown great self-control on that front of late—passing up on bolts of Tula Pink, Anna Maria Horner, and Denyse Schmidt—as my friend Sarah at Smiles Too Loudly can attest to.

How about you? What oldies but goodies do you covet or have to buy when you encounter them?

Linking up to ...

http://www.mollisparkles.com/2014/11/sunday-stash-100-sensuede.html


Follow on Bloglovin

Sunday, November 16, 2014

X Marks the Spot

There are so many contests and sew-alongs in the quilty corner of the blogosphere. I often find it difficult in deciding what to participate in and what to let pass me by.

It’s hard to say no to Le Challenge, however. Each month, the creators of Le Challenge—Lucy of Charm About You and Nat of Made in Home—post a theme. Crafters then interpret that theme, sometimes in very different ways, and post a project in line with it the next month. Previous themes have included nature, charity, and small.

I joined the party back in September, when the theme was era, and made a Rubik’s cube Christmas ornament. In October, the theme was mix, and I made a Christmas tree of cross-stitch blocks. (The tutorial is available here.) And then the theme for November was revealed: X.

The beauty of that—for me!—was my October project fit the bill for November. So I made another Christmas tree of cross-stitch blocks. The first one will be gifted. This second one is for me, me, me!


I like working with the tiny 2½” cross-stitch blocks. My seams match up well, but my Xs are a bit off in places. I think that would bug me if the blocks were bigger. Somehow the dense patchwork of smaller squares seems more forgiving. I stitched in the ditch, as I did with my first tree. Admittedly, that part was a little annoying. I like stitching in the ditch, but the seams in this project are bulky, and it shows in my quilting lines.


I still have a stack of cross-stitch blocks in Christmas fabrics waiting to be made into something. With two quilts to wrap up before Christmas 2014, I think those X’s will have to wait until Christmas 2015.

With one submission for Le Challenge complete, I opted to make a second one that interpreted the theme completely differently. X can also represent the Roman numeral for 10, so I made 10 quilted tissue holders as teacher gifts for Christmas (my goal is to make 20!) ...


These are identical to the tissue cozies I made last month for myself and are based on this tutorial from Leland Ave Studios.

Lucy and Nat have unveiled December’s theme: ink. I have zero idea what I might do for that. If you have a suggestion, I’m all ears. Share it in the comments below, or post it to the Le Challenge blog!

http://www.le-challenge.blogspot.com/2014/10/le-challenge-16-mix.html


Follow on Bloglovin

Saturday, November 15, 2014

Getting Smarter About Stashing

When I started sewing, I did a lot of bags and home-dec projects. (I still make a lot of bags and I am in denial about the home-dec projects I should be working on. It’s been seven window-treatment-less months in my family room now. Alas!)

Those projects were not conducive to establishing a stash because they often required at least a yard of a particular print. My selections at that time were haphazard. I bought what I liked and chose the amount to buy whimsically. I even invested in fat quarters, which were not particularly helpful for the projects I was making. I still find myself today using some of those fats that were purchased six, seven, eight years ago.

Now I’m a quilter and I’ve gotten smarter. Fats are appealing, but I try not to stash them; half-yards work better for me and my projects. And although my stash contains many designs purchased only because I like them, I try to focus on almost-solids. They have a longevity that the latest and greatest can’t always offer. (I’m convinced that in 10 years we’re going to look back at our owl-adorned quilts and sewing projects and think, “What the heck?!”) I’d argue that those sensible almost-solids can also transform a good quilt into a great one, offering a visual interest that even the best solid can’t.

I put my stashing instincts to the test at Sew Fresh Fabrics’ going-out-of-business sale.

First up: oranges, aquas, and teals. I have been obsessed with these colors lately. (Click here for a recent orange project, here for an aqua one, and here for a teal one.) From left to right, I scored selections from Comma by Zen Chic, Juggling Summer by Zen Chic, Acacia by Tula Pink, and Fox Field by Tula Pink. Actually, I like Tula’s scribbles so much that I got the hot-pink colorway, too.


My favorite is the fabric from Juggling Summer. Eep—I adore this and wish I had bought a full yard!


I also purchased Lizzy House’s butterflies in two different colorways, convinced that they’ll soon disappear from store shelves. Little did I know that Andover plans to release that design in a slew of new colorways next spring. Woo hoo! These two pretties will soon have some sisters.


How about you? What is your stashing strategy, or are you one of those disciplined quilters with a slim stash?

Linking up to ...

http://www.mollisparkles.com/2014/11/sunday-stash-100-sensuede.html


Follow on Bloglovin

Monday, November 10, 2014

Tutorial: A Gift Bag for Beer Lovers

If you’re like me, you have at least one occasion each holiday season to thank a friend for his or her hospitality with a bottle of wine. And if you’re like me, you think that the addition of a handmade bag elevates that gift to a new level.


May I make a suggestion, though? If I invite you to my house for the holidays, skip the wine—and bring a six-pack instead. Don’t get me wrong: my husband and I would appreciate the wine and we’d eventually open it, but we’re beer drinkers at heart. (And while I’m making suggestions, I prefer something nice and hoppy; my husband goes for amber ales!)

And just because you’re toting beer instead of wine doesn’t mean you have to skip the handmade gift wrap. Using felt and a little pearl cotton, you can make a gift bag for the beer lovers in your life. In fact, you will probably spend more time making your beer selection than you will whipping up this project.

Materials

28½” x 26” rectangle of acrylic felt
Contrasting thread
Pinking shears
Pearl cotton

These instructions are for a beer carrier whose bottom dimensions are 7½” x 5” (from my research, this is a standard size).

Instructions

Take your 28½” x 26” rectangle of acrylic felt. From each of the four corners, cut out a square that measures 10¼” x 10¼”. (I found it easiest to use my white Chaco liner to mark the cut lines on the wrong side of the felt.) The result will be a cross that looks like the picture below:


Pink the very tip of each side with your pinking shears.


Embellish the bag as you desire. I free-handed snowflakes in pearl cotton on one of the long sides of the gift bag. I made sure to embellish away from the yet-to-be-sewn sides, to ensure my embroidery wouldn’t later end up in the seam allowance. The sides of my beer carrier are 5½” tall; I made sure to place my snowflakes so that the wrong side of the embroidery wouldn’t be visible when the beer carrier was inside the gift bag.


Now, using thread in a contrasting color, sew the side seams together. To do this, match the top edges of two adjacent sides with the wrong sides together and pin. Start sewing a ¼” seam at the bottom corner and work your way out to the top, back-stitching at both ends. (I think a longer stitch length looks best on this project.) Repeat until all four seams are sewn.


Insert your six-pack of beer (the weight of the bottles will help you here). The beer carrier will fit very snuggly in the felt gift bag. This is by design: the tight fit allows you to carry the beer by the handle without losing the gift bag.


Happy gift giving!

Linking up to Sew Cute Tuesday, Let’s Bee Social, Needle and Thread Thursday, Finish It Up Friday, TGIFF at Quilt Matters, and Ho Ho Ho and on We Sew ...

Follow on Bloglovin

Friday, November 7, 2014

Slow (to Think About) Sewing

In the past few months, Sew Mama Sew launched a Slow Sewing series, features that explore subjects like organic cotton farming and the benefits of having many WIPs. If I had to boil the series down to its most central concept, though, slow sewing means sewing by hand.

And I can honestly say I avoid that at all costs.
 
Why make one when I can make three?

If a pattern requires a little blind stitching to finish off a gap in a seam for turning, I top-stitch with my machine around the entire project instead. If a designer touts the look of hand applique on a bag or quilt, I sketch-stitch with my Janome. I’d rather work on my machine-quilting skills instead of trying to get my hand-quilting stitches nice and even. And in all honesty, hand sewing is hard on my body. That repetitive motion takes its toll, not unlike the keyboard I’m composing at right now.

But there’s one aspect of my creative process that is slow. I like to mull over project ideas, design decisions, and fabric choices (especially fabric choices!) as I work on a project. To hurry a bag or quilt along without giving my brain the time it needs to work things out seems dishonest to who I am as a creator.

Take one of the projects on my sewing table this week: three tote bags. I spotted them first on Instagram and was happy to learn that the designer, Sue of Sweet Jane’s Quilting, provided a tutorial. They seemed like a great way to both use up some old Brannock and Patek jelly-roll strips I discovered I had and bang out a Christmas present or two in the process.

These are simple bags. They are fairly quick to sew. So why did it take me nearly a week to create all three? Because I’m slow to think about sewing.

Here’s how the week panned out:
  • Sunday evening: I decided to make two bags and laid out the red, green, and taupe jelly-roll strips, arranging and rearranging until I liked what I saw. Then I did some cutting (admittedly, this was premature for my creative process!) and slept on my decisions. 
  • Early Monday morning: I realized that one of the collections of jelly-roll strips was horrid! I edited some of those already-cut fabrics out and added in others. I labored over which fabric to use as that thin horizontal strip separating the top exterior fabric from the vertically pieced bottom ones.
  • In the last moments of crafting time on Monday: I had an epiphany! I could put those strips from the black colorway to good use. Pairing them with some scraps of Little Black Dress (by Basic Grey for Moda), I realized I had a third bag to make.
  • Early Tuesday morning: I started writing this post. For real. The fabric wasn’t halfway on the road to becoming bags, but I like to take my time thinking about my writing just as I do with my sewing projects.

I’ll spare you the rest of the blow-by-blow account. Let’s just say I finished my first bag on Thursday and my third and final bag on Friday (and worked on a variety of other WIPs in the process).

This design and the fabrics are more traditional than I usually trend, but I’m super happy with the results. In fact, I think I will gift the black one to myself. : )

If you decide to have a go at this tote tutorial, it’s worth noting that I opted not to quilt my bags. Instead, I used Pellon’s Shape Flex on the back of both the pieced exterior and the lining.

Picking out the lining fabric is almost as much fun as the exterior fabrics

How fast—or slow—do you approach a single project? I’d love to hear your take, even if you’re one of those quilters who can bang out something in, like, a week. (I’m so jealous!)

Linking up to Finish It Up Friday and TGIFF at Quokka Quilts ...

Follow on Bloglovin

Tuesday, November 4, 2014

Some Scrappy Self-Discipline

At some point in the past year, the scrap scene at my house spiraled out of control. I had imposed a rule on myself a while ago: I could only keep scraps that were at least 2½” x 2½”. After all, would I really use anything smaller than that?

Someday these will be a quilt

What has since muddled my judgment? I think it was piecing my Penny Sampler, in all of its paper-pieced glory. During that project, I found myself using—and as a result, collecting—tiny bits of fabric.

I decided over the weekend to remedy the disorder in my scrap collection. (The fact that I have in the works a thousand more important projects with a holiday deadline didn’t sway me from this goal. I may be a little lacking in the reality-skills department!) In general, I organize my scraps by color in clear plastic bags and store those bags in a big plastic bin. It’s completely unsexy, but it works for me.

While examining those bags, I unearthed fabrics for two projects. First, I found enough 6½” x 7” rectangles to make quilted tissue holders for the 20-plus staff members at my younger guy’s preschool. Making these tissue cozies is addictive, and sewing 20 of them is doable by Christmas break, some six weeks away.

Second, I found and cut many, many squares for Obsession, the project pictured below, from Laura Jane Taylor’s Quilt-opedia.

Obsession, from Laura Jane Taylor’s Quilt-opedia

I originally discovered that quilt on Kinda Quilty. It’s a scrappy project that appeals to me. Although it uses many different fabrics, there is still an overarching design and unifying color palette. It’s also a great project for using some of the low-volume charms from the swap Chelsea and I organized last month. (That swap is over, but we’re hoping to run another in the new year. I’ll keep you posted.) I have zero time to begin constructing this quilt right now, so I’m shooting for a January 2015 start.

Farewell, beautiful fabric—see you next year!

Two Three things in conclusion ...

How do you tame your scraps? What do you keep, and what do you toss? (I threw out some slivers of Denyse Schmidt’s Chicopee and Hope Valley lines, and it about killed me!)

Also, have you voted for your favorites at the Blogger’s Quilt Festival at Amy’s Creative Side yet? One of the contestants is Kinda Quilty’s version of Obsession. Many of my blogging besties also submitted quilts. Check out the festival for some good quilty inspiration, and cast your vote for your favorites through November 7.

Update: So I was just on the Lark Crafts blog, and there’s a giveway for John Q. Adams’ Pretty in Patchwork: Holidays. Few people have commented for a chance to win. But hurry—the giveaway closes on Wednesday, November 5, at 9 p.m. EST.

Linking up to Let’s Bee Social, WIP Wednesday, and Needle and Thread Thursday ...

Follow on Bloglovin