
Fusing the Interfacing
If bag making is new to you, you may not have had an occasion to use interfacing. Don’t be intimidated by the thought of fusing it to your beautiful project pieces. I use the same product Anna uses—Pellon Shape-Flex, SF101—because I have a bolt of it at the ready. The Shape-Flex instructions provide more detail than we need for the application here. All you really need to do is (1) cut the interfacing the same dimensions as the piece you’re adhering it to and (2) use a pressing cloth to press each bit of the interfacing for 10 seconds. Now, the directions also say to use the wool/steam setting on your iron. I never put water in my iron and just press on the cotton/no steam setting, and everything works out fine. For a pressing cloth, I use a paper towel, dipping it into a bowl of water, wringing it out, spreading it over the interfacing before pressing with the iron. Dip, wring, spread, repeat until the entire piece of interfacing is fused.
Getting the Right Seam Allowance
I am presuming you Cargo Duffle makers are quilters who can sew a quarter-inch seam allowance in your sleep. This is a gentle reminder that Anna instructs us to use a half-inch seam allowance throughout this pattern unless noted otherwise.
Clipping Corners
In step 1(a), Anna tells us to clip corners. By clipping away a chunk of the seam allowance at the corners, you will prevent unwanted bulk that could cause distortion there. As you can see from my picture, below, you can get pretty close to that corner—just the width of a few threads away. As long as you don’t cut into the seam itself, the pocket will be fine.
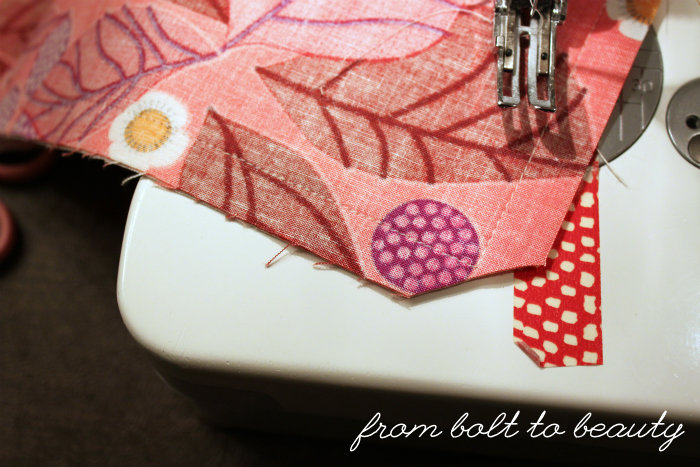
Folding the Pleats
When I get to the step about making the pleats, I do as the pattern instructs, marking the center point of the front of the pocket panel. Instead of marking the four fold lines on the front, I flip my pocket to the back, mark the fold lines there, and score them with my Clover Hera Marker. Then I flip back to the front, fold along the lines, and press with starch, which sets me up for neater edge stitching.
This picture, lit up at night by the glow of my machine, shows the center marking and two of the four fold lines.

By the way, edge stitching is exactly what it sounds like. You sew really close to the fold, maybe a sixteenth of an inch from the edge. I tried to capture my edge stitching in the photograph below. I used a cream thread that blends in with the pocket fabric, though, so it’s hard to see. (Click on the image to enlarge it.)

Making the Flaps
The only curve sewing this pattern requires is the pocket flaps. If you’ve sewn curves in a quilt, you use the same principles here: shorten your stitch length a bit. Go slowly. With your needle in the down position, pivot as necessary.
You’ll need to clip the seam allowance here, too. Since Anna uses a half-inch seam allowance throughout this pattern, I trimmed rather aggressively around the entire flap, not just at the curved corners. Look at this picture for a before and after …

Again, I’m clipping the width of a few threads away ...

Once I turn my flaps right side out, I press with starch, just to get everything nice and flat before I edge-stitch.
If you have any questions or comments, the best way to share them with me and everyone else sewing is to use the comments below, but you can also email me at frombolttobeauty (at) gmail (dot) com or DM me through Instagram.
Document your progress on Instagram using the hashtag #cargodufflesewalong!
Related Links:
Main Cargo Duffle Sew-Along Page
Sew-Along Day 1: Cutting the Pattern Pieces
>Sew-Along Day 2: Making the Cargo Pockets<
Sew-Along Day 3: Quilting and Assembling the Exterior Panels
Sew-Along Day 4: Making the Gusset, Tabs, and Handles
Sew-Along Day 5: Assembling the Bag and Installing the Snaps
Sew-Along Day 6: Lining the Bag
Prize Linky

Thanks for giving so much detail on the pocket pieces. I was going to skip them and add a zipper pocket, but you’ve convinced me to do it as is.
ReplyDeleteDay 2, and I'm still behind LOL Hoping to get on track before Friday. ☺
ReplyDelete