Friday, March 8, 2019

Duffle Bags in Process / Beauties Pageant 23

A fun part of of sew-alongs—whether I’m actually sewing the project or not—is how participants approach the fabric pulls so differently. I get a kick out of seeing the same pattern realized in a variety of palettes and prints. We’re just a few days into the Cargo Duffle Sew-Along, and I’ve already spotted these beauties ...

Amy (@amynicholefraser) and I share a love of Rifle Paper Co’s floral prints. Look at this one she paired with gray Essex linen. So. Very. Pretty. (Note to self: You need to start sewing with more stripes.)

Photo courtesy of @amynicholefraser

@sewcially.awkward assembled the next fabric pull. It’s pretty hard to go wrong with Basic Grey as your focal fabric, and this floral from the design house’s Mon Ami collection does not disappoint. Then there’s that red fabric ... I think that’s the accent fabric for the straps. Sassy!

Photo courtesy of @sewcially.awkward

Justine (@sewjustinesew) has had the Cargo Duffle Bag on her to-do list for ages, and here she is, keeping up with the sew-along and kicking some WIP in the process. Those feathers have me dreaming about spring ...

Photo courtesy of @sewjustinesew

If you’re intrigued by the Cargo Duffle Bag pattern, it’s not too late to join the sew-along. A smaller finish like this makes a nice in-between-quilts palate cleanser. For the full sew-along schedule, click the link in the navigation bar or here. Participants who finish their projects by the end of the month can enter to win one of these prizes.

***

For those of you with a finish to share, it’s time for this week’s Beauties Pageant!


The pageant rules are simple:
  • Post your finish in the linky tool. (No links to your own giveaway or linky, please!)
  • Point your readers back here with a text link or use the button above.
  • Visit and comment on other participants’ finishes.


Follow on Bloglovin

Thursday, March 7, 2019

Sew-Along Day 3: Quilting and Assembling the Exterior Panels

Today we will be quilting and assembling the exterior panels. As with the Cargo Duffle pattern in general, Anna’s directions are fabulously detailed with text and pictures. I’ve made so many of these bags, however, that I tweak a few steps. You’re welcome to read my thoughts and throw them in the trash on your way to your sewing machine—you’ll do just fine following Anna’s instructions!

My Perfectionist Approach to the Quilting Lines

I’ve quilted all of my Cargo Duffles with horizontal lines spaced three-quarters of an inch to an inch apart. To make sure the spacing of these lines is consistent throughout the exterior panels, I do this:
  1. Mark a horizontal line with my water-soluble pen at 4 inches from the bottom of both the front and the back (instead of Anna’s 3½ inches). 
  2. With my quilt sandwich (canvas, batting, quilting cotton) secured with pins, I start quilting at that 4-inch point and quilt outward, to the top edge.
  3. I turn my bottom accent piece to the wrong side by a half inch and press. Then I starch it and press again.
  4. Now when I place my exterior bottom accent on the quilted piece, it covers up that first line of quilting. When I start quilting the accent piece to the exterior panel, the quilting lines will be perfectly spaced.
The bottom exterior accent will cover up that first quilting line.

I did not follow these instruction for my first Cargo Duffle, and the spacing
is inconsistent where the main fabric and bottom accent meet.

My Persnickety Way of Attaching the Flaps

I also alter the instructions for attaching the flaps, all in the name of anal-retentive bag making:
  1. I trim a quarter inch off the top raw edge of each flap.
  2. Then I turn that raw edge under a quarter inch and press with starch.
  3. Now when I attach the flaps per the instructions, the raw edge is concealed by the rectangular bit of stitching on the top of the flap.
Except for a stray thread or two, the raw edge is pretty well concealed.
 
If you have any questions or comments, the best way to share them with me and everyone else sewing is to use the comments below, but you can also email me at frombolttobeauty (at) gmail (dot) com or DM me through Instagram.

Document your progress on Instagram using the hashtag #cargodufflesewalong!

Related Links:
Main Cargo Duffle Sew-Along Page
Sew-Along Day 1: Cutting the Pattern Pieces
Sew-Along Day 2: Making the Cargo Pockets
>Sew-Along Day 3: Quilting and Assembling the Exterior Panels<
Sew-Along Day 4: Making the Gusset, Tabs, and Handles
Sew-Along Day 5: Assembling the Bag and Installing the Snaps
Sew-Along Day 6: Lining the Bag
Prize Linky 


Follow on Bloglovin

Tuesday, March 5, 2019

Sew-Along Day 2: Making the Cargo Pockets

Hello, Cargo Duffle makers! Now that you have your bag pieces cut, we can tackle the pockets that put the “cargo” in our duffle bags.

Fusing the Interfacing

If bag making is new to you, you may not have had an occasion to use interfacing. Don’t be intimidated by the thought of fusing it to your beautiful project pieces. I use the same product Anna uses—Pellon Shape-Flex, SF101—because I have a bolt of it at the ready. The Shape-Flex instructions provide more detail than we need for the application here. All you really need to do is (1) cut the interfacing the same dimensions as the piece you’re adhering it to and (2) use a pressing cloth to press each bit of the interfacing for 10 seconds. Now, the directions also say to use the wool/steam setting on your iron. I never put water in my iron and just press on the cotton/no steam setting, and everything works out fine. For a pressing cloth, I use a paper towel, dipping it into a bowl of water, wringing it out, spreading it over the interfacing before pressing with the iron. Dip, wring, spread, repeat until the entire piece of interfacing is fused.

Getting the Right Seam Allowance

I am presuming you Cargo Duffle makers are quilters who can sew a quarter-inch seam allowance in your sleep. This is a gentle reminder that Anna instructs us to use a half-inch seam allowance throughout this pattern unless noted otherwise. 

Clipping Corners

In step 1(a), Anna tells us to clip corners. By clipping away a chunk of the seam allowance at the corners, you will prevent unwanted bulk that could cause distortion there. As you can see from my picture, below, you can get pretty close to that corner—just the width of a few threads away. As long as you don’t cut into the seam itself, the pocket will be fine.


Folding the Pleats

When I get to the step about making the pleats, I do as the pattern instructs, marking the center point of the front of the pocket panel. Instead of marking the four fold lines on the front, I flip my pocket to the back, mark the fold lines there, and score them with my Clover Hera Marker. Then I flip back to the front, fold along the lines, and press with starch, which sets me up for neater edge stitching.

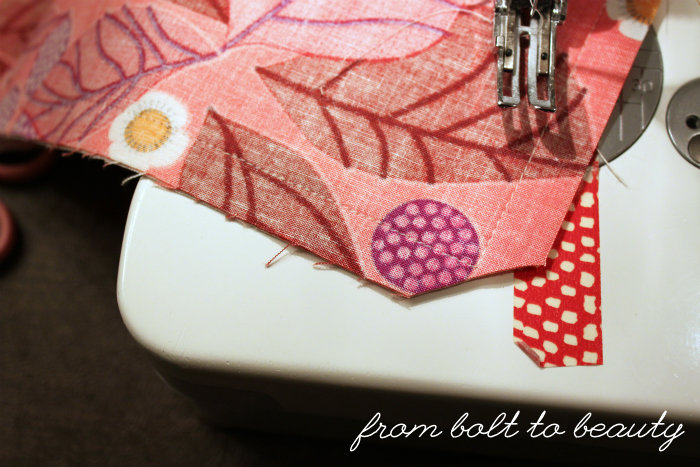
This picture, lit up at night by the glow of my machine, shows the center marking and two of the four fold lines.


By the way, edge stitching is exactly what it sounds like. You sew really close to the fold, maybe a sixteenth of an inch from the edge. I tried to capture my edge stitching in the photograph below. I used a cream thread that blends in with the pocket fabric, though, so it’s hard to see. (Click on the image to enlarge it.)


Making the Flaps

The only curve sewing this pattern requires is the pocket flaps. If you’ve sewn curves in a quilt, you use the same principles here: shorten your stitch length a bit. Go slowly. With your needle in the down position, pivot as necessary.

You’ll need to clip the seam allowance here, too. Since Anna uses a half-inch seam allowance throughout this pattern, I trimmed rather aggressively around the entire flap, not just at the curved corners. Look at this picture for a before and after …


Again, I’m clipping the width of a few threads away ...


Once I turn my flaps right side out, I press with starch, just to get everything nice and flat before I edge-stitch.

If you have any questions or comments, the best way to share them with me and everyone else sewing is to use the comments below, but you can also email me at frombolttobeauty (at) gmail (dot) com or DM me through Instagram.

Document your progress on Instagram using the hashtag #cargodufflesewalong!

Related Links:
Main Cargo Duffle Sew-Along Page
Sew-Along Day 1: Cutting the Pattern Pieces
>Sew-Along Day 2: Making the Cargo Pockets<
Sew-Along Day 3: Quilting and Assembling the Exterior Panels
Sew-Along Day 4: Making the Gusset, Tabs, and Handles
Sew-Along Day 5: Assembling the Bag and Installing the Snaps
Sew-Along Day 6: Lining the Bag
Prize Linky 


Follow on Bloglovin