Friday, February 24, 2023

Greetings from QuiltCon Atlanta / Beauties Pageant 207

I left the stormy, cold weather of Massachusetts on Thursday and am now hanging out with a few thousand quilty friends in Atlanta, at QuiltCon. It has been four years since I last was able to attend this event, and I was overdue. Truly, no other quilt show is quite like QuiltCon.

If you are also in Atlanta, come see me at the Quilt Pattern Mart booth (#2315), along with my Set to Spin quilt and my ombre Ridiculously Easy Jelly Roll Quilt. In fact, QuiltCon attendees who visit the QPM booth can download instructions for the small throw size of Set to Spin for free! (It has been released as a full pattern here.)

I dont have any quilts in the show this year, but a few of my quilts have hung at past QuiltCons, in Savannah (2017), Nashville (2019), and Austin (2020).

Heres the roundup ...

Mix and Mingle appeared at QuiltCon Savannah. There was a nine-patch challenge that year, so I made a huge one and then cut it up and sewed it back together. Because this was my first show submission and it was accepted and I traveled to Savannah, Mix and Mingle has a special place in my heart.

Circa 1870 showed at QuiltCon Nashville, which I also had the luxury of attending. I love this beauty and the backing fabric that inspired the palette. I have had many requests to write a pattern for this design, but making it requires many Y-seams. (Enough said.)
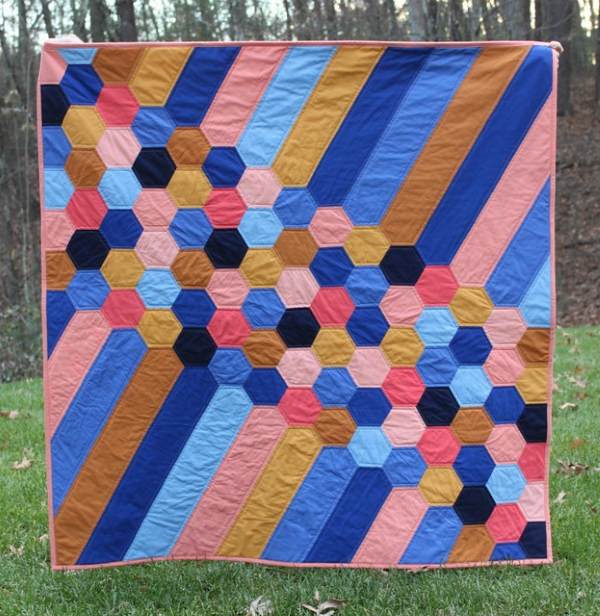
47XY+21 hung at the same time as Circa 1870. I have the privilege of raising a son with Down syndrome, and 47XY+21 is about that parenting journey. You can read about my amazing son here.

Love Boldly showed at QuiltCon Austin and has since been released as a full pattern. I wasnt able to attend the conference that year, so I took special delight in this picture, which Quilt Pattern Mart Founder Heather Kinion took of the show floor. Those hearts are so big and bright that you can pick them out from the sea of quilts! 


You can read the original post about Love Boldy here. Info about the pattern is available here.

What is your take on quilt shows? Do you attend them? Do you submit your projects to them? Tell us about it in the comments.

Follow Me On ...


* * *


The pageant rules are simple:
  • Post your finish in the linky tool. (No links to your own giveaway or linky, please!)
  • Point your readers back here with a text link or use the button above.
  • Visit and comment on other participants’ finishes.

You are invited to the Inlinkz link party!

Click here to enter

Friday, February 17, 2023

Set to Spin Pattern Release / Beauties Pageant 206

*** Click here to purchase Set to Spin ***


My latest pattern—Set to Spin—releases today!

Based on an antique quilt, Set to Spin uses simple paper piecing to bridge the old and the new. Use solids to create a uniquely modern project, or go super scrappy for a chic vintage look.

Set to Spin comes in four sizes:

  • Crib: 36½" x 48½"
  • Small throw: 48½" x 60½"
  • Large throw: 60½" x 72½"
  • Twin: 72½" x 96½"

This is an intermediate pattern, and instructions presume prior experience with paper piecing. 

A supplementary blog post and video take quilters through my particular paper-piecing process step by step—from the supplies I use to how I press—and illustrate how to get great results with the pattern. Access the blog post and video here.

The pattern also features two alternative layouts. Both use just 12 blocks to create a small throw or large throw ...

Set to Spin is available as a PDF download in my Etsy shop, and it’s $9 through the end of this month!

And for those of you headed to QuiltCon next week, be sure to visit the Quilt Pattern Mart booth (#2315), where you can download instructions for the cover quilt (i.e., the small throw size) free!

For some Set to Spin inspiration, check out the testers’ blocks and quilt tops at #SetToSpinQuilt on Instagram!

The cover quilt was beautifully quilted by Tammie Earnest with the Golden Curls panto from Urban Elementz.


*** Click here to purchase Set to Spin *** 


Follow Me On ...  


* * *


The pageant rules are simple:
  • Post your finish in the linky tool. (No links to your own giveaway or linky, please!)
  • Point your readers back here with a text link or use the button above.
  • Visit and comment on other participants’ finishes.

You are invited to the Inlinkz link party!

Click here to enter

Thursday, February 16, 2023

My FPP Technique for Set to Spin


*** Click here to purchase Set to Spin ***

This post supplements the instructions in my Set to Spin pattern with more information about the supplies I use and the foundation paper-piecing technique I prefer. There’s also a discussion about pressing.

Supplies

Rotary blades: I use two, one for fabric and one, outfitted with an older blade, for paper.

Glue stick: Any washable version will work fine.

Add-a-Quarter Ruler: This ruler has a lip on it that makes creating a quarter-inch seam allowance super easy, but it’s not mission critical. Any quilting ruler is suitable for the task.

Best Press Spray: I like this spray because it is scent-free and I can buy it in large jugs. Plenty of other, less expensive options for starch are available, though.

Newsprint: There are all sorts of specialty papers on the market for paper piecing. I find them to be expensive, though, and prefer using newsprint, which is very affordable and readily available in reams of 8.5" x 11" sheets that you can send through your printer. It’s also recyclable. I do find newsprint to be a little slippery to work with, so I often wear my quilting gloves while piecing with it to improve my grasp. 

Cardstock or thin cardboard: I use a piece to fold back my pattern and trim seams neatly and easily. (See the video below to learn more on this.)

Technique

I choose to cut my fabrics into simple, oversize rectangles. I find that the combination of oversize pieces and basic shapes prevents me from making mistakes and having to rip out stitches because a fabric doesn’t fully cover a section of the pattern. I also have problems with spatial concepts—my brain just doesn’t work that way!—and this technique compensates for that.

There is waste with this method, for sure. Once you see how I work with these pieces, I think you’ll understand the method to my madness, though. If you have a different technique that works for you, go for it!


Pressing the Seams

The Set to Spin pattern details how to press the A and B units in a way to get seams to nest. 

When it comes to sewing two quarter blocks together or two halves together, I recommend pressing the seams opens to produce less bulk in the seam allowances. However, if you’re using a dark fabric 1 and a light fabric 2, pressing the seams open could allow little triangles of fabric 1 to show through fabric 2. 

I found this out the hard way. Look at the shadows of that center fabric 1 in this picture:

To avoid this issue, I now trim back those little triangles of fabric 1. Look for these little flaps on each side of the A units:


Trim them with a pair of snips to look like this:

Because there are four A units in each finished block, there will be eight flaps to trim.

The Set to Spin testing crew did not flag any other issues with fabric showing through in the finished block. Just to be on the safe side, make sure your fabrics don’t cause any problems by sewing a test block. Place that test block on a piece of batting, and hold it up to a well-lit window, checking to see whether any darker fabrics show through.

Questions?

I hope this supplemental pattern information is helpful. If you have any questions, you can always drop me a note at frombolttobeauty [at] gmail [dot] com. 

*** Click here to purchase Set to Spin ***