
I almost always skip that step when I shouldn’t because making a prototype seems inefficient to me and because, well, I’m impatient. Why create a small version of a project when I’m gung-ho about making the real deal?
Recently, however, I got the notion to make a throw quilt in a simple patchwork of alternating white and colored fabrics and then finish it off with orange-peel quilting. (This was @chelseafr’s fault. After I saw this project of hers, I was smitten.) Since I had never tried orange-peel quilting, I chose to follow in Alice’s footsteps and make a kidsize quilt for charity first, using some long-overlooked pastel scraps.
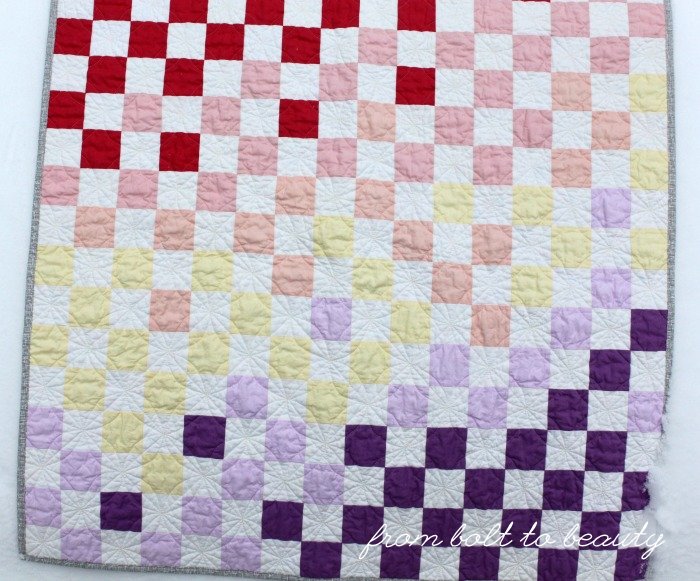
I cut my pastel scraps into 3-inch squares. When I ran out of pastels, I moved on to darker-value solids. I ended up using six colors: hot pink, pale pink, pale orange, yellow, lavender, and purple (it’s hard to differentiate the pale pink from the pale orange in my pictures). Then I played with the squares on my dining room table until I came up with this arrangement. I love how the darker colors anchor the top left and bottom right corners, and the configuration of the pastels has a pretty ombre-like effect.
 |
| Mother Nature’s recent behavior has not been conducive to good photo shoots. So fed up with all the snow and wind, I opened up my front door, plunked this quilt on top of the snow, and started taking pictures! |
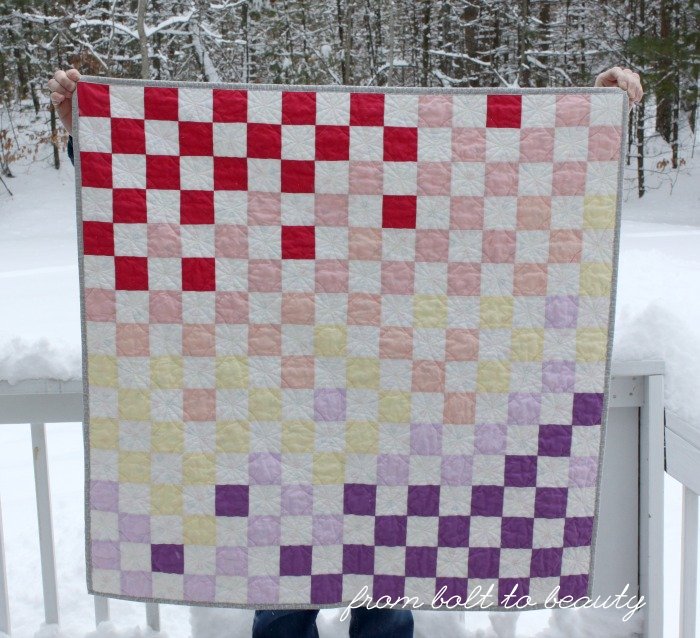 |
| Then I convinced my husband to stand in the 20-degree cold and help! |
To tackle the quilting, I consulted Jacquie Gering’s new book, Walk. I sewed my base grid on point, in the white squares, and then marked dots to guide my creation of the edge-to-edge S-curves. As I quilted my project over multiple sessions, however, I noticed that the shape of my orange peels evolved. They started out nice and skinny but grew chunkier as I got further into the quilting. About halfway through, I stopped marking my guide dots, made a peel-shaped template, and marked the quilting lines in their entirety.
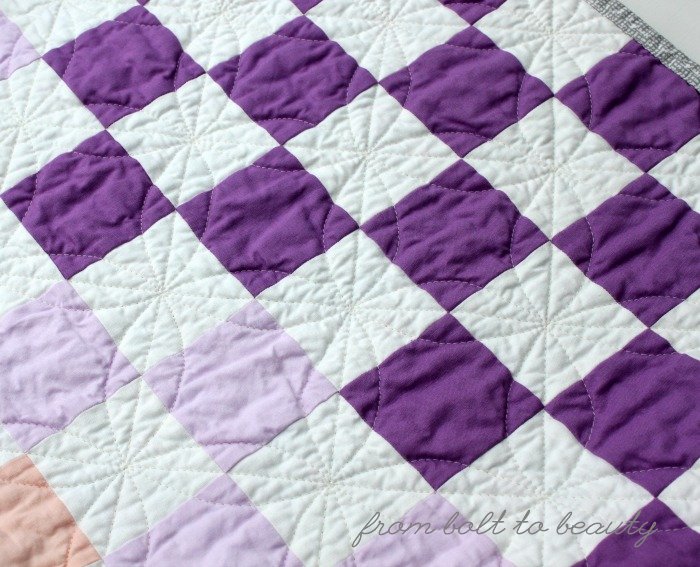 |
| When I focus on the peels here, I’m pleased with the quilting, but when I look for the overlapping circles amid the peels, I realize I need more practice. |
It seemed like a cop-out, but I like my quilting experiences to be as relaxing as possible. I want to enjoy the process, and it’s easier for me to follow lines than rely on my muscle memory to achieve consistently shaped quilting. I do what I have to do to get the results I want—even if it means taking the time to do all that marking!
 |
| I have another yard of that floral print, featured on the back, in my stash. Maybe there’s another practice quilt in my near future! |
I’m glad I decided to make this quilt. I really like it, and I’m sure I’ll employ my newfound confidence with orange peels again. Creating this quilt convinced me, however, not to make the throw size I originally had in mind. Between the alternating white-and-solid patchwork and the orange-peel quilting, the quilt has a distinctly feminine feel, which is pretty but not right for the throw I want to make.
I have a question for my fellow straight-line quilters out there ... Have you tried any curves in your quilting? How much did you mark, and was there a reference you found particularly helpful? And if curves are new to you, I have to tell you that this experience has transformed how I think of quilting on my domestic machine. Maybe it could do that for you, too!
Linking up to Main Crush Monday, Scraptastic Tuesday, Let’s Bee Social, Needle and Thread Thursday, and Finish It Up Friday ...

I haven't tried marking a quilt for quilting yet. Mine are usually freeform in one way or another. I am going to have to check back and read the responses from others. I really like those orange peels, might be a good place to start for me.
ReplyDeleteI have done gentle curves with my walking foot, but I definitely tend to think straight lines when I am using my domestic machine unless I put on my FMQing foot. I think that marking the lines for this case would relax me a lot as well.
ReplyDeleteWhen I quilt with my walking foot, I usually stick with improv-y curves to avoid marking. :) Nothing wrong with marking though - it just takes forever. Your quilting looks fantastic.
ReplyDeleteYour orange peel turned out wonderfully. I just did an orange peel design freehand using a 2" patchwork grid and I was not happy with it (my lines were just too irregular and different). Luckily, all of the squares are busy patterns so they hide the quilting.
ReplyDeleteLovely finish!! I prefer marking with my walking foot - if the machine is going to do most of the work for me, why think? :D
ReplyDeleteGreat quilting and I love the effect of the pastels with the solids.
ReplyDeleteI have not tried curves yet - straight line quilting all the way. If I did sew curves though, I would probably use a template and mark lines like you did. I agree that taking the time is worth it to get the results you want.
ReplyDeleteGreat quilting! I love the orange peel pattern, might just try this soon too!
ReplyDeleteSo far I have only down organic wavy lines with my working foot and straight lines of course. I have not yet tried FMQ on my domestic machine only on a longarm.
ReplyDeleteI love the orange peel quilting desing and I would also mark it. I often even mark straight lines that have a specific turning point as I find it hard to guess that and hate the imperfect, non-marked versions.
As we already invest a lot of time into a quilt. Why stop at the almost last step and recieve a unsatisfying result. I'd rather mark :)
Sorry, long comment. Anyways yours turned out great and I can totally see the circles as well. Thanks for the push to try it out rather sooner than later! xo
When I did orange peels I used a template that I made. I marked the entire thing in chalk and worked on the diagonal. It went pretty quickly without feeling as if I had made 100 curves.
ReplyDeleteAlso I received some wonderful input form my guild friends to help me think through it.
First of all, congrats on your lovely finished quilt! I love what you did with the color placement; it's a very sophisticated effect from simple squares. Very cool. As for marking being a "copout" -- no way! There is some definite muscle memory involved in quilting! Remember when we were in elementary school learning cursive writing, how the teachers had us trace over perfectly formed cursive letters before writing our own? Go ahead and mark those perfect curves and quilt without guilt -- you'll only be shortening your learning curve by training yourself to quilt smooth, perfect curves. And it will lead to better quilting WITHOUT marking, sooner than you could achieve if you skipped the marking.
ReplyDeleteI love this finish! So pretty and clean!
ReplyDeleteBravo! Good for you for finishing a lovely quilt and experimenting with quilting! I FMQ orange peels and it is a very different approach...nor perfect by any means, but creates a great soft quilting effect.
ReplyDeleteI really like this quilting pattern. Kudos. I don't do well with curves, but I like the look of them.
ReplyDeleteIt is a beauty - love the simple piecing and the not so simple quilting! Big success I'd say....Thanks for linking up to #scraptastictuesday When I FMQ I don't tend to mark if I can avoid it - I don't have the patience and prefer a free hand sort of feel
ReplyDeleteI have down gentle curves with my walking foot - I love Jacquie Guering, and didn't know about this book, thanks for the tip! - but haven't tried orange peel as yet... add to list :) Well done on persevering, it's a beautiful quilt!
ReplyDeleteYou have made a darling of a little quilt! A practice quilt, what a novel idea!!! I have not attempted any real curves in quilting before, and this design I would definitely have considered out of my ability on my machine...so many new ideas!! Thank you!
ReplyDeleteHi Michelle, your quilt is lovely. It's a great idea to make practice quilts. I too have very little patience for making prototypes since once I've made something, it's more of a "been there done that!" I'm really glad that you're starting to quilt your own quilts. I've been at it for about 3 years. I try to make as many smaller projects as possible to practice. I'm now making throws that have simple blocks that I can practice in. My friends and relatives are happy to receive them, even if they are "practice quilts". I also use templates and anything else that helps. Even drafting the lines is a relaxing enjoyable step. Keep it us!
ReplyDeleteThanks for reminding me I still haven't finished that quilt;-) This is gorgeous!!! For my first orange peel quilt I marked the lines but once it was finished I felt like I had the muscle memory to free style the next.
ReplyDeleteThe quilting looks great! What a great idea to use up some scraps and make a quilt for charity to practice your idea!
ReplyDelete