Pages

Friday, February 22, 2019

February, Don’t Fail Me Now! / Beauties Pageant 21


From the get-go, I knew that I would not be replicating January’s level of productivity in February. There was just too much to do—and in a short month, at that. At the very least, I thought I could finish piecing the scrappy quilt top I have been working on. Right now, all 48 blocks are finished. I still need to sew those 48 blocks together, but I have seven more days before March comes in with its own set of expectations.

This quilt has been fun to work on because it features many fabrics I haven’t had an opportunity to sew with in the past. These prints—all beautiful in their own right—just didn’t fit into previous projects.

Most of what you see is from Anna Maria Horner and other Free Spirit designers ...

This diamond is almost all Anna Maria Horner fabrics.

Rifle Paper Co. for Cotton and Steel ...

I love that Rifle Paper Co. floral with the periwinkle background. I used every
last bit I had left over from my Circa 1870 quilt.

I was happy that Alice made an appearance in these strips.

 Among others, like Lizzy House, Bonnie Christine, and Basic Grey.

There are many, many points to match on bias edges when I sew these into rows.
Wish me luck!

How devoted to to-do lists and deadlines are you when it comes to your quilting? For me, it’s a fine balance between making progress on the quilts at hand and not becoming so legalistic about finishing project after project that this hobby feels more like a job.

Of course, if you’re a stickler for deadlines, you might have a finish this week. I hope you’ll share it in this week’s linky!


Follow on Bloglovin

Friday, February 15, 2019

My B&C Gypsy Wife / Beauties Pageant 20

Here are a handful of many filler blocks for this project.

Soon after I started blogging, Jen Kingwell’s Gypsy Wife pattern became all the rage. This reaction was merited: Jen’s design is beautiful, and the bohemian feel of her original Gypsy Wife is unlike anything I had seen.

But this pattern also had a reputation. The instructions were difficult to follow, and I knew multiple quilters personally who had started a Gypsy Wife and abandoned it before finishing. Plus, it’s a big project—only a special few make more than one!—and the idea of embarking on the quilt top, let along quilting it, intimidated me.

Last month, however, Rachel Hauser (Stitched in Color) and Kelli Heath (Scrappy Violet) teamed up to host the 2019 Gypsy Wife quilt-along. I thought that the event would give me the structure I needed to complete this quilt for myself.

I decided to make an airy version of Jen’s pattern. For the blocks themselves, I am digging into my Bonnie and Camille stash, focusing on fabrics in pink, red, aqua, green, and navy. I have yet to settle on a plan for the background stripes, but I’m thinking of sewing a combination of small geometrics (maybe dots?) in neutral colors, like cream and gray. Of course, I will also use a good dose of my favorite neutral, Kona Snow.

These are the four feature blocks I completed in January.
These are four more filler blocks.
Yup, more filler blocks!

So far February has provided no time to work on this quilt, but I have high hopes that will change—after all, the month is just halfway over. ; )

Those of you with a finish to share, now’s the time. (And if you have a finished Gypsy Wife, no matter how old, we would love to see it here!) Post your project to this week’s Beauties Pageant!


The pageant rules are simple:
  • Post your finish in the linky tool. (No links to your own giveaway or linky, please!)
  • Point your readers back here with a text link or use the button above.
  • Visit and comment on other participants’ finishes.


Follow on Bloglovin

Wednesday, February 13, 2019

Sew-Along: Schedule and Supplies


Schedule


The Cargo Duffle Sew-Along is an event that was held in March 2019. The sew-along is over and the prizes handed out, but you can still make your own beautiful bag!

The Cargo Duffle Bag, designed by Anna Graham of Noodlehead, will take you several hours to complete; it’s doable in a single weekend. The sew-along breaks the process down into six days of instruction. Here’s all you need to know ...

Free Pattern Download from Robert Kaufman

Necessary Supplies and Optional Notions

Day 1: Cutting the Pattern Pieces

Day 2: Making the Cargo Pockets

Day 3: Quilting and Assembling the Exterior Panels

Day 4: Making the Gusset, Tabs, and Handles

Day 5: Assembling the Bag and Installing the Snaps

Day 6: Lining the Bag

Please note: As I make my Cargo Duffle, I alter the pattern by adding tabs at either end of my zipper, to aid in opening and closing it, and by lining my duffle instead of binding the raw interior edges. These changes affect the materials list, as noted below.

Supplies


Hardware

In my opinion, the most difficult part of bag making is finding the needed hardware! This has gotten easier as I now can find almost anything online, but I still purchase my hardware first and then match my fabric to it.

Luckily, the required zipper and snaps for the Cargo Duffle are readily found at big-box craft stores. I bought my 26-inch coverall zipper, for example, at Joann. It comes in two colors—black and dogwood—with brass teeth. Either one matches Dritz’s #5/size 24 snaps in gold, also available for purchase as Joann.


There are two options for installing your snaps. You can buy pliers to do the job, but they are over $30 a set. I use the less fancy tool here.

Anna herself offers a limited selection of bag hardware on her site. She offers a metal spring snap starter kit, which is cool because it contains four snaps in each of three finishes. As of this posting, however, it is out of stock.

Fabric

The Cargo Duffle Bag is designed for quilting cotton. You will be layering that fabric with batting and canvas, so your bag will have nice structure in the end. I have used a home dec denim-linen blend as my bottom gusset and exterior bottom accent in each of my four Cargo Duffle Bags because I really love the color and look of it. I wouldn’t say my finished product is any sturdier as a result, though.

The fun thing about bag making is that you can use fabric you might not put in a quilt. A large-scale design that would be unrecognizable cut into little bits and sewn in a quilt can be enjoyed in all its glory on a bag. My first two Cargo Duffles used Amy Butler fabric for that very reason—I loved those fabrics but couldn’t find a quilt project to use them in. My third Cargo Duffle used a print from Denyse Schmidt created for chain stores. Since it wasn’t a quilt-shop-quality fabric, I would hesitate to use it in something that would be washed over and over again, but it was perfect for a bag that would only be spot-cleaned now and again.


I have also used a home dec print for the main exterior fabric. This worked well. It did affect how I constructed my handles, however. If you choose to use a home dec fabric, be sure to check out the suggestions here.  

Lining

I have lined each of my Cargo Duffle Bags instead of binding the raw interior edges, as the pattern recommends. It’s not a perfect solution, but I like it. If you choose to follow my lead, this will affect your materials list:
  • You’ll need a yard of fabric for the lining. (This assumes a 44-inch width of fabric. If you’re a careful cutter, you can get away with three quarters of a yard.) I recommend a quilting cotton. Something with a soft hand, like Michael Miller’s Cotton Couture or an Art Gallery fabric, would be especially nice, but any quilting cotton will work fine. 
  • You’ll still need a yard of cotton canvas, but the color of it is less important because it will be mostly hidden by the added lining. (You can see my natural canvas just peeking out in the picture below.)
  • You will not need the quarter yard of double-fold binding.  


Zipper Tabs

I also add what I am calling “zipper tabs” to each end of my zipper gusset. I think they make opening and closing the zipper easier. If you also want to add these to your bag, you’ll need a scrap of quilting cotton that is at least 4 inches by 7 inches.

Notions

In addition to the size 16 needle and walking foot that Anna recommends in the pattern, I suggest you have the following on hand:
  • Starch—My top-stitching is neater when I sew well-starched pieces. (I will clue you in on when I use starch in the individual steps of the bag-making process.)
  • Clover Wonder Clips—If you haven’t used Wonder Clips in your quilt making, buy some. They’re essential for keeping bulky layers together while sewing bags, and they’re pretty kick-ass for sewing down your quilt bindings, too. A small package will suffice.
  • Water-soluble pen—Any one that can be removed with a spritz of water will do.
If you own a Clover Hera marker, have that on hand, too. I wouldn’t buy one specifically for this project, though. Another optional notion is Steam-A-Steam 2 in the quarter-inch size. This is double-stick fusible tape that I use to install zippers.

To see the finished bags from the sew-along, check out the linky here or the hashtag #cargodufflesewalong on Instagram!

Follow on Bloglovin

Friday, February 8, 2019

Pageant Highlight Reel / Beauties Pageant 19

I can’t recall the last time I could say this, but for the past week, I haven’t so much as touched my machine. It seems like a good day, then, to indulge in a look back at finishes friends have shared in the past few Beauties Pageants.

Here are four of my favorites ...

Cynthia over at Quilting Is More Fun Than Housework is the queen of scraps. Her postage stamp quilt is testimony to that. Click through to her site to see her quilting up close and personal.


Jayne, of Twiggy and Opal, also tackled a scrap project recently. I love how the disparate prints she uses are brought together by those repeating white circles. This one is going on my to-do list!


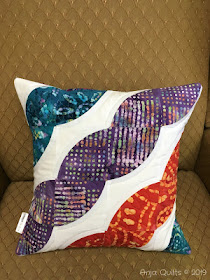
Anja, of Anja Quilts, kicked some free-motion-quilting butt on her latest pillow. The front is beautiful, but you need to click through to really appreciate her wishbone FMQ.


And Alison, who blogs at Little Bunny Quilts, turned the traditional churn dash block on its head with her Dashing to the Chapel pattern.


How about you? Did the past week provide the time to finish a project? Now’s your chance to tell us about it! (No judgment if you’re like me and need to live vicariously through other sewists’ work today.)


The pageant rules are simple:
  • Post your finish in the linky tool. (No links to your own giveaway or linky, please!)
  • Point your readers back here with a text link or use the button above.
  • Visit and comment on other participants’ finishes.


Follow on Bloglovin

Friday, February 1, 2019

Mice to Go with Those Cats / Beauties Pageant 18

What’s cuter than a Cargo Duffle Bag that’s covered in cat faces?

A Cargo Duffle Bag that’s covered in cat faces and accompanied by a coordinating pouch adorned with silly mice.

Today’s finish is an addendum to yesterday’s project. It’s a pouch I have made before. You can read the specifics, including how I transform pouches like this one into toiletry bags, here.


There’s not much more to say about these mice, other than a little part of me died inside when I took a rotary blade to them. I have just scraps of these brown mice left. The fact that the same print can be found in both peach and mint in my stash doesn’t lessen the blow.

What’s the precious fabric in your stash? (Obviously, my heart belongs to Lizzy House’s long out-of-print Catnap line!) And how are things on your sewing table? Please share any recent finishes with us in this week’s pageant ...


The pageant rules are simple:
  • Post your finish in the linky tool. (No links to your own giveaway or linky, please!)
  • Point your readers back here with a text link or use the button above.
  • Visit and comment on other participants’ finishes.


Follow on Bloglovin