Pages

Friday, February 26, 2021

Scrappy Granny Square Quilt / Beauties Pageant 118

Granny Square Quilt in cool colors

I am always amazed by those quilters who have the focus and discipline to work on one project at a time. I like to have a bunch of quilts cooking simultaneously. That way, if I feel like chain-piecing one day and sewing a backing together the next, I can. This approach keeps things interesting for me.

My Scrappy Granny Square Quilt—moreso than any of my other projects!—was one that I could not bear to sew in one fell swoop. Making this quilt was slow going. The purpose of this project was to obliterate my cool-colored scraps, but doing so meant cutting and sewing individual squares instead of strip-piecing. Specifically, it meant cutting and sewing 1,230 squares. See what I mean? Slooow going!


The Fabric Pull

Everything except for one of the fabrics I used came from scraps and stash. The initial palette was set by the block below, which features prints from Carolyn Friedlanders Botanics line I had from my Park Bench BOM (see it here). As I culled through my scraps and made more blocks, I eventually added some reddish purples and periwinkles to flesh out the palette and create a generously sized throw quilt.

The outer ring of squares allowed me to bust through tons of low-volume scraps. Sashing the blocks with a 1-inch (finished) strip of Kona Snow provides a nice visual break between the scrappy blocks.

The back features fabric from 1canoe2 and Anna Maria Horner.

Granny square block in Carolyn Friedlander's Botanics

The Quilting

The joy in making this quilt was assembling the fabrics that appear in each block. The challenge was quilting it. I knew all those 2.5-inch squares needed the complement of curvy quilting, so I free-motioned a stipple design with pale gray thread all over my assembled granny squares. The only quilts I had free-motioned in the past year were both baby quilts (see the most recent here), and the fight to get nice curves evenly spaced over a 62-inch by 73-inch quilt was formidable! I give my efforts a solid B. : )


I really enjoy making scrap quilts, and I think I will eventually make this one again. After all, its lovely and busted through over 5 yards of scraps! Do you have a preferred pattern or two to use up your scraps?


Linking up to Favorite Finish and Oh Scrap!


Follow Me On ...


* * *


The pageant rules are simple:
  • Post your finish in the linky tool. (No links to your own giveaway or linky, please!)
  • Point your readers back here with a text link or use the button above.
  • Visit and comment on other participants’ finishes.

You are invited to the Inlinkz link party!

Click here to enter

Friday, February 19, 2021

Henlo Fren Pillow / Beauties Pageant 117

My Henlo Fren pillow hack

If youve been following my blog for any length of time, youve likely clued into the dog obsession here at From Bolt to Beauty world headquarters. We currently have one furry family member, a five-year-old Golden named Rose whose big personality demands that the rest of the household revolves around her. 

This obsession has only grown worse over the past year. My husband and I, in an effort to keep our wits about us during the monotony of the pandemic, have started following dog accounts on Instagram and TikTok. And let me tell you, there are dog lovers, and then there are dog lovers on social media.

In fact, that second group speaks its own language. Those people talk not of dogs and puppies but doggos and puppers, and greet each other with “henlo fren” instead of “hello friend.” Those hoomans feed their canine companions treatos and brush their doggos’ floof. And sometimes, when their pets are being extra naughty (see Rose in the pic above with my sock!), they just have to shrug and concede that’s just doggos being doggos.

Hello Friend Pillow Pattern Hack

The time spent on canine-friendly social media instigated a pillow pattern hack. Using the Hello Friend pattern Happy Sew Lucky released at the beginning of the pandemic, I made my own Henlo Fren pillow. All the letters I needed for “henlo fren” appear in the phrase “hello friend,” so there was little actual hacking to do; the only sacrifice I made for my version is forgoing the originals cool letter spacing. 

My quilted Henlo Fren pillow

My husband was pretty excited to receive this as a Christmas gift. Actually, I think it’s the most excited he’s gotten about any project I’ve made in the nearly 20 years I’ve been sewing!

A Past Pillow Debacle

It had been a few years since my last foray into pillow making. Pillows are supposed to be fun, satisfying sews, and a 2019 pillow project ended badly. I took some much-loved bits of Alison Glass fabrics and sewed them into this lumpy mess ...

Quilted Alison Glass pillow

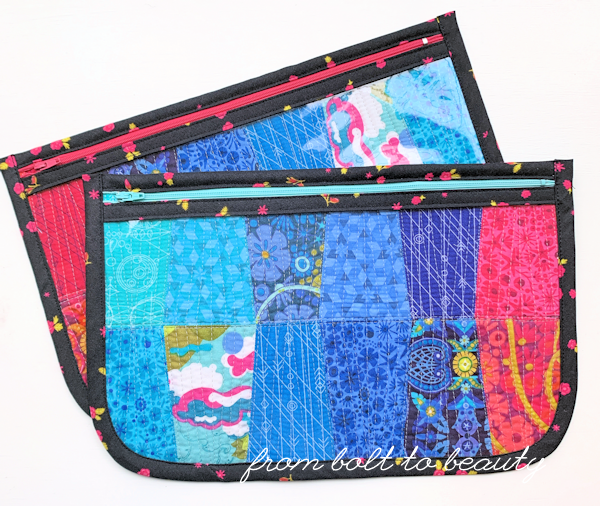
What went wrong? Well, I quilted the pillow cover too densely, which affected its drape (or lack thereof). I couldnt remedy the stiff cover, but I did try to get it to fit the pillow form properly. Multiple attempts to trim excess fabric were ineffective, and after banishing the pillow cover to a dark corner of my closet for a year, I chopped it up and resurrected it as two pretty awesome See-It-All Pouches. Nice, right? (I wrote more about this pouch pattern, from Aneela Hoey, and sewing with vinyl here.)

Two See-It-All Pouches

The Merits of a Zipper Enclosure

I knew I didnt want to make the same mistakes with this pillow, so I swiped the quilting design directly from Happy Sew Lucky’s pattern: I started with a line of quilting along the perimeter of the word bubble and then echoed that shape every half-inch. Its simple and elegant, and adequately attaches the pillow cover to the fleece lining.

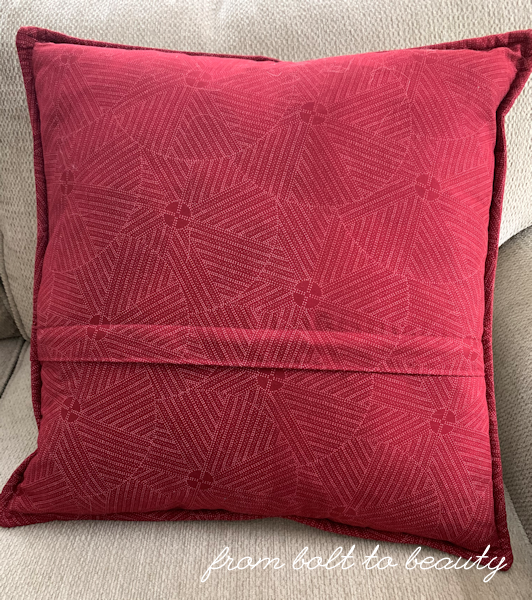
The pattern provides instructions for both an envelope enclosure and a hidden-zipper enclosure. (For that matter, it also offers two options for sewing the words: traditional piecing or paper piecing. I paper-pieced my words.) Although I usually opt out of installing zippers whenever I can, Ive sewn plenty of them (see more zipper projects here) and chose to follow the pattern’s zipper instructions, which created a clean finish. I did make my cover an inch smaller horizontally and vertically, just so there was a little more poof and a little less extra room once I inserted the 20-inch form. Together, the zipper enclosure and slightly smaller cover resulted in a pillow whose plumpness is evenly distributed and lump free. 

Zipper enclosure on my pillow

Words of Pillow-Making Wisdom, Perhaps?

Everyone has his or her own preferences when it comes to making pillows. Happy Sew Lucky has me sold on zippers. What are your words of wisdom for the pillow-making masses?

Follow Me On ...


* * *


The pageant rules are simple:
  • Post your finish in the linky tool. (No links to your own giveaway or linky, please!)
  • Point your readers back here with a text link or use the button above.
  • Visit and comment on other participants’ finishes.

You are invited to the Inlinkz link party!

Click here to enter

Friday, February 12, 2021

Four Hearts, One Quilt / Beauties Pageant 116


Thank you for all the kind words about the Love Boldly projects I shared last week. I get such a kick out of seeing what others do with my patterns, and the testers I worked with on this pattern release did not disappoint! 

Love Boldly Pattern in the Baby Size

Among the six testers, three sewed quilts, two sewed pillows, and one sewed a runner. Seeing what they accomplished with the pattern helped me get my own project to the finish line ...

This four-block quilt (the baby size) started out as a nine-block quilt (the small throw size), but I just wasn’t feeling it. There was too much going on, which is an odd effect for a quilt that is composed of a single repeated block. I decided that the palette was the issue. Once I narrowed the color scheme down to just blues and purpley reds, things started to fall into place. If I had more of these fabrics on hand, I would have made this quilt bigger. Instead, it will go to a baby or be gifted as a wall hanging.

Art Gallery Fabrics

This quilt is composed entirely of Art Gallery Fabrics. All but one print is from Amy Sinibaldi’s Playground and Mayfair collections. See the sassy chevron in the bottom right corner? That print was designed by Maureen Cracknell. I’m glad it plays well with the others!

The background is Pure Solids in linen, the binding is Pure Solids in plum, and the delicate floral on the back is another Mayfair design ...

The Quilting

I quilted this project the same way I quilted my original (see the cover quilt on the pattern, below). I started by sewing a large X across it and then echoed in each of the four quadrants. I really like this approach, but I want to change things up for future Love Boldly projects. Got any suggestions? Because this project started off larger, I have a bunch of already-sewn-up heart blocks. I’m thinking they’ll become a runner (check out Ange’s runner in last week’s lineup) and a few pillows.

Last Weekend for the Sale

To learn more about this pattern, read my pattern release post. To purchase, visit my Etsy shop. Love Boldly is available at the introductory price of $7.50 through Sunday, February 14!


Follow Me On ...


* * *


The pageant rules are simple:
  • Post your finish in the linky tool. (No links to your own giveaway or linky, please!)
  • Point your readers back here with a text link or use the button above.
  • Visit and comment on other participants’ finishes.

You are invited to the Inlinkz link party!

Click here to enter

Friday, February 5, 2021

Tester Parade! / Beauties Pageant 115

Photo courtesy of @simplyjesiquilts

Perhaps the most important step in pattern writing is enlisting a group of quilters to help test. I worked with six testers to release Love Boldly, each of whom made a few blocks and got back to me with critical feedback on how to improve the pattern. Because it’s not just about getting the numbers right ... It’s about writing instructions that different people with their own take on the quilt-making process can use successfully.

I adore the projects that came out of these testing experiences! The pattern provides instructions for a single block and three quilt sizes (baby, small throw, large throw). A few testers made the four-block baby-size quilt, and I can’t blame them: It makes for a satisfying sew. (I know this because I just finished piecing my own baby quilt!)

Photo courtesy of @joandesan


Photo courtesy of @chrysalisknits

One tester transformed her three blocks into a table runner, which I love so much that I’m making my own. I think the orientation of the blocks and the two-color palette are brilliant!

Photo courtesy of @angesullivan

Another quilter made a pillow from a single block in her mom’s favorite color. Gosh, a two-toned heart doesn’t get bolder and happier than this!

Photo courtesy of @simonerigden

And another still tested the bonus block design included in the pattern—an American flag heart block—which she’ll be making into something for her sailboat. Beautiful, right? I’m crazy about the dark background fabric.

Photo courtesy of @mjordan_101

Each tester’s Instagram feed is linked in the caption corresponding to her project. I encourage you to check out these quilters’ other makes over on Instagram!

Love Boldly is available exclusively at Quilt Pattern Mart. (The introductory price of $7.50 is available through February 14!) Love Boldly is available in my Etsy shop. If you make your own Love Boldly blocks, please let me know by dropping me an email (frombolttobeauty [at] gmail [dot] com) or by using the hashtags #frombolttobeauty and #loveboldlyquilt on Instagram. You can also upload finished blocks posted on blogs or in Instagram to a future Beauties Pageant. : )

Follow Me On ...


* * *


The pageant rules are simple:
  • Post your finish in the linky tool. (No links to your own giveaway or linky, please!)
  • Point your readers back here with a text link or use the button above.
  • Visit and comment on other participants’ finishes.

You are invited to the Inlinkz link party!

Click here to enter