
Today’s post is for those readers who, like me, quilt on a domestic machine. (I sew on a Janome 1600P-QC—a semi-industrial machine that’s crazy fast and only straight-stitches.) I know that every machine and every sewer working a machine is different, but I think the conversations we have about quilting are important. Quilting is the hardest part of the quilt-making process for me. The more we share about our approaches, successes, and failures, the more information we have to execute our next quilting project.
Last week, I shared about my giraffe quilt, a project that presented some unique quilting challenges.
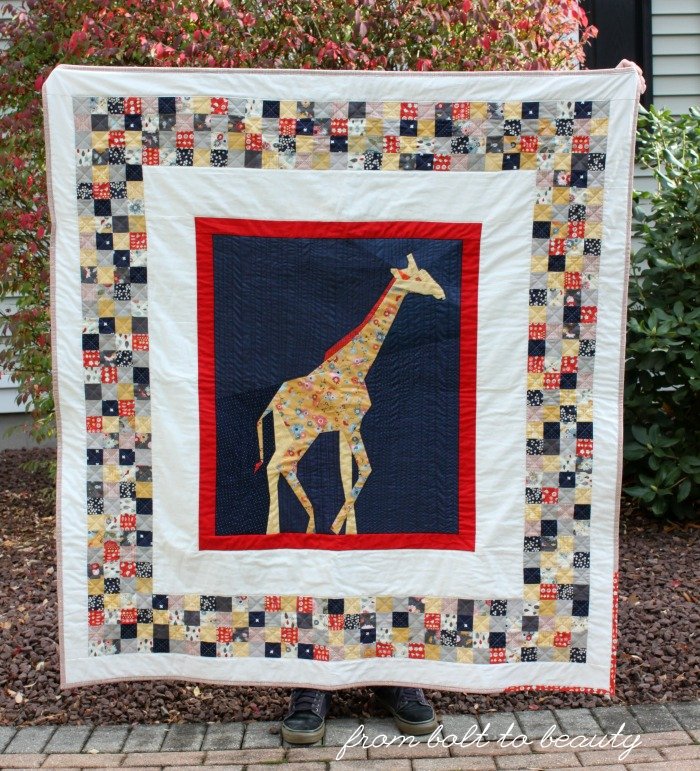 |
| This quilt now lives with Chelsea, of Patch the Giraffe. |
It is one of the few quilts I’ve made with a clear focal point—that beautiful paper-pieced giraffe, designed by the Tartan Kiwi—which influenced my quilting decisions. (My Scrappy Color Wheel is another quilt with a focal point.) Here’s how I approached the task ...
Quilting the Giraffe Center
As with all my quilts (even with those that are simple edge-to-edge straight lines), I started quilting this project in the center. I didn’t want to detract from the intricacy of my paper-pieced giraffe, though, so I opted to quilt vertical lines in the navy background around the animal. Using my walking foot, I quilted along the perimeter of the giraffe and then quilted the vertical lines. Once I reached the top or bottom of the navy, I’d pivot the quilt and work in the opposite direction.
 |
| The color in this picture is off, but this close-up gives you a good look at the quilting. |
These lines were organic and imperfect on purpose—I didn’t mark a thing. It was a forgiving approach and a relaxing experience. I don’t think I’ve ever had so much fun quilting. (I never admit to enjoying the quilting part of quilt making, so this is momentous!)
When I quilt other projects, like my Cross My Hearts Quilt, I approach each line from the same direction. By pivoting the giraffe quilt—sometimes quilting from top to bottom, other times quilting from bottom to top—I encountered what I’d call drag. There are visible ripples in this section of the quilt, and there were two spots in particular where the fabric between quilting lines was puffy. My inner voice of reason (which takes the form of Sarah of Smiles Too Loudly, who has advised me about similar quilting dilemmas!) argued that I’d notice these issues less once the quilt was washed and dried. You can see this phenomenon in the picture above as well as on the back of the quilt ...
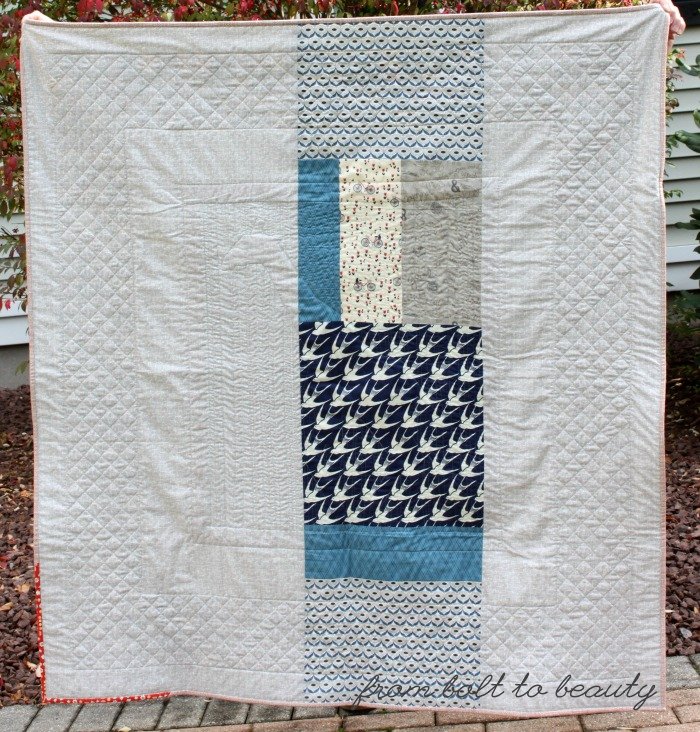 |
| The back features my go-to net fabric from Dear Stella, along with some of Basic Grey’s Mon Ami, Cotton and Steel's bluebirds, and more. |
I also sewed around the perimeter of the navy background. In a perfect world, I would have started with that step—to isolate the giraffe center before filling it in with vertical lines—but I feared that approach would cause puckering. I always need some wiggle room to smooth out wrinkles on the fly. (Does that jibe with your quilting experiences? I am convinced I’m the world’s worst spray baster!)
Anchoring the Elements
I’m no fancy free-motion girl and was at a loss about what to do with the borders. Normally, I would have stitched in the ditch to ensure they’d stay put, but I pressed my seams open (I prefer to press to one side when ditch stitching) and stitched alongside the borders’ seams instead.
Quilting the Patchwork Border
At first blush, the patchwork border was a no-brainer. I could use the squares to quilt a simple cross-hatch, and that is what I chose to do. My concern was that the cross-hatch—with its regular, straight lines—would look weird with the imperfect vertical lines in the center, but maybe I was overthinking it. I’m curious ... What would you have done?
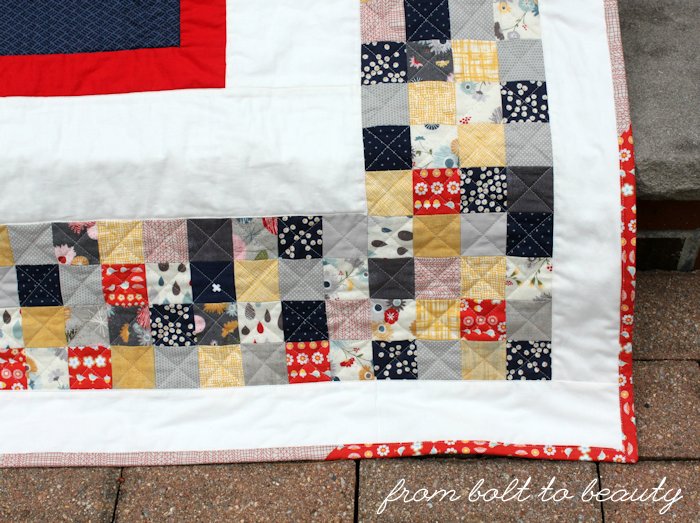 |
| I love this scrappy corner of the binding as well as the adjacent cross-hatch quilting. |
To my longarm-quilting friends: I didn’t mean to overlook you from the outset of this post. I’m convinced, however, that your quilting experiences are all rainbows and unicorns. Surely, purchasing a longarm would alleviate all my quilting woes! You’re free to tell me I’m off my rocker in the comments. : )
Read about piecing this project here.
Linking up to Needle and Thread Thursday and Finish It Up Friday ...

Do you have the ability to adjust your pressure foot pressure? When straight line quilting with a walking foot I almost reduce my pressure foot pressure to nothing and it has really helped me not have fabric waves. It's still a dance, to be sure.
ReplyDeleteYes, I can adjust the pressure. It's as light as it can go and still produce straight lines with even stitches -- which is almost zero on my machine -- but the dance continues!
DeleteI don't have much in the way of advice, but I think this turned out lovely. It looks so soft and cuddly. I am not an expert, but I feel the cross hatch and the lines give it a nice overall balance. It is a very cute quilt.
ReplyDeleteThat looks great! I think the irregularly spaced lines give a subliminal 'zoo' reference for the giraffe & the mild 'puckering' implies motion of an outdoor wind. You've got giraffe both on wild safari and how we are more familiar with them at a zoo, both at once! The border cross-hatching was also a perfect choice. All this IMHO. Do share even more when you quilt; most of us are on domestics.
ReplyDeleteThanks! I should talk to you when I need a quilting cheerleader! : )
DeleteI do all my own quilting on my domestic machine too (Pfaff Ambition 1.0). I avoid straight lines because of what you explain here...the waves & puckering, although in my limited experience they do seem to disappear with washing. I think your choice to cross-hatch in the border was excellent!! I often get hung up with what to do in the borders so for that reason most of my quilts don't have one!!
ReplyDeleteYour Giraffe is beautiful!!!
I really enjoy these kinds of posts. They teach me things that I should be on the lookout for and the reason why it might be better to do it this way rather than that way. :)
ReplyDeleteGreat. It's helpful for me to process my decisions in blog-post form. There's always a method to my madness!
DeleteYvonne's suggestion of changing the foot pressure is what I was going to recommend, but I'm no expert on straight line quilting as I prefer to free motion quilt.
ReplyDeleteI would have taken the same approach. Probably even taken the cross hatch further into the quilt. Looks great. Wash it and see what happens.
ReplyDeleteYou know, that was my original plan, to continue the cross-hatch into the borders. It would have entailed marking the lines though, and I was feeling lazy! If I had the project to quilt again, I'm not sure whether I'd do the cross-hatch differently or not.
DeleteI really like everything you did here. I have a modest midarm quilting machine and even after two years, this still beats almost anything I've done! Keep up the good work.
ReplyDeleteUnicorns and rainbows? You clearly haven't girded your loins to go into battle with a longarm. There are fewer puckers for sure but, after 5 years of very intermittent use, I'm still playing a guessing game as to where that needle will land. Saw one video where the quilter using the domestic machine spray basted all the layers.
ReplyDeleteThis looks good!
ReplyDeleteI always have problems with drag even with my walking foot and zero foot pressure. I hear you!
My solution has been to try to improve my free-motion quilting as my straight lines still suck.